Online Learning After COVID

Robert N. Bilyk

As a Learning and Development Specialist, eLearning Toolmaker, former director of a Center for Online Learning, and founder of Cyber Village Academy, I’m observing education’s response to the current crisis with profound regret.

Introduction

I feel like the curator of an art gallery.  I’ve grown a collection of fine art and agonized over every detail of its presentation.  Then disaster strikes and my exhibition space is displaced by a thousand people who evacuated to the art gallery and sought shelter.  The space is suddenly overcrowded, the toilets overflowing, and the art hidden behind sweltering bodies.  When the danger passes, thousands of people will say that they’ve experienced firsthand my most treasured art gallery.

The COVID Crisis — Our Emergency Response

During the COVID crisis, thousands of teachers and tens of thousands of students evacuated to emergency online learning – and they can now say that they’ve experience online learning firsthand.

Image Credit – Dobrislava (Wikimedia Commons)

But in a recent survey of 7,238 K12 teachers (Network of Public Educators, April 2020), here is what they had to say about it:

  • 56% of the teachers felt overwhelmed by distance teaching
  • 55% of teachers said that their students will be further behind than in the classroom
  • A month into the crisis, 25% of teachers (n= 7238) hadn’t determined how they will assess student’s work.
  • 26% of teachers held video conferences with their students once per week and 36% did not video conference at all.
  • 30% struggled to adjust to distance learning
  • 56% of students struggled to adjust to distance learning
  • 64% used Google Classroom

The results are not good, and probably not unexpected.  The results in higher education are no better. In a recent survey of 826 faculty members conducted by the Babson Survey Research Group:

  • 55% of teachers (who had no previous online experience at the institution) lowered their expectations for the amount of work that students would be able to do
  • 34% of teachers (who had no previous online experience at the institution) lowered their expectations for the quality of work that students would be able to do

Educause writes:

Online learning carries a stigma of being lower quality than face-to-face learning, despite research showing otherwise. These hurried moves online by so many institutions at once could seal the perception of online learning as a weak option, when in truth nobody making the transition to online teaching under these circumstances will truly be designing to take full advantage of the affordances and possibilities of the online format. (Educause Review, March 2020)

The authors of the Educause article define what we are seeing. They propose a specific term for the type of instruction being delivered during the COVID crisis. They call it emergency remote teaching.

Online Learning versus Emergency Remote Teaching

I subscribe to that view.  Online learning and emergency remote teaching are not the same.  What we conclude about the one can’t be generalized to the other.

Effective and engaging online learning requires that a lot of things come together and work in harmony before we can hope for good outcomes.   It also has to start with inspiration and vision – and not an emergency measure.

My own inspiration comes from a deep appreciation of individualized instruction, adaptive learning, the power of interaction, the power of challenge, and the satisfaction of grasping new concepts.  Online learning has a place in every curriculum regardless of the primary modality, lecture or otherwise.

To underscore the distinction between online learning and emergency remote teaching, the Educause article cites  Learning Online: What Research Tells Us about Whether, When and How.  In Learning Online,  the authors identify nine dimensions, each of which has options, reflective of the complexity of the design and decision-making process.

The nine dimensions are modality, pacing, student-instructor ratio, pedagogy, instructor role online, student role online, online communication synchrony, role of online assessments, and source of feedback.

The authors also made another point that has stuck with me.

Yet an understanding of the important differences has mostly not diffused beyond the insular world of educational technology and instructional design researchers and professionals. 

What Lessons Have We Learned?

As a member of the instructional design community, I’m challenged with the question of how can we break out of this insular world and really make an impact?  Many are feeling the pain of this crisis and feeling dissatisfied with online teaching and learning.

From parents, I’ve heard:  Kids are getting stir crazy.  Parents are in a power struggle with their kids.  Both teachers and parents struggle to find good sites, good videos, and good activities.  Kids need organizers – from lockers to bulletin boards.

I’ve also heard a few triumphs.  Recently, a parent showed me an obstacle course that a seven year old built.  A required video recording showed the kid scrambling through this course three times.  To me this represented design, physical education, and communication all rolled into one activity.  To me, it seemed very clever and a credit to the teacher.

I have other observations.

Online learning needs some organizer: a place where students can find assignments, submit work, get feedback, etc. It is amazing that to me that K12 teachers adapted so quickly to such a variety of systems  — but they were on a learning curve at the worst possible time.

In the survey, 64% of the teachers used Google Classroom.  Google Classroom wasn’t around before May, 2014.  The Google statistic surprised me despite the reasons being obvious.  Google classroom is free and simple.  A fifteen-minute YouTube video can get teachers and students up and running.  In time, they can master slightly more sophisticated tasks like sharing the editing rights to documents, collaboration and integrating other Google applications.

Google classroom lacks many of the features of learning management systems like Moodle, Schoology and D2L Brightspace  — but again, its simplicity is attractive especially during an emergency response time.

After the COVID crisis, will simple and free be sufficient or will K12 school leaders inventory what worked and what was missing?  Will teachers get the professional development and support that they deserve?  They certainly accomplished a lot with what little they had in terms of training and resources.

In higher education, the story is a little different.  Most higher education institutions have adopted very sophisticated learning management systems, and have invested in media libraries, web conferencing, assessment platforms, quality-control processes and so forth.

And yet, we know that there are only 13,000 instructional designers (source: Online Learning Consortium)  with a wide range of roles spread over 5,500 higher education institutions.  Many institutions, like the University of Minnesota, have more than a dozen instructional designers.  That means many smaller institutions are lucky to have even one specialist whose role it is to help faculty design and build online courseware.  And how about professional development?  Are faculty getting the training they require?   After the COVID crisis, will school leaders double-down on online learning development, or dismiss it as a ‘lower-quality’ option?  Will online learning get properly funded or will it be down-sized in response to the enrollment crisis that appears to be hanging over institutions (https://www.bloomberg.com/opinion/articles/2020-05-11/what-colleges-must-do-to-survive-the-coronavirus-crisis)?

Just before the COVID crisis, higher education administrators participated in a survey administered by Quality Matters and Eduventures, titled “The Changing Landscape of Online Education, 2020” (CHLOE).  The majority of respondents said that they did not require students to complete an orientation before studying online.  Then suddenly, online learning became a necessity.  How well prepared were students to learn online?

Another survey statistic, although not surprising, also suggests room for improvement.  In the regional public universities, only 50% of the faculty who are approved to teach online received training on the learning management system.  Approximately 45% received training on resources and pedagogy.  The reason for that lack of participation is not known.  The authors of the survey write that more data is needed to understand the resistance of faculty to becoming more effective online teachers.

I’ll look forward to learning more after the crisis is over.  Did faculty simply substitute their lecture classes with Zoom, or did they take advantage of all that blended learning has to offer in synchronous and asynchronous environments?

It’s Time for a True Sea Change

I expect that a true sea change in online learning will require effort and resources at every level: from student and faculty development to school leaders supporting and rewarding that effort – and paying attention.

But a lot responsibility also falls on the tech providers.  For one, we need to make it easier for instructors to find, select, adopt, adapt and collect data from Open Educational Resources.

In a sense, we operate in a Balkanized environment.   Balkanization is the breakdown of a region into smaller autonomous units that are usually hostile to one another.  We can embed eLearning resources, but they don’t interoperate at any level.  That makes it particularly challenging for teachers with such little time.

As an example, Open Educational Resources are wonderful, and yet faculty must expend quite an effort to find something that matches their objectives. What is the free equivalent to expensive, proprietary systems, which do a good job mining OER and aligning OER to standards and objectives?

Image Credit : Merridy Wilson-Strydom (Wikimedia Commons)

From the perspective of a toolmaker, I am impressed with the work that repositories like OpenStax, Merlot, OERCommons have done.  But OER repositories don’t offer a place to store, share and collaborate on learning objects.  (Although, in some cases, they do allow you to store materials created with their own authoring tool.)

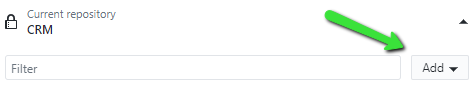
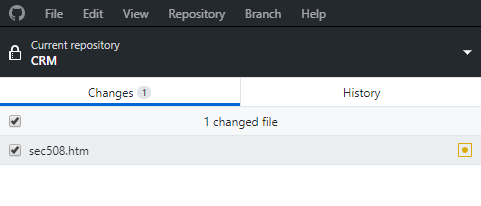
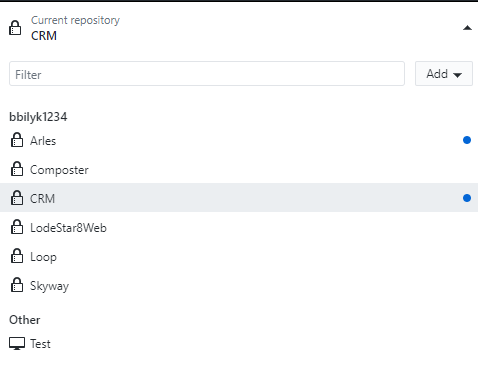
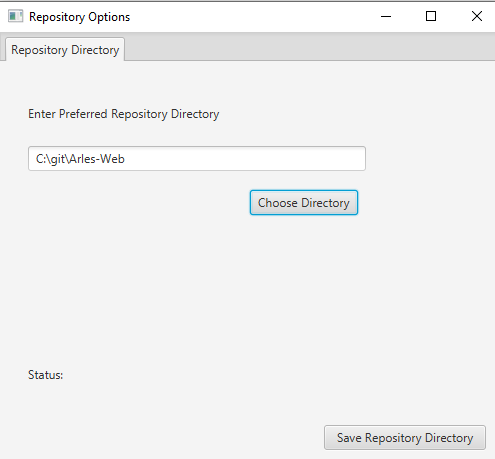
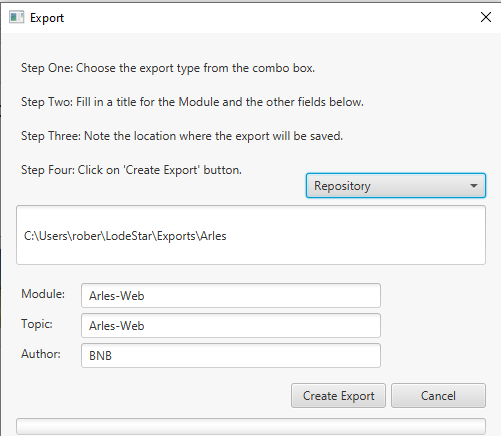
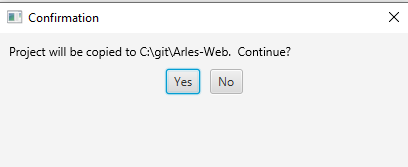
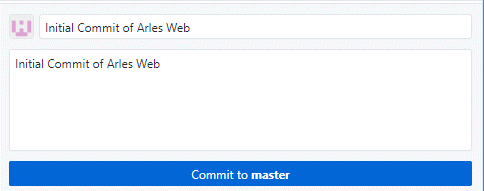
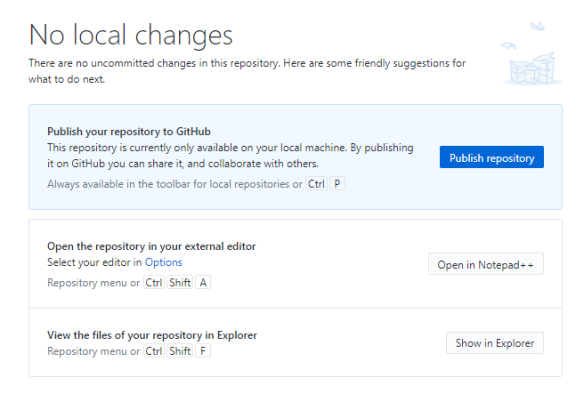
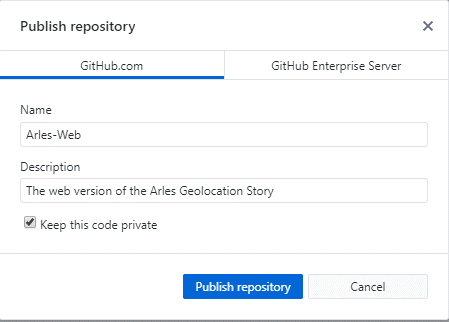
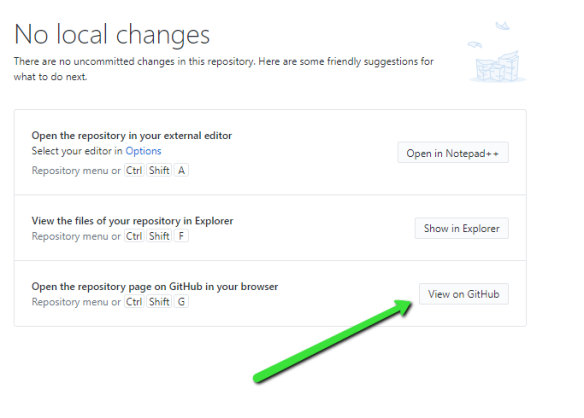
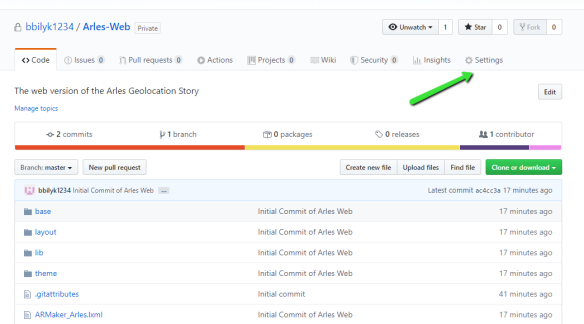
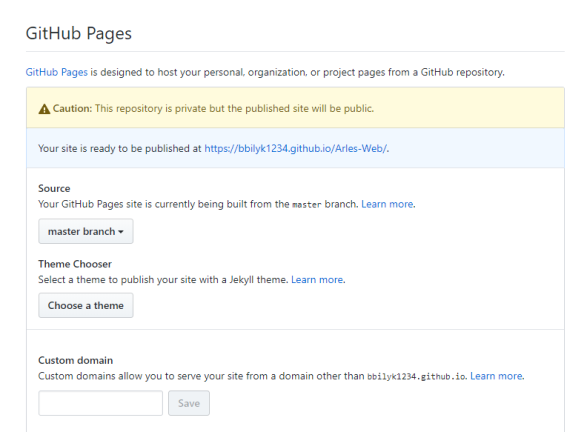
That’s why we began integrating our own tool with GitHub, which offers a place to store, publish, version control, and collaborate on projects. Seven Steps That Will Change How You Share eLearning  What is the EdTech equivalent of GitHub?  The closest that I’ve seen is OpenStax.

Perhaps only the largest of our tech companies can solve the problem of interoperability.  We need to be able to store, share, version control, and plug in learning resources into our learning environments.

Along with the technology, our teachers need professional development and reward and recognition for their efforts.  A single teacher might be able to create one quality resource in one academic year.  That single resource should be shared with the broader community and the teacher rewarded for her contribution.  In higher ed, the resource might factor into tenure and promotion.  In K12,  it might mean a cash reward equivalent to a coaching assignment.

A higher power needs to organize a learning activity exchange where reward comes with contribution.  Each and every resource needs to be interoperable with learning management systems and learner record stores (LRS).  Every resource needs to be tagged by standards specialists so that they are easily discovered and aligned to standards.

Conclusion

A lot of factors contributed to the poor results of emergency remote teaching.  At the fore are the lack of teacher and student preparation for online learning.  School leaders can help with that.  We are also asking teachers to operate in an environment that is somewhat hostile and not interoperable.  The onus is on the tech community to do better and to think through how learning materials can be stored, shared, collaboratively worked on, and plugged into environments that can capture student responses and performance data.

We need to improve not only for the sake of emergency response but for the betterment of education…even at the best of times.

References:

Emergency Remote Learning Survey Results

Perspectives: COVID-19, and the future of higher
education

http://www.onlinelearningsurvey.com/covid.html

Means, B., Bakia, M., & Murphy, R. (2014). Learning online: what research tells us about whether, when and how. New York: Routledge, Taylor & Francis Group.


Seven Steps That Will Change How You Share eLearning

Introduction:

These steps might not rise to the level of the seven articles of the US Constitution but, hype aside, these seven steps will change how you store, version control, publish, and share your work with the eLearning community.  If you attempt these seven steps, you might get frustrated and even fail at first.   But, if you persist,  in time, you will become comfortable with the process and never do things the ‘old’ way again.

The Problem

Traditionally, instructors have worked on interactive learning activities and then published them to learning management systems like Moodle, BrightSpace and Blackboard.  The project sitting on the instructor’s hard drive lacks an easy-to-retrieve back up and the project uploaded to the  learning management system remains siloed.

By siloed, I mean that when the instructor wishes to share the project with a broader audience or register the project in learning object repositories like Merlot, OER Commons and Curriki , the problem becomes even greater.  Normally, you can’t share your project that is sitting in an LMS with an Open Educational Resources (OER) repository.  If you wish to publish to an OER repository, you must solve a number of problems:

Where does the project get stored? 

Most OER repositories are referential.  They don’t store; they reference material that is stored on the web somewhere outside the repository.  As an instructor who wishes to share with a larger community, you need a website.

How does the project get backed up? 

You need some sort of backup solution.

How does the project get versioned?

You need a version control system.  With a version control system you can revert changes,  create different versions of the same project, and much more.

How does the project get shared with other instructors? 

You must use DropBox, Google Drive, or OneDrive.  But none of these systems allows you to publish directly from their shared drives.  Creating websites from DropBox, Google Drive and OneDrive is disallowed.

One solution doesn’t address all of these problems.  You need a combination of things — or, you need GitHub.

Introducing GitHub

GitHub offers you a place to store, secure, version-control, publish and share your project with others.

GitHub allows you to publish your projects through the web and, optionally, share your project for collaboration with other instructors.

In GitHub,  you can store anything that you can create with tools like LodeStar, including learning activities, geolocation stories, interactive fiction, interactive case studies, WebQuests and eBooks – all for a nominal subscription fee payable to GitHub.

Collaboration

For more advanced users, you can invite collaborators to your project.  With the GitHub Pro plan, you can keep your authoring files private but still publish the project as a website for your students, colleagues, and OER repositories to see.   That means that your project files stay private and the public only sees the end result (the HTML).  You can keep your authoring files private and invite collaborators to help you work on the project.

What is GitHub?

GitHub has traditionally been a place for computer programmers to store, secure, manage and share versions of their code.  It has been the place for openly sharing code.

The very mechanisms that enable programmers to share their code will enable  instructors to publish their projects to the internet, and secure, store, backup and, optionally, share their work with other collaborators.   By default, under the GitHub Pro plan, projects are secure and private.  The instructor then has control over whether or not the project is published to the internet as a website.

Technically, GitHub is an open-source repository hosting service, which means cloud storage for code. That code can include projects created in LodeStar.  GitHub hosts your project and  keeps track of the various changes made to every submission or, in technical speak, commit. The service is able to do this by using git, a popular revision control system.

So GitHub is both powerful and sort of geeky sounding.  But, if instructors follow some very basic steps, they will harness the power of GitHub to store, publish, and optionally share their projects just like any computer programmer.

So how do I get started?

LodeStar 8.0 build 4 and later support GitHub.  This build is now available.

In  broad terms, you create projects such as Interactive Case Studies in LodeStar.  Each project is matched with a GitHub local repository (folder).   As the project is being developed, you export the project to the local GitHub repository.   You use GitHub Desktop to commit the project to a master and then push the project to the repository in the cloud.    When you’re ready, you publish your project to the web.

It looks like this:

2020-05-12_2149

Getting Started in Seven Steps

Step 1. Install and sign into GitHub Desktop

Download GitHub Desktop from https://desktop.github.com/

GitHub Desktop supports both Windows and Mac.

Launch GitHub Desktop and follow the initial welcome screen to sign into your GitHub account. You’ll see a “Configure Git” step, where you can set your name and email address.   Be very careful with selecting a name.  The name will appear in the web address for your projects.

Step 2. Create a new local repository

You’ll see a “Let’s get started!” view, where you will see some options, including create a new repository, or add an existing repository.

Select ‘Create a New Repository on your Hard Drive’

Remember our diagram?  You first create a local repository on your hard drive and then push the contents of that repository to the cloud.

Fill out the fields:

  • “Name” defines the name of your repository both locally and on GitHub in the cloud.
  • “Description” is an optional field that you can use to provide more information about the purpose of your project.
  • “Local path” sets the location of your repository on your computer. By default, GitHub Desktop creates a GitHub folder inside your Documents folder to store your repositories, but you can choose any location on your computer. Do not choose a LodeStar directory.   You will want to keep LodeStar projects and your repositories separate until you are ready to export.  Write down the location of the local repository.  You will need to point LodeStar to that repository in a latter step.
  • Your new local repository will be a folder inside the chosen location. For example, if you name your repository myEBook, a folder named myEBook is created inside the folder you selected for your local path.
  • Don’t worry about more advanced topics like Readme files, licensing and the ‘Ignoring files’ selection. Let’s stick to the basics.

Click Create repository.

When you have been working with GitHub for a while, you can add a new repository by selecting the ‘Add drop down menu’ to the right of the current repository.

image2

So that you can follow along, I will create a repository for the web version of the Arles Geolocation Story that I’ve written about in past blogs.

Here is what the dialog box looks like.  I’ll click on ‘Create Repository’ to create the folder.

image3

Side note. Understand GitHub Desktop

Below the menu is a bar that shows the current state of your repository in GitHub Desktop:

Current repository shows the name of the repository you’re working on. You can click Current repository to switch to a different repository in GitHub Desktop.   Pictured below is the repository I was working on before transferring my Arles project to a repository.

image4

In the screen shot above, I am working on a project named ‘CRM’.  That is the current repository that is selected.

If I clicked on the words ‘Current repository’, this is what I would see:

image5

The Arles in the listing is my Arles mobile app.  What I am about to demonstrate is the creation of a repository for my Arles Web app.   In the list are all my projects that are matched to their own local repositories.   If I wanted to work with a different local repository like Composter, I would click on its title  to make it the current local repository.

Side note.  Ignore the concept of Branch right now.

Branches is a term used in versioning systems like Git. This has nothing do with LodeStar branches.  Essentially you can clone your project and make independent changes to the clone (the branch) and the original.   For now, our current branch will always be master.  If you choose to become more skillful at using GitHub, you can learn all about branches and forks and pull requests.  But you don’t need to go there.  Making changes to the current branch labeled ‘master’ is sufficient.

image6

Step 3.  Publish Repository – but not quite yet

You will see Publish repository button on the right, but let’s leave that alone for a while.

image7

You are done with the initial set up.  Now, we’ll get into the regular flow of exporting a project and then pushing the local repository to the cloud.


Step 4. Set up a LodeStar project to export to the local repository

You will need LodeStar 8.0 Build 4 or later for this step.

Open an existing LodeStar project or start a new one.  Once you are in the project, select Tools > Repository Option.

In the screenshot below, I chose the directory that I created in Step Two: Create a new local repository.  In my case it is c:\git\Arles-Web but more typically it will be [username]/Documents/Git/repository name.

By selecting the repository directory, you are associating the LodeStar project with this repository.  Click on the ‘Save Repository Directory’ button.

image8

Please note: Each project is associated with its own repository directory.

Step 5: Work on your LodeStar Project then Export it to the Repository

You do not need to complete your project before exporting it to the repository.  Exporting to the repository, then pushing the changes to the cloud will serve as a backup of your project.  At this point, no one will see it but you.

Once you have done some work on your project, then select Export > Repository.

Fill in the fields and click on ‘Create Export’.

You are essentially copying your project to the local repository associated with this project.

image20

Disregard the exports directory that you see in the dialog above.  That is a more advanced topic.  The destination is the Repository Directory. You will see a confirmation that you are exporting to the repository directory in the following dialog.

image10

After the export, go to GitHub desktop.

Step 6:  View the Changes in GitHub Desktop

The Changes view in GitHub Desktop will now show all of the files in your LodeStar project.

image11

I’m not displaying all of the files in the screenshot above.  There are 189 of them.

In future exports, only the files that have changed will be listed.  The Changes view shows changes you’ve made to files in your current branch but haven’t committed to your local repository. At the bottom, you’ll also notice a box with “Summary” and “Description” text boxes and a ‘Commit to master’ button.

Type in a sentence for ‘Summary’, and a detailed explanation in ‘Description’.  Your first commit might be labelled as ‘Initial Commit’.  You can repeat that in the description or be more descriptive about the project.

Initially there are 189 files in this project, which includes all of the data files, html, css, scripts, audio files, and imagery that LodeStar manages in a project.

Again, fill in the summary and description.

image12

Click on the ‘Commit to master’ button.   This commits the files to the master branch in the local repository.  I know that I haven’t explained the concept of ‘master’,  but just know that, for our purposes, committing to the master is a good and necessary thing.

After all of the changes are processed, click on the Publish Repository button to send a copy of your local repository to the cloud.

image13

You will see this dialog:

image14

Review the name and description.  Keep the code private.  That means we are keeping the cloud version of this project private.   If you subscribe to GitHub at the Pro level, you can keep your repository private, but still publish to the web.  You cannot do this with the free version.   You must make your repository public in order to publish your web page.

Please note:  If you make your repository public, anyone can copy your project to their own.

 The Pro plan allows you to have your cake and eat it too.  You can keep your repository private, but still publish your project to the web.  In other words you can create a website from your private repository.  Specifically, you can create a public website from the master branch of your private repository.

You can create a private repository with the free plan, and then, when you are ready, upgrade the free plan to the pro plan.  (I’ll show you how at the end of this article.)   At the time of this writing, the Pro Plan is $4 per month.

Step 7:  Publish the index.html page

The index.html page is the launch page for your project.  It is currently private.

To see your project in the cloud.  Click on the ‘View on GitHub’ button as seen below.

image15

This is what you will see when you get to the cloud:

image16

Pictured above is the typical appearance of a GitHub project in the cloud repository.  It is starting to look really geeky and spooky, but don’t worry.  It’s just heads on stakes.  Ignore everything for now.  Click on Settings. Just focus on ‘Settings’.

In Settings, scroll down until you see GitHub Pages.   If you are on the Pro plan, you can now select ‘master-branch’ as the source for your GitHub Pages.  This means that Github will publish the index.html file that LodeStar automatically committed to master.  Remember, ‘master’ is good. If you’re not on the Pro plan, we’ll show you how to upgrade at the end of this article.

The publication takes a while for the first time.  The message reads:

Your site is ready to be published at https://bbilyk1234.github.io/Arles-Web/

Update:  the location is now

https://lodestarlearning.github.io/Arles-Web/index.html


Once the site is ready, the message will change.   The site will be slo-o-o-w the first time you access it, but that will change once Github caches your files for quicker access.

image17

How to upgrade from GitHub Free to GitHub Pro

At the time of this writing, GitHub Pro users are billed $4 per month.   With GitHub Free you can create private repositories but not publish them to the web.  You can publish public repositories, but your project can then be copied by any subscriber to GitHub.

To upgrade, log in to GitHub in the cloud at:

https://github.com

Click on the rightmost menu.  See the arrow on the far right in the picture below.  Then select ‘Settings’.

image18

Select Billing from the menu on the left, then click on the green Upgrade button.   GitHub Pro is likely all that you need.  It enables you to keep your project repositories private, but still publish them to the web.

image19

Uploading Changes

Once you’ve committed a project and uploaded it to the cloud repository, you are bound to make changes.

In my example, after I uploaded the Arles-Web project, I decided to add a link to the mobile app version.

After making changes to your project, do the following:

  1. Export to the Repository again.

image20

  • Open GitHub Desktop and make your project the current Repository.  I’ll make Arles-Web the current repository.  View the changes but be patient.  It might take a couple of minutes to place the changes in the repository.  The list of changed files will update.

image21

  • Fill in the summary and description for this commit. You do this to describe every commit.

image22

  • Click on Commit to master.
  • Now here is a new step! Click on Push origin either at the top or by clicking on the blue button.  Both are pictured below.  Technically, this is called pushing the commit to the origin.  But, basically you are copying the changed files in the local repository to the cloud repository.  If you published your project to the web in a previous step, your changes will be almost instantly published to the web.

image23

Conclusion

Seven steps will change your life.  At least it will change your approach to sharing eLearning.  You will be in control of your work like you never have before.  You will be able to safely back up your files, version control them, keep them private, publish them, share them with other instructors – all in one amazing platform, GitHub.

Once you are confident that you have mastered the basic steps, you can read dozens of articles and see dozens of YouTube tutorials on how to do the fancy stuff in GitHub.  Remember, however, that if you accomplish the seven steps, you’ve accomplished a lot.  Those seven steps alone will change how you work and interact with the eLearning community.