
The instructor as designer recognizes that the online platform can do more than simply compel students to read, watch, and listen. With carefully designed learning activities, instructors can engage students in explaining, categorizing, inferring, applying, solving problems and more. In short, rather than simply reading content, students can be working and interacting with content in meaningful ways.
Our audience is the instructor as designer. We hold on to the hope that online learning won’t be commercialized to the point of reducing instructors to proctors. We value the instructor as designer because no one understands his or her students’ needs better than the instructor. And, although developing online learning may be time consuming, it’s a lot of fun. Who wants to delegate that entirely to publishers?
Screenshot of the LodeStar eLearning authoring tool
In recent posts, we’ve been thinking and writing about larger design concepts that help instructors to engage students. This article, in contrast, surveys a range of techniques supported by the LodeStar eLearning authoring tool — sometimes in minute detail — that sharpen the edge of a well-designed activity and make it more effective.
Unless, you follow the development of the LodeStar authoring tool very closely, some of the items below will come as a surprise to you. Again, some of these items are simply techniques that will enhance your online learning projects; other items are larger in scope.
Let’s start with some simple techniques and then work our way up.
Introduction
The LodeStar eLearning authoring tool offers a range of templates that help instructors build online activities. The ‘Swiss Army Knife’ of templates is the ActivityMaker template. If you wish to get a good sense of what ActivityMaker can do, visit our post at https://lodestarlearn.wordpress.com/2015/01/03/12-ways-to-engage-students-with-elearning-authoring-tools/
This article (not the link) dips into some of the settings of the authoring system that can affect student engagement in a significant and meaningful way. Each of the techniques is numbered and listed below.
#1: Link to other pages in a project
Knowledge is an interconnected web of informational, procedural and conceptual relationships. Sometimes, we want our designs to pick a ‘happy path’ through a topic’s complexity. We want students to start with a limited number of simple propositions or declarations and build up to a more complex understanding of the subject matter. Sometimes we want students to infer generalizations from the information that is presented to them in a relational manner.
A LodeStar activity can be a linear progression through content and application or it can be an interconnected website or both. A LodeStar activity can have navigational buttons that step a student through the content or it can turn off navigational buttons. Students can navigate through links, table of contents, or branching (discussed later).
For example, instructors may want to create a menu to give students choice of content. The menu page in the ActivityMaker template is restricted to four menu options and may, therefore, not be satisfactory. What if an instructor wanted five or … ten menu items?
What if an instructor simply wanted to link together pages in a LodeStar activity? Fortunately, the technique is simple in LodeStar 7.2 build 12 or later.
To make this work, be sure to give each of your pages a unique page ID. Once you have given your pages a page id, then select text that you wish to convert to a link. Click on the link button in the editor. The pull- down menu will reveal page id’s to you both in name and numerical format. Select the page that you want linked.
Of course, you are not restricted to pages within LodeStar. You can link to anywhere on the internet.
#2: Link to an overlay
So now that we know how create links to pages within LodeStar, let’s see what more we can do. Typically, links cause the program to jump to the linked page. If designers check ‘Show as Overlay’, the linked page displays as an overlay. In other words, students won’t jump to the page. The linked content gets overlaid on the current page. Students don’t lose their place or the context of the learning.
Note that text pages, with or without graphics, make the best overlays. Other page types are restricted from acting as overlays for technical reasons.
#3: Make Use of the Page Options
Each page type in ActivityMaker comes with various options that will help instructors to enhance the students’ experience.
The speaker icon enables instructors to import an MP3 file. In the audio dialog they can choose to display a player control to pause and play audio.They can also cause the audio to play automatically when the page starts.
Pages with audio look like this:
A small audio icon appears at the top left when audio is available
I’ll review some of the other controls that instructors may see either on a text page or question page or both.
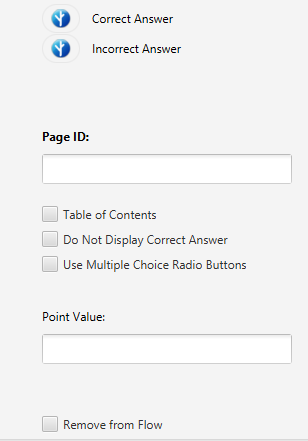
Controls found on the right side of LodeStar pages
The Correct Answer and Incorrect Answer branch icons allow instructors to branch or provide feedback based on overall (page level) correct or incorrect responses instead of answer level option branches.
The Table of Contents check box adds the current page to the table of contents. Different options for table of contents are found under Tools > Project Settings.
The Resources check box turns the current page into a resource that can be accessed at any time. Checking the check box causes a button to display at the bottom of the screen (depending on the layout), which will bring up the page as resource at any time.
Again, text pages, with or without graphics, make the best resources.
The ‘Do Not Display Correct Answer’ suspends feedback that informs the student of the correct answer.
The ‘Use Multiple Choice Radio Buttons’ converts the multiple select question type to a multiple choice question type. In playback mode, students will see radio buttons rather than checkboxes next to each answer option.
‘Point Value’, of course, assigns points to the current Question page.
‘Remove from Flow’ prevents the page from being displayed, unless branched to.
#4: Use Page Branching to Differentiate Instruction
The following is self-evident and almost foolish to write, if not for common practice: Student’s don’t all learn in the same manner. They don’t share the same level of prior knowledge, aptitude, experience, motivation, etc. A benefit of online learning, which is largely unrealized today, is that we can differentiate instruction based on student choice and performance.
Here is a recital of the various ways that projects created from the ActivityMaker template can differentiate instruction.
- Links to different pages (content areas) offer students choice and a sense of control over their own learning. This is particularly important for adult learners.
- Displaying pages as resources allows a student to summon up page content at any time. The student may be working on a case study and may wish to have quick access to critical information.
- Branches based on performance either at the answer option level, page level or section level. The branch icon appears in LodeStar in various places. We see it next to answer options on the multiple choice question page. That means that a branch option and/or feedback will display if that answer is picked. There are many branch actions. ‘Jump to Page’ is one example.
- Page Level branches follow a branch and/or provide feedback based on overall correct or incorrect responses. For example, in multiple select questions it might be difficult to branch based on any one selection. A page level branch can be based on whether or not the student answered correctly overall.
- Section level branches are accomplished with gates. A ‘Gate’ is an ActivityMaker page type. Gates support all of the branch actions supported by answer level options and more. In other words, gates control program flow. For example, the program can jump to remedial activities or a higher level of challenge.
#5: Use Video to Bring a Project to Life
Even though the well-known educational psychologist Richard E. Mayer observes that we don’t fully understand the role of video in online learning, he acknowledges that it plays an important role.
In our view, short videos can bring an online learning project to life. It can bring experts to the course site; provide students with an audio-visual look at phenomena in, perhaps, a more efficient way than text and graphics; and it may be the preferred mode of learning for many students.
LodeStar supports three important forms of video.
One, the ActivityMaker template video page supports YouTube Video. Rather than fussing with embed codes, instructors can simply paste a YouTube URL into the main field. Although the LodeStar previewer doesn’t display YouTube videos, instructors can preview videos by launching the project in Firefox. The Firefox browser supports the preview of local resources. Other browsers do not.
Two, ActivityMaker enables an instructor to link an MP4 video file that is available by URL over the internet. LodeStar supports merging an MP4 video from an internet source with a WebVtt (.vtt) caption file imported into the project.
Three, ActivityMaker enables an instructor to import an MP4 file into the project.
#6: Use Flashcards to Help Students Remember
When students struggle to remember a term or definition it increases their cognitive load and makes the assimilation of new information more taxing than need be. Many strategies help students remember information. The use of Flashcards is but one example.
ActivityMaker supports Flashcards. In other words, Flashcards are part of the Swiss Army knife that ActivityMaker represents. The positive side is that a Flashcard activity can be blended with other pages that engage students in such things as video, text and graphics and checks for understanding. The negative side is that instructors have found it challenging to set up the gates that are needed for incorrectly answered flashcards to be returned to the queue.
LodeStar now offers the Flashcards template. Instructors will find the gates preset correctly. Instructors need only add the instructions, fill in the first card and add more. This template is still based on the ActivityMaker template. That means that instructors can add other page types and benefit from the full functionality of ActivityMaker.
#7: Use Instructional Design Patterns (compound strategies) like WebQuests
In previous articles, we introduced the concept of instructional design patterns. If you missed the articles, start with https://lodestarlearn.wordpress.com/2015/05/04/instructional-design-patterns/
WebQuests are one example of an instructional design pattern. WebQuests are an inquiry-based format, first introduced by Dr, Bernie Dodge at San Diego State.
LodeStar now offers the Webquest template to make it easier for faculty to build them and export them to learning management systems. Webquests are extremely popular in K12, but they show great promise in higher education. In brief, a Webquest sends students out into the internet with a purpose. A Webquest defines a task for students to complete, often in groups, and then spells out a process for completing the task. A Webquest offers a finite set of links as resources that have been vetted by the instructor or ‘an expert’.
For a closer look at Webquests in area of nursing education, view the following quantitative and qualitative study submitted to the International Journal of Nursing:
http://aripd.org/journals/ijn/Vol_1_No_1_June_2014/4.pdf
The LodeStar Webquest template is also based on ActivityMaker. That means that Webquest authors have the full range of ActivityMaker capabilities open to them. At the same time, instructors do not need to complete all of the set up required for a Webquest. That is all done for them in the Webquest template.
#8: Use eBooks (epub 3)
If you missed our article on Open Textbooks and ePub, you’ll want to visit the following link:
https://lodestarlearn.wordpress.com/2015/07/29/open-textbooks-and-epub/
In short, LodeStar enables instructors to author their own eBooks. Actually, authoring an eBook may seem daunting. The epub3Maker template supports not only eBooks but something much much smaller in scale such as white papers, pamphlets, lab manuals, course introductions….whatever.
#9: Jazz up your Activities with Themes and Layouts
LodeStar now supports both themes and layouts. Themes enable instructors to choose from a number of color coordinated presets. Theme is mostly about color. Theme controls the colors of the header, footer, content area and HTML background. Instructors can even click on the advanced button in the ThemesManager dialog and create their own header and footer gradients.
Themes have been around in LodeStar for a long long time. Layouts are relatively new.
Layouts enable instructors to choose from a range of presets that affect the position of the header, footer, content body, table of contents and any gadgets that are used in the project.
With the combination of Themes and Layouts, instructors can create a unique look for their projects.
#10: Infographics
Infographics can play a number of roles in eLearning. They can provide data in a pleasing pictorial format through the use of headlines, graphs, symbols and images. They can outline a topic of interest to help students organize material and understand up front what some of the key points will be. They can be used to assess students when instructors invite students to generate their own infographics to communicate their understanding of a key issue or concept.
Here is the typical infographic:
http://elearninginfographics.com/elearning-statistics-2014-infographic/b
Here is one more to look at.
The following infographic was created in LodeStar and combines a Prezi style presentation with an infographic style of presentation. It introduces seven phenomena that we are paying close attention to:
www.lodestarlearning.com/samples/Ten_Trends_Infographic/index.htm
Conclusion
Instructors and students benefit from LodeStar’s rich array of options. Instructors can choose from a variety of templates. The ActivityMaker template offers an array of page types. Page types can offer an array of options. All of this helps the instructor create a rich and engaging experience for students.


