
Introduction
Great learning experiences can be crafted from 3D technology. The simplest form of 3D technology is the photosphere. It is accessible to teachers and trainers and can be used quite effectively. In this article, I’ll show off a demonstration project and describe the use of 3D models, a photosphere, text and graphics, video, and audio.
Two years ago, I wrote about using photospheres in online courses. Today, ‘interactive’ photospheres are a critical strategy that designers of every stripe should master. Currently, the use of photospheres is supported by the proliferation of 3D models, photosphere projects, new services, improved technology, and new features in our own authoring software.
So, let me parse this mix media approach. To start, a photosphere is a 360-degree panoramic image that can be displayed in a viewer. Learners can ‘navigate’ the image by dragging the view in any direction and zooming in and out. Google Street View is the best-known example, but photospheres abound in art museums, tourist bureaus, real estate sites, and social media.
The photosphere is deceptively simple and hides a more profound change in the web. As we all know, browsers support the trinity: HTML, JavaScript, and CSS. All three technologies have been evolving. Recently, JavaScript began supporting a variety of new technologies, including WebGL. WebGL makes 3D rendering possible in a browser without the need for plug-ins. In short, WebGL (Web Graphics Library) displays 3D and 2D. Because of WebGL, browsers can benefit from hardware graphics acceleration to display (render) complicated graphics. The key is hardware acceleration. The processing of graphics in a dedicated graphics process unit is many times faster than in the main CPU.
The photosphere uses WebGL or hardware acceleration. To display a photosphere, a distorted image is mapped on the inside of a 3D sphere. Our perspective is from the center of the sphere with a narrow field of view. By dragging the image, we pan the sphere and bring hidden parts of the image into view.
With the help of LodeStar, an eLearning authoring tool, we can add interactivity.
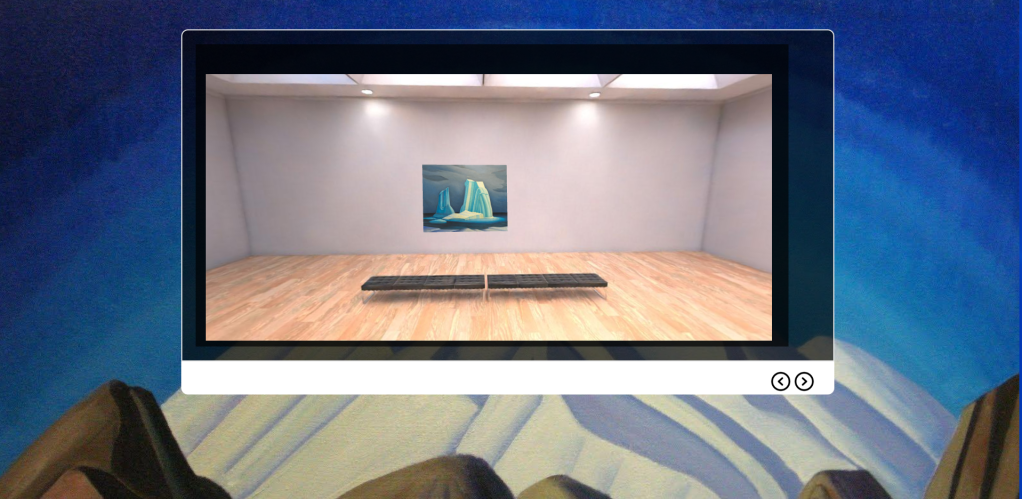
To best illustrate interactive photospheres, I created this demonstration project based on one of my loves, the Group of Seven.
A little background: I went to school in Canada. Until the thirteenth grade, the study of history was the study of British, American, and Russian history. The study of literature was primarily European and British literature. The study of art was primarily of British and French art. In grade 13, that all changed. We studied Canadian history, literature, and art. For me, that was transforming. Central to Canadian art was the Group of Seven. Their subject was primarily the Canadian landscape. Until recently, I could find Group of Seven paintings only in the McMichael Canadian Art Collection in Kleinberg, Ontario. So, I decided to create a gallery of my own. Just a small one for demo purposes, featuring two of the artists associated with the Group of Seven.
Visit this link and if your curiosity is piqued, I will share the details of how I made this learning experience. Launch the demo and on the second page drag your mouse across the scene.
Art Gallery (lodestarlearning.github.io)
The details
First, I needed a model of an art gallery. I went to TurboSquid and bought one for $19. I could have found a photosphere from Flickr or elsewhere, but I wanted control of the objects in my gallery. I could have built a 3D model from the ground up – but wanted a short cut.
The model came in the form of a DAE, which is a 3D interchange format. The DAE format is based on the COLLADA (COLLAborative Design Activity) XML schema. (This is a standard format that can describe 3D objects, effects, physics, animation, and other properties. All the major 3D modeling tools can import it.) I then brought the model into Blender.
Blender is a free 3D modeling tool and it is quite incredible.

In Blender, I edited the model and added my own camera. To render a photosphere, I made the camera panoramic and then equirectangular. Equirectangular is a projection type used for mapping spheres onto a two-dimensional plane. This results in a very distorted image when viewed normally. Viewed in a photosphere viewer, the image looks spectacular.
Next, I imported the image into LodeStar. With the help of the LodeStar’s interactive image editor, I drew hotspots over the doors and imported images of paintings that I positioned in the art gallery. Technically, the images become image overlays. As the viewer moves the image up and down and across, the imported images adjust accordingly by scaling, skewing, and repositioning.

In the scene above, the imported images appear above the benches. A hotspot sits over the doorway. When a learner clicks on the doorway, LodeStar executes a branching option. In this case, that means a jump to the next gallery.
In the example, two gallery rooms are featured. The first gallery exhibits two paintings of Lawren Harris. The video icon displays a YouTube presentation on Harris’ work. The second gallery exhibits two paintings of Emily Carr, and a wonderful YouTube presentation on her work.
Conclusion
Photospheres are but one part of 3D technology. Browser support for WebGL makes it possible for us to use 3D models interactively. Students can view 3D models from any perspective and manipulate them. The possibilities are endless. LodeStar and other tool makers must make it easier to load these models and make them useful for educational and training purposes. Just as we support functions that can change an image or element’s rotation, position, opacity, and color, we must provide functions that can manipulate 3D objects.
We are currently working on some prototypes and would love to hear from you and what would most benefit students. Please send us your comments.
