
Introduction
Instructional Designers are skilled at using text, media and graphics to help meet learner objectives. But design often extends beyond the visible into the functional. Designs might require tracking user performance, branching to an appropriate level of instruction, saving state, and creating highly individualized, interactive, learning experiences.
At the root of this functionality is the humble variable. Understanding the variable and all of its implications in a learning design may seem a little out of reach of instructional designers. That seems like programming…and programming is the domain of specialists like programmers or instructional technologists who know and, perhaps, even enjoy things like mathematics and logic.
But most instructors and many designers don’t have such specialists as a resource. With a little knowledge, designers can expand their designs on their own and create better experiences for learners.
The Variable
As a start, there are some basic things about the variable that all instructional designers should know – some basic things that will help designers think about their designs more clearly.
First, a bit of unlearning.
We learned about the variable in elementary school. We were asked to solve for x, given this type of equation.
6 + x = 10;
‘x’ was a challenge. You had to manipulate things in your head like x = 10 – 6. You needed to learn about the dark art of algebra.
And so, something as arcane as this

produced the graph below if you repeatedly plugged in a number for t, solved for x and scaled up the result:

Probably not the traditional domain of instructional designers.
But, in instructional design, the variable isn’t a problem to solve. It’s a tool. It’s a tool like text and graphics and media. And you can start simple.
The use of variables gives us the ability to save state (remember things like user performance on a question item) and to branch (go down one learning pathway versus another) and to evaluate performance (were the right things chosen and in the right order, perhaps).
So powerful is the variable that all major eLearning authoring systems not only use variables internally but give the author access to them.
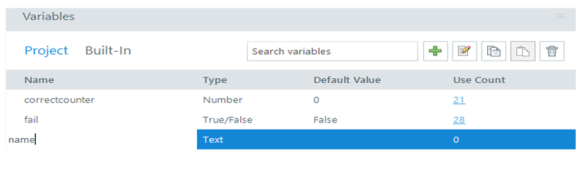
Down below is a screenshot from Storyline, a popular authoring tool. The author of a game is tracking how many correct answers the learner achieved (correctcounter), whether or not the learner has achieved a fail condition (fail), and other things not pictured here like whether or not the learner has attempted the question once, twice or three times, the overall score and the number of seconds on the timer (timer).
The variable is a storage place. Some people like to use the analogy of a bucket – a place to dump data into. I like the analogy of a mailbox. The mailbox has both an address and a place to store stuff. Like a mailbox, variables have an address in computer memory; they have an easy name that we can use to refer to that place in memory; and they store a value. That storage place can typically hold numerical values, characters (as in a name) or true/false states. There are fancy names for all these things like integers, floats, strings and booleans – but we are only concerned about basic things such as the value being stored as a number, set of characters or true/false.
Numbers versus characters versus true or false matter because they take up different amounts of computer memory, they enforce the type of data that is stored in the variable so that coding mistakes aren’t inadvertently made, and they are stored differently in the bowels of the computer.
The following screenshots also hint at another division between variables. The first screenshot that follows shows user variables. User variables, in this case, store information about the student name and id.
User Variables in Captivate

In the next screenshot, system variables store program settings related to movie control.
System Variables in Captivate

There is also another category often referred to as the user-defined or custom variable, not shown here. In most programs, if you wanted to track something special, you would create your own variable. For example, if I gave the learner a choice of tools to select in order to complete a task and wanted to track which tool was selected, I could create a variable called ‘toolSelected’ and assign the variable a value.
For example, toolSelected = ‘caliper’
Or, optionally, I could assign a number to the variable, as in toolSelected = 1

Alternatively, I could create a variable called ‘caliperSelected’ and set it to true or false. Or I could create a variable called ‘toolsSelected’ and in this case, set it to:
toolsSelected = “caliper; nippers”
In short, I have options.
So with that we are straying dangerously close to the wheelhouse of the computer programmer. But for the instructional designer, what is important is an affordance — a capability. We could give our learner a task and have the learner collect the appropriate tools. Just knowing that variables can hold a bunch of values gives us a strategy to think about. What if we placed learners in a situation where they could gather things to use in a problem-solving situation? Thinking about variables and their capacity to store can inform our thinking – and give us a strategy or a way to accomplish our objective.
Let’s take this a bit further.
Conditional Statements
In my next example, I will use a custom variable and apply it to some branching logic. In order to understand the example, we’ve already looked at the variable. Now let’s look at some logic. Branching logic can be achieved by either a conditional statement like one finds in Microsoft Excel or, in the example that follows, a ‘Gate’
Let’s think about logic.
In the spreadsheet below, we have scores in column B. The logic is that if the score in column B is greater than 49, then the text in column C will show ‘Pass’. Else, column C will show ‘Fail’
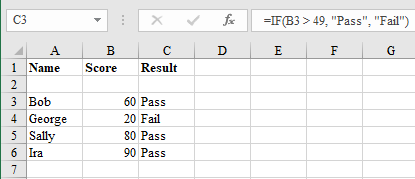
The gobbly-gook language part of this, looks like:
=IF(B3 > 49, “Pass”, “Fail”)
B3 is the cell that lies at the intersection of column B and row 3. So, if you can think of the first part inside of the parentheses as a condition, the second part is a value if the condition is true, and the third part is a value if the condition is false, then the gobbly gook reads like this:
If the condition is true, show “true”, else show “false”.
The condition: is the value in B3 larger than 49? If yes, show ‘Pass’; else if no, show ‘Fail’.
eLearning authoring systems present different ways of using the same type of logic. You can imagine a branching scenario. If the learner score is greater than 80, proceed down the ‘enrichment’ path. If not, proceed down the ‘remedial’ path. Branching is just a series of else if statements, like the one shown on the spreadsheet.
So now, let’s show an example that combines the use of the variable and some branching logic.
An Example
In the following example, we’ll introduce LodeStar 8 (which will be released soon). In the activity, I will show 6 animals. 3 of the animals are critically endangered.
The object of the lesson is for students to understand what critically endangered means and, given some data, to be able to identify some animals that are examples of critically endangered species.
Identifying the critically endangered is actually highly technical, involving numbers, habitat area, habitat fragmentation, number of generations and so forth. Let’s say, for the sake of our example, that we presented students with all of that information and then asked them to select the animals that are critically endangered.
If students correctly select a critically endangered species, they will earn 2 points. Selecting an endangered species subtracts 1 point. Selecting a vulnerable species subtracts 2 points.
Out of the six animals, three are critically endangered. The best score is therefore 6.
Here is a screenshot of LodeStar 8 and the ActivityMaker template, which we used in our example.
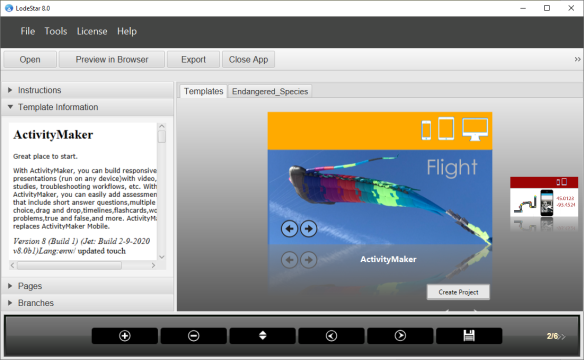
A screenshot of LodeStar 8, due to be released March 2020
ActivityMaker supports different page types. I’ll select the “Text” page type. This page type supports text, imagery, SVG graphics, and widgets. (We’ll talk about widgets soon.)
On the first page, I’ll add six images and a page heading.

Produced with LodeStar 8 ActivityMaker Template
Adding Branch Options to Images
First, to assign a Branch Option to an image, I click on the image and select the branch icon. The branch icon is used throughout LodeStar. (Please note: You can only add branching logic to an image once it is loaded and appears on the page.)

The Branch Option dictates what happens when a question is answered correctly or incorrectly, when a page is displayed, when a gate is reached and so forth. In this case, the branch icon controls what happens when an image is selected. There is a selected branch option and a deselected branch option. This is new to LodeStar 8.

To start, I load the image, select a scalable size (in percentage) and then click on OK. I then click on the image and re-open the dialog box.
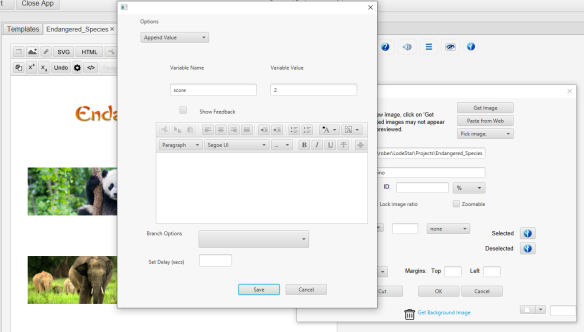
I click on the ‘Selected’ Branch for the Sumatran Rhino and launch the branch dialog.
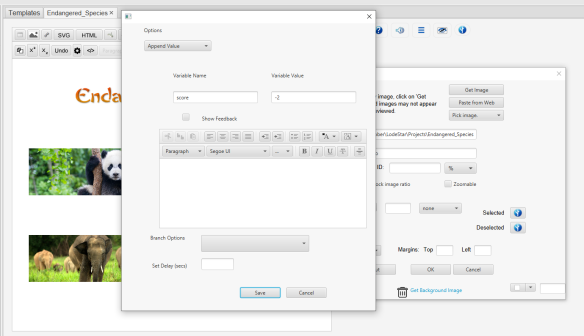
I then set the Branch Option to ‘Append Value’ and fill in the variable name, which is ‘score’ and a value that will be appended to the variable, which is the value of 2.
Appended, in this case, means that 2 will be added to whatever the value that the variable ‘score’ is currently storing. Essentially this:
Score = Score + 2
Meaning
The new value of score is assigned the old value of score + 2.
For deselected, the opposite is true.
score = score + (-2);
Or
-2 will be appended to score, which is the same as
score = score – 2;
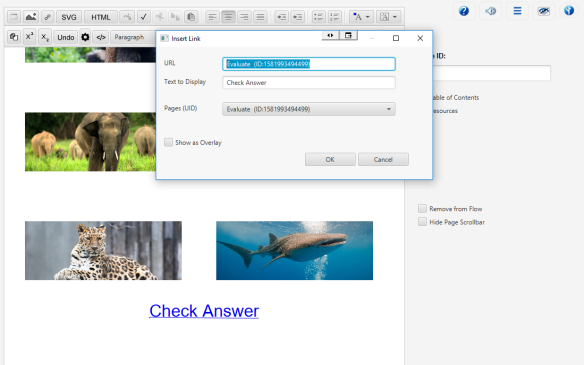
I then want to present the option for students to evaluate their selections. I type in text ‘Check Answer’, highlight it, and then select the ‘Insert Link’ tool in the HTML editor.
LodeStar’s HTML editor is unlike any other editor. The ‘Insert Link’ dialog presents multiple options including the ability to link to one of the LodeStar pages. The Pages (UID) dropdown displays all of the available pages. If the author forgets to give a page a human-friendly name, then only the computer-friendly UID number is shown. In the screenshot below, you can see both.
When the student clicks on ‘Check Answer’ they will jump to the ‘Evaluate’ page and see an Embedded Variable widget displayed on the page.
The purpose of the Embedded Variable widget is to display the values of variables. The widget dialog is launched by clicking on the sprocket icon as pictured. (Remember, the LodeStar HTML editor is not your everyday brand of HTML editor.)

Insert a widget on a page
The widget dialog presents a menu of different widgets.

Widgets enable authors to embed timelines, word problems, questions, drag and drop, and other items on a Text Page
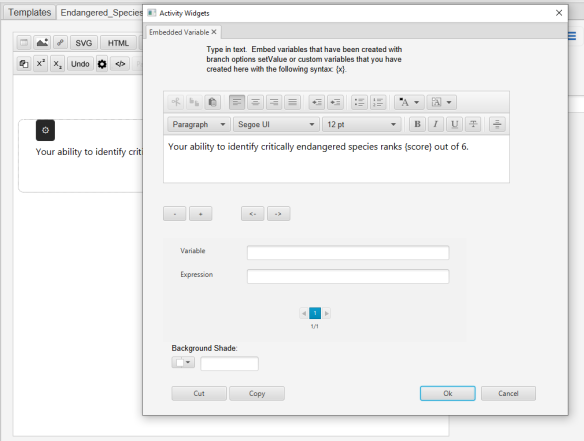
The author inserts the ‘Embedded Variable’ widget wherever s/he wishes to display variables and then types in the following:
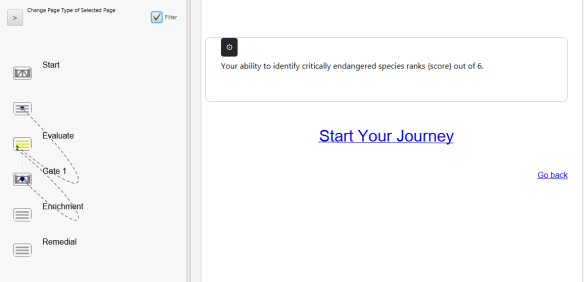
Your ability to identify critically endangered species ranks {score} out of 6.
‘score’ is a variable name. It holds a value (the student performance). When the student sees this sentence, they will see the value and not the variable name. If the variable has not been initialized (given a starting value), they will see ‘undefined’.
I also added two links: ‘Start Your Journey’ and ‘Go back’.
Students can go back and attempt to improve their scores or they can move on. The ‘Start Your Journey’ links to the ‘Gate 1’ page. The ‘Go back’ links to the page with the animals. The following diagram, found under ‘Branches’ on the left side, shows the branching connections from the Evaluate page to the preceding page and from the Evaluate page to the Gate. (I’ll explain gates in a second.)
The Branches view
The following screenshot shows the ‘Embedded Variable’ widget editor. Variables that have been used elsewhere in the program need only curly braces {} to be used. Variables that don’t exist can be declared here. (They can hold the result of expressions written in JavaScript, which is a more advanced concept.) ‘score’ was used on an earlier page and, so, it can simply be referenced with the curly braces.
Again, the two links on the page cause the learner either to move forward to the gate or backward to the animals.
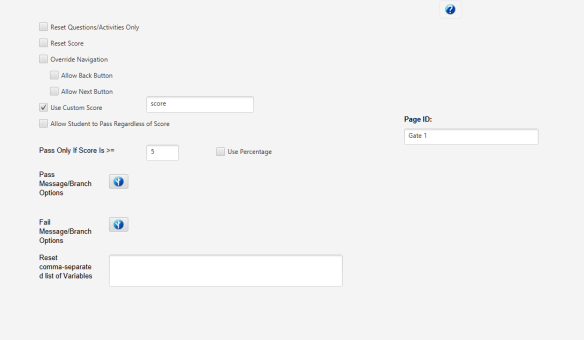
Finally, we have the ‘Gate’, which is a LodeStar page type. We use the gate in this case to branch the student. If the student scored 5 or above, then we follow the ‘Pass Branch Options’. If the student scored lower than 5 then we follow the ‘Fail Branch Options’. ‘Pass’ and ‘Fail’ might not be appropriate terms, but students never see these terms. They just imply one branch if the condition evaluates to true and another branch if the condition evaluates to false.
The condition is:
Pass only if Score Is >= 5
The variable that holds the score is the variable named ‘score’. The variable name can be anything. The author simply checks ‘Use Custom Score’ and identifies which variable will be used in the condition, as pictured below.
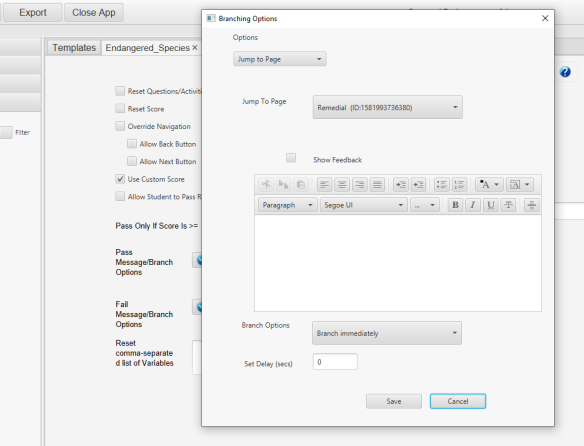
The following two screens show the two branch options. The ‘Pass’ option is set to ‘Jump to Page’ to a page that is titled ‘Enrichment’. The ‘Fail’ option is set to ‘Jump to Page’ to a page that is titled ‘Remedial’.

The following screenshot shows a page labeled ‘Enrichment’. Notice the ‘Page ID’? The Page Id was used in the gate. This represents the start of a whole series of pages that represent the enrichment sequence. Similarly, there is a remedial page, the start to a series of pages that represent the remedial sequence.

Here is what the ‘fail’ branch dialog looks like.
When I click on the ‘Gate’ in the Branches view (as opposed to Pages view on the left side) and filter out the other pages, I can see the following. Gate 1 branches to either ‘Enrichment’ or ‘Remedial’. If I check off the filter I will see all of the branches for all of the pages, which gets to be a bit overwhelming.

More Complex Scenario-based Learning
So far, we are making the learner do something. We then store their performance in a variable called ‘score’. We use the value of the variable to branch in one direction if the score is low and in another direction if the score meets or exceeds a number.
That is a very basic building block. It’s like Legos. A Lego® brick is a simple thing, but Lego® bricks can be combined to form ever more complex shapes. So too in eLearning.
As a culminating example, let me describe a project we recently completed. The basic strategy of storing values in variables was used in a highly interactive learning module that we created to teach the topic of using LinkedIn in for business development.

With the use of variables, we were able to track learner performance through four Social Sales Index (SSI) measures: brand, people, insights, and relationships. If learners acquire the skills to improve their SSI index through the learning module, then they can apply that directly to LinkedIn and see tangible results.
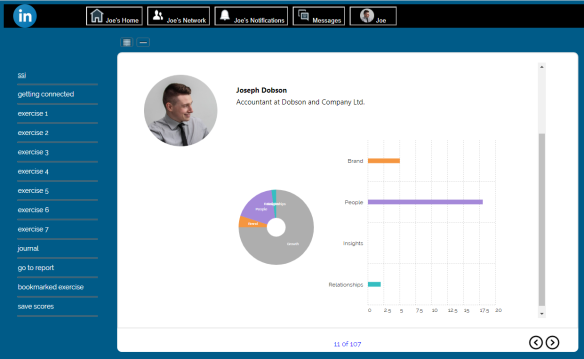
In the learning module, behind the scenes, there are four variables, each matched to an SSI metric. As learners expand their LinkedIn network, respond appropriately to notifications, build their profile, etc. etc. they increase their SSI. Each activity is tied to one of the variables.
The Function
We started with the humble variable, and then saw it used in branching logic. Variables are also frequently used with functions.
A function is a group of instructions used by programming languages to return a single result or a set of results or simply to do something.
Because LodeStar automatically tallies student-earned points and reports performance to the learning management system, in our example, we use functions to override that behavior by setting the user score and total score to our SSI metrics or to anything we want.
Let’s look at functions in general, and then at how our example uses them.
As mentioned, the function either does something or gives you are result based on some input. In LodeStar, functions are just something you use rather than define. But if you looked at a function from a programmer’s point of view, it would look like the following function named addValues. (functions are often named in this way, with the first letter lower cased.)
function addValues(value1, value2){
sum = value1 + value2;
return sum;
}
‘value1’ and ‘value2’ are inputs (or arguments, in technical speak)
The body of the function falls inside the curly braces {}. The body of the function adds the two inputs and spits out a result — a return value. Notice how we assign the sum of ‘value1’ and ‘value2’ to a variable?
Our use of a function is simpler. We don’t need to define functions. That work has been done for us. We just need to use them. We need two functions to override the default behavior of LodeStar. As mentioned, the default behavior is that LodeStar automatically tallies up the student performance points in all of the different question types and reports that to the learning management system. But we don’t want that. We want to report the SSI score.
A perfect SSI score is 100, so that becomes the total score. The sum of brand, people, insights, and relationships becomes the user score.
We use the function named setCustomUserScore(value) to set the user score. We use setCustomTotalScore(value) to set the total score.
Once we do that, all of the module’s learning activities are tied to this real-world performance measure. Finally, and most, importantly, all of the activities simulate real-world LinkedIn actions.
Conclusion
So, for our project, it all started with the humble variable. We asked how does LinkedIn measure proficiency. The answer is the SSI index. We then asked how would we capture the learner’s performance in an SSI metric. The answer is four variables named brand, people, insights and relationships. We then asked how could we bring up different types of content in the form of notifications, messages and so forth. The answer was in the use of variables and some conditional logic. Finally, how would we report the SSI index to the learning management system. The answer was….the function.
Instructional Designers traditionally think about text, graphics, audio and other types of media. These elements alone lead to very linear designs. The addition of variables, logic, and functions frees up our designs from the constraints of these linear models and allows us to add variability, surprise, realism and other things that enrich the learning experience.
So, start simple.
