Simulations on a Shoestring

Robert N. Bilyk
President, LodeStar Learning Corporation

Introduction

With artificial Intelligence, new tools, and new standards there is a sea change that improves our ability to create simulations efficiently.  I’ll take a moment to reprise my summary of the benefits and types of simulations and then dive into what we can do now that we could not do before — efficiently.

Why simulations

Simulations help learners draw upon their knowledge to make decisions in a ‘real-world’ setting.  They stimulate recall of recent learning and past knowledge.  They demonstrate how knowledge can be applied.  They can simplify situations to support learning or they can tax learners with the complexity of challenging environments.

The term simulation can apply to a broad range of instructional activities.  It can mean role-playing, a virtual lab, a decision-making scenario, a game, a diagnostic exercise, an immersive reality environment, and more.  A simulation can range from a simple demonstration of how things work, like an electrical circuit, to a complex problem that invokes the learner’s critical thinking and analytical skills.

I’ll limit this discussion to decision-making scenarios, which can include simple simulations (or ShortSims) and highly complex interactive case studies. 

Behavior mindset shift

AI, new tools and new standards dramatically lower the cost of building simulations.  But it takes more than technology to turn the tide.   Chrisopher Lind (host of Future-Focused1) and Michael Vaughn (CEO of The Regis Company) captured the issue in their recent conversation about simulations.

Michael Vaughn has been working in this space for years.  In his conversation with Christopher Lind, he notes that:

“The first thing we realized when we put instructional designers into it [simulation] the reaction is always the same, they loved it because it was fresh, it was new, it was a new way of thinking about building things, and all that stuff was really exciting and then when they had to sit down and actually start building a simulation it was almost the deer in the headlights.”

He and Christopher agree that a lot of design has really been about information architecture and not the design of learning experiences.   A simulation is a learning experience. They acknowledge that for years building simulations seemed beyond the capability and budget of learning and development professionals.

But that is no longer true. 

A simulation project

For my courses at Metropolitan State University in Learner Experience Design3, I have been contemplating a simulation that helps students apply what they’ve learned from my presentations, the texts, and the examples.  So, I’ve been building a prototype.  I’ll describe the prototype, what skills I needed, and how new tools and standards have helped me.

Let’s begin with the purpose of the simulation.

In my simulation I challenge students to develop training that helps a company solve a problem.  As Paul Matthews2 writes, sometimes learning experience designers need to play the role of a performance consultant and dig for the root cause of a performance issue.  In my simulation, you are asked to develop training for a residential solar panel installer.  The fictitious company installs and services solar panels.   The first tier of technical support for customers is the customer service technician.  If the tech can’t solve the problem over the phone with basic problem-solving strategies and tools, then a truck and field technician are dispatched to the customer site.   The company goal is to reduce what they call truck rolls.  The goal is to save the company money.

The simulation randomly selects a scenario from a bunch of scenarios, each with a different root problem.  Learners must interview technicians, the L&D director, and the dispatcher.  They must look at field notes and the tool metrics to decide on the learning outcomes that will make a difference.  Finally, they pick from a list.  The outcomes on the list are a strong or weak match depending on the randomly selected scenario.

Let’s review some of the actions that are critical to an interesting simulation.

Defining a Challenge

So, the first mindset shift is to think it terms of a problem and a challenge to present to the learner.  That’s a little different than a presentation on an ADDIE Analysis or a presentation on Design Thinking Empathy.  We’re not developing a presentation that competes with a hundred YouTube videos.  We’re developing an experience.

Creating Context

It’s been more than a year since AI was democratized by ChatGPT, DALL-E, and BARD.  Now there are dozens of tools that allow us to generate text and images, convert text to speech, synchronize animations with sound, and more.

For my prototype, Bing Image Creator generated images related to solar panel installation.  I tried to choose images that were both illustrations and stylistically consistent.  That proved to be very challenging but the tools improve each week and, at this stage, I’m only developing a prototype.

I used ChatGPT to help generate common problems that homeowners experience with their solar panels.  I didn’t use the ChatGPT content but it gave me ideas to dig into. The problems can range from decreased energy production to complete system failures.  I gathered information from ChatGPT, solar panel installers, and my own experiences.

Graphics generated by DALL-E

I asked Bing Image Creator (powered by DALL-E) to generate images of a customer service timeline and specific pieces of equipment like the inverter – a device that converts the current produced by a solar panel to one that will work in the home.

I assembled these images in my video editor and combined them with a script that was fed into a text-to-speech synthesizer.  I used Amazon Polly at no cost, but there are dozens of inexpensive synthesizers available.  They use AI to produce naturalistic sounding speech.  The inexpensive ones aren’t perfect but for prototyping or for projects on a shoestring budget, they may be acceptable.

Creating randomly generated scenarios with datasets. 

I used the LodeStar Dataset Widget to generate data.   I first defined the properties or data fields (upper part), clicked the ‘Generate’ button to create the dataset and then filled in the values.   In the screenshot below, I picked problem 1 and then identified the media that represents what each of the employees will say.  Three of the fields also control the level of tool usage that is displayed in the scenario screen.
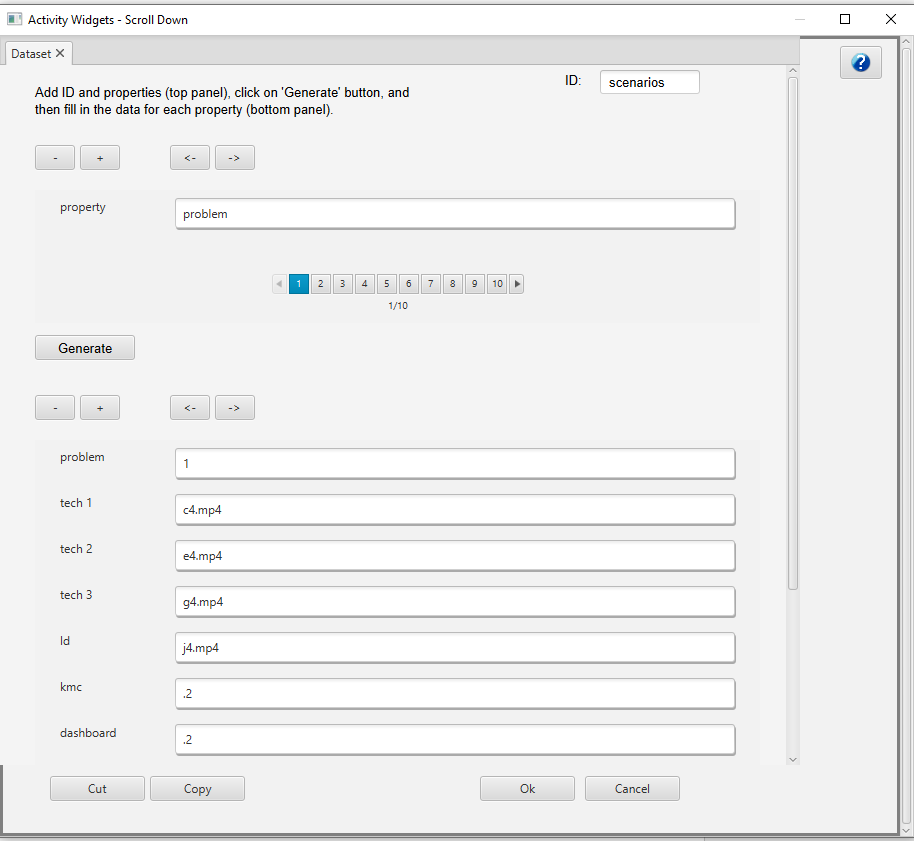
Dataset widget in LodeStar enables author to both define a dataset and then populate it

Scripting Randomization

In my case, LodeStar randomly pulls from the dataset so that these characters say something different each time,  providing clues to the root problem.  The level of usage of the tools (KMC, Dashboard, and Ticketing system) is also drawn from the dataset.

This is accomplished with a single line:

var scenario = getDataSet(“scenarios”, “-1”);

The -1 causes the engine to randomly select from a group of scenarios.  Each subsequent call will return a new dataset from the remaining unused datasets.

LodeStar makes it easy, but the same thing can be accomplished with script that essentially does these things:

  1. Describes the scenario data in a machine readable format
  2. Adds each scenario to a collection
  3. Generates an unused random number and uses that to pull a scenario from the collection
Once a scenario is randomly selected, all of the elements give clues to the underlying problem: employees, tool metrics, and field notes

Using Voice Synthesis and Character Puppets

I used voice synthesis and animations to represent the technicians, dispatcher, and Learning and Development director.

I had a little fun with the next step.  I added character puppets. 

Character puppets are composed of rigging.  Character rigging is a skeletal structure made of bones and joints.  The puppet creator skins the structure with artwork. The more rigging a character has, the more complex and subtle movements they’re capable of.

The puppet artists create the skeletal structure, the joints and the artwork for these puppets as well as the visemes. A viseme defines the formation of the face and mouth while a person is speaking. 

Adobe Character Animator imports a puppet created by GraphicMama.com

Here is where AI comes into play again.  AI supports the analysis of the audio file and chooses matching visemes.  In short, lip synching.  In the past, there were several hokey tools that attempted lip synching.  In the 90s when I lip synched characters to recorded speech, I needed to painstakingly morph visemes in a complex tool like 3D Studio and its predecessor.  Today, the technology has improved and the effect is appearing less and less mechanical.  In the coming years, along with the use of avatars, this technique will be more and more refined. 

Character tells his part of the story.

Displaying randomly generated elements

I displayed a list of learning outcomes in random order.   I will challenge learners to choose the top five outcomes that address the underlying training problem out of list of 20.  Their answers are evaluated based on the current scenario and the outcomes that are listed in the dataset.   An outcome might be correct in one scenario and completely wrong in another.  Just like real life.  Also, as in real life, some of the information provided by the employees might be misleading.  One technician may be performing correctly while the others may lack the knowledge, opportunity or motivation to perform correctly.   
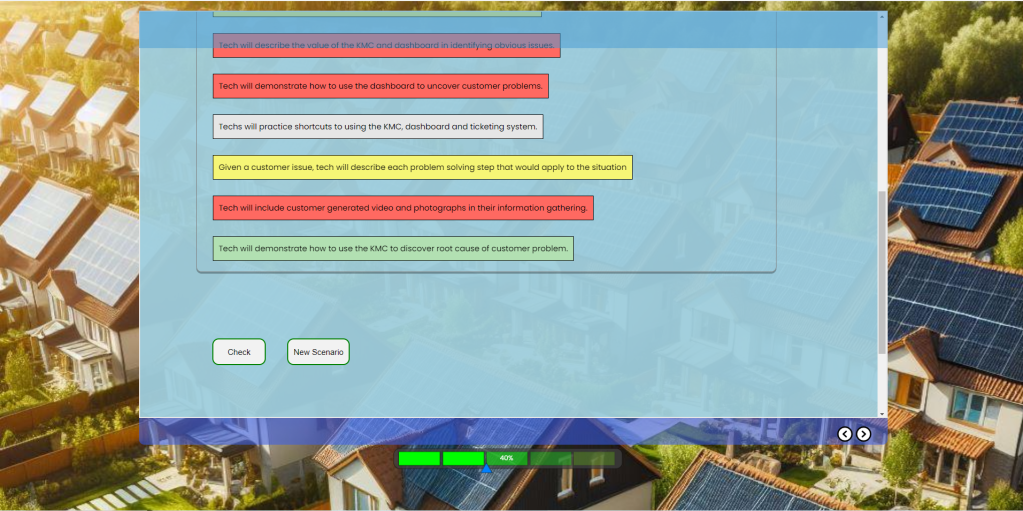
Learning outcomes are randomly ordered and judged according to the currently selected scenario

Coding for greater control

I added code (simple script) to evaluate the learner’s answers based on the scenario rather than answers that are hard-coded to be right or wrong.

LodeStar provides a simple scripting language that makes it fairly easy to evaluate the learner’s answers.   For those designers who wish to avoid scripting altogether then LodeStar offers a Gate page type and branching options.   The branch can direct learners to a batch of questions and answer options that are aligned to the scenario.

The use of simple scripting enables the designer to create one engine that will evaluate learner choices based on the scenario.    The use of branching enables the designer to create sets of questions and match those sets to each scenario.

In the example of simple scripting, the code would do the following:

  1. Ensure that the learner only selected five outcomes.
  2. Retrieve the dataset and parse out the right learning outcomes for that dataset.
  3. Loop through the outcomes and check if the outcome is contained in the set of learner’s choices.  If yes, append score and change the displayed outcome to green.

Here is an example of LodeStar Script accomplishing the above.  LodeStar Script follows JavaScript in the way that it declares variables, evaluates conditional statements, and loops through an array.  But LodeStar Script is not JavaScript.  It features high level functions that make it very easy to perform tasks, change properties, animate, play sound and video, and fifty other things.

Trainers and instructors can start with simple branching and slowly build on their scripting ability to increase their power to generate dynamic simulations that change every time the learner returns to them.

LodeStar Script also supports the generation of xAPI statements as do the branching options.
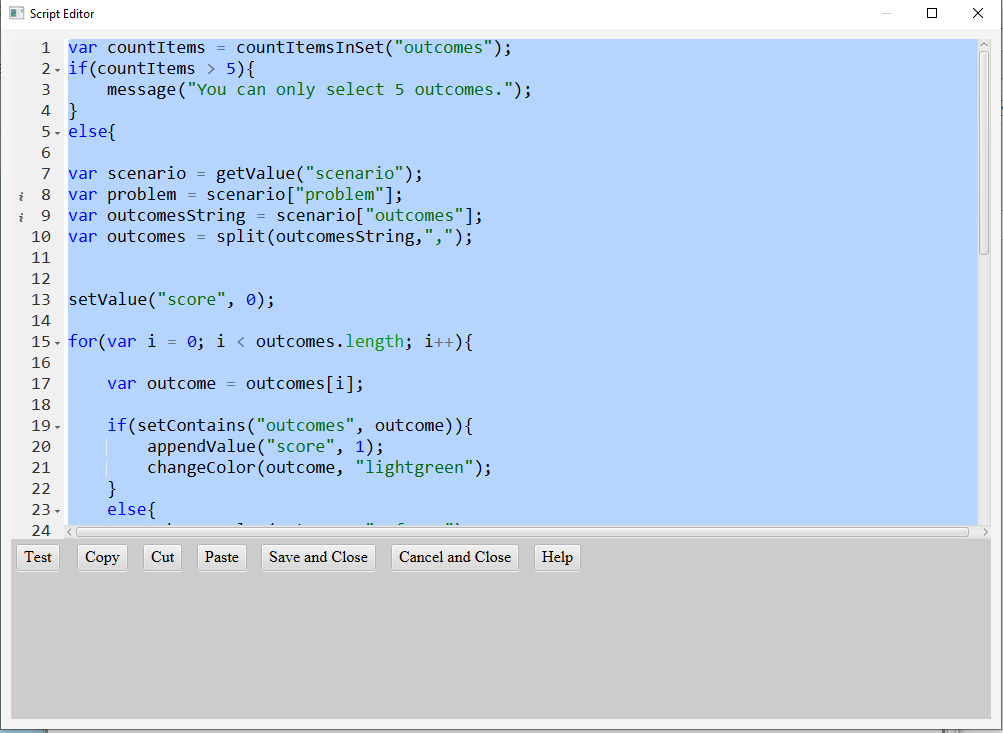
LodeStar Script offers high level functions that make it easy to perform tasks. Dozens of lines of code are reduced to a single line.

Controlling animations programmatically

In my simulation, I wanted a visual indicator of how the learner was performing.  I created a meter with the SVG editor, an animation timeline with the animation editor, and then controlled the animation with some script.  I also programmatically controlled the usage graphs for each of the tools – again, based on the dataset.

Simulations are often supported with animation that can be programmatically controlled.    The following screens show how I did this in LodeStar.

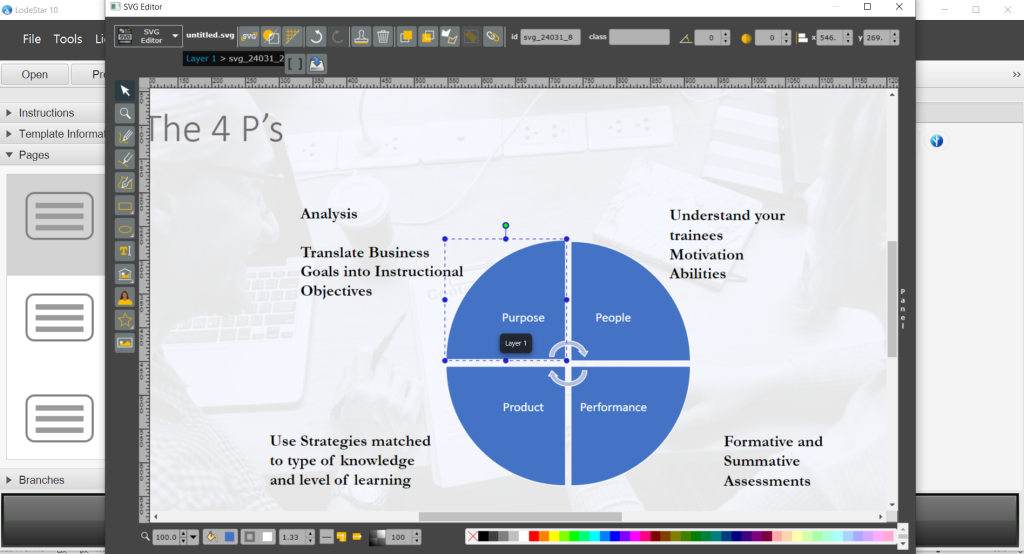
First, I created the meter with five bars in the SVG editor.  I also added a triangle indicator.
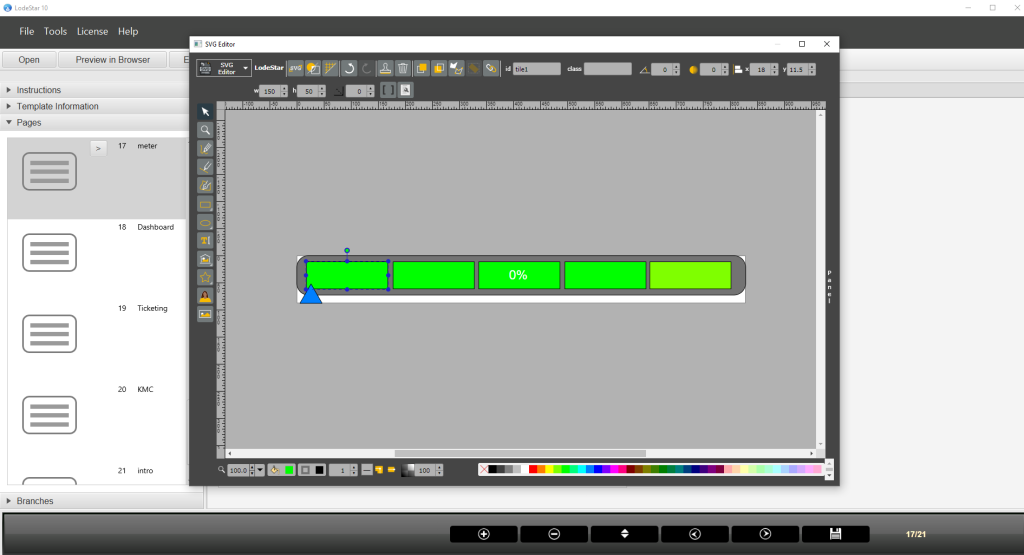
The SVG editor enables the creation of SVG elements that are assigned a unique ID

Then I opened the animation editor and changed the timeline for each bar.  I made the first bar fully opaque at 1 second, the second bar at 2 seconds and so on.

If a learner performed at 60 percent, the first three bars would be fully opaque.  The triangle indicator would appear just right of center.
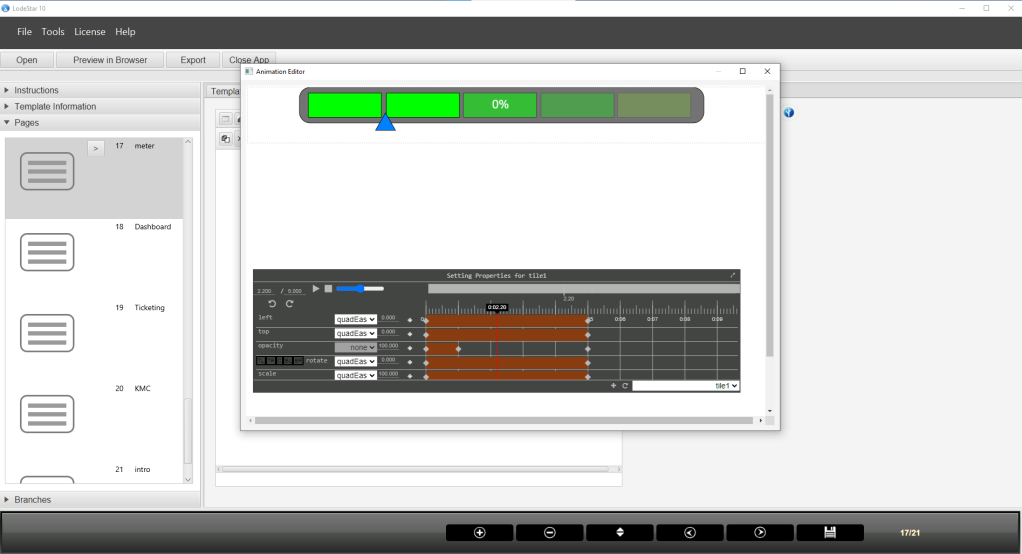
The SVG graphics are brought into the Animation Editor and animated.

Now, I needed to control the animation play head.  Once I evaluated the learner (user) score I did the following:

  1. Set the system score for the user
  2. Set the total score for the user.
  3. Move the animation playhead to the 60 percent mark with the following function: changeAnimation(“meter”, 0, percentage)
  4. Change the text to show 60 percent
  5. Disable the check button.
  6. Send an xAPI statement to the learner record score that states what outcomes the learner chose for the given dataset problem.
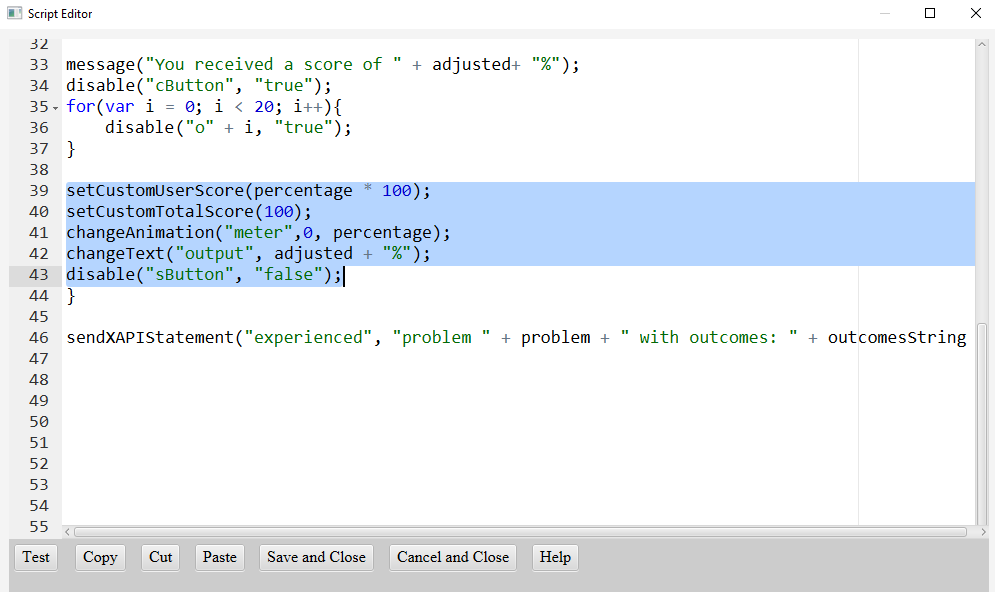
LodeStar Script can be tested inside its Script Editor

Conclusion

Simulations are an effective tool to engage your audience and promote learning.  With artificial intelligence, we can research and write content, generate images, synthesize speech, and synchronize speech to lip movements.   With advances in HTML standards baked into authoring tools like LodeStar we can generate datasets and randomly draw from them.  With advances in standards, we can create SVG graphics, animate them, and control the animations programmatically. 

The biggest challenge is in finding authors who are willing to learn these techniques and use them to engage learners.  Thinking back on Christopher Lind and Michael Vaughn’s comments, we can become more than information architects.  We can become learning experience designers. 

References

  1. Future-Focused with Christopher Lind
    https://christopherlind.substack.com/
  2. Paul Matthews
    https://paul-matthews.com/
  3. Metropolitan State University, Learner Experience Design Graduate Certificate Program
    https://www.metrostate.edu/academics/programs/learner-experience-design-graduate#about

Top Influences on the Development of LodeStar 10

Introduction

Modern web pages offer designers a rich palette of media types and standards to create engaging learning experiences. The web page has become an amazing success story.  It started as a battle ground of competing standards and self-interests and has arguably matured to become a meeting ground. 

If you aren’t on the bleeding edge, you’ll benefit from the convergence of standards. In CanIUse.com, browser support for many enabling technologies such as SVG and WebGL (explained later) shows up as green tiles across the table of browsers.  Green means these technologies are commonly supported, which is good news because learning experience designers can put these technologies to work.

caniuse.com by Alexis Deveria, available under a Creative Commons Attribution 4.0 License

Many of today’s eLearning projects are essentially webpage applications with additional standards that support communication to learning management systems or learner record stores. Many of the technologies that make the web interactive, responsive, accessible, and expressive are the same technologies used in eLearning applications.  Most of the major eLearning authoring systems are web page design systems for web pages that are hosted in learning management or content management systems.  There are many exceptions, of course, which include augmented reality systems, gaming engines and environments, and other virtual spaces that are not built on HTML5.  But let’s stay focused, for a moment, on the web.

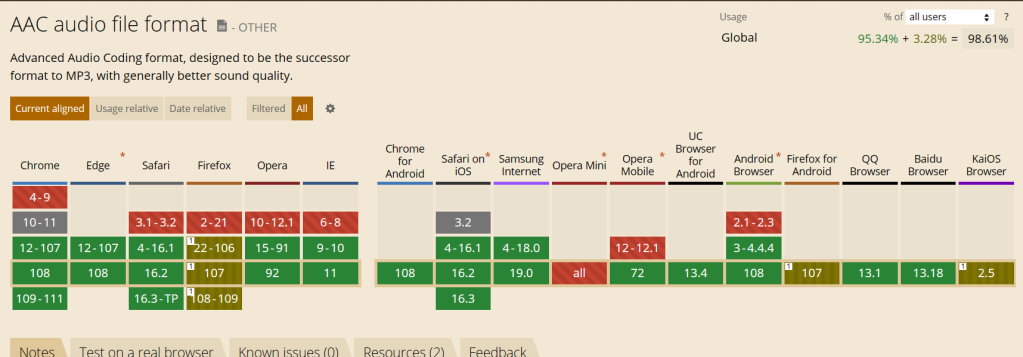
For maturing standards, the web has become a place of agreement.  In the not-too-distant past, basic HTML markup and styling had to address the many differences between browsers and how they interpreted the World Wide Web Consortium (W3C) standards.  Even a technology that most of us take for granted, the audio file, was once unsupported by a single file format that every browser could play.  Designers had to choose both an audio format and a fallback format. Thankfully that has changed.  All browsers can now legally play the .mp3 file or the HTML5 Ogg Vorbis audio format.

caniuse.com by Alexis Deveria, available under a Creative Commons Attribution 4.0 License

Soon the .m4a audio file (AAC) will be supported by all browsers and offer even higher quality audio at less the data cost.

caniuse.com by Alexis Deveria, available under a Creative Commons Attribution 4.0 License

But audio is only the beginning.  All modern browsers (IE 11 excluded) support GIF, animated GIF, JPEG, PNG images, animated PNG, and motion video in the MPEG-4/H.264 video format. 

All browsers support the language features of the last major revision to JavaScript.  JavaScript is the code that makes the web interactive.  It is the code that makes eLearning projects interactive.  Standardization allows all of us to benefit from the interactions that eLearning authoring tools produce with less worry about browser and device differences.  (I emphasize less worry because there is always something to worry about.)

Interactive 3D has become a new frontier for eLearning.  All major browsers support WebGL, which is a method of generating 3D graphics using JavaScript and hardware acceleration.  In the early 90’s, when I first created 3D worlds, I needed an entire lab of computers dedicated to rendering three-dimensional meshes into an animation of three-dimensional images that we would transfer onto a laser disc.  Today, WebGL enables us to render a mesh into a rotatable, scalable image in real-time, all in a browser.  If you’re not familiar with WebGL, please read on.

In short, Learning Experience designers, instructors and trainers can now use audio, video, imagery, text, three-dimensional graphics, scalable vector graphics, math mark-up, interactivity, and logic to realize their grandest designs and create engaging experiences for their learners.

On the eve of LodeStar 10’s release, I am taking stock of these standards and other influences that had a strong bearing on where our product is headed.  Like all toolmakers, I am keeping an eye on effective strategies as well as emerging and maturing technologies and am imagining the opportunities for designers as we work to make these technologies practical and accessible.

Here is a list of standards and strategies that are central to LodeStar’s current development.

Scalable Vector Graphics

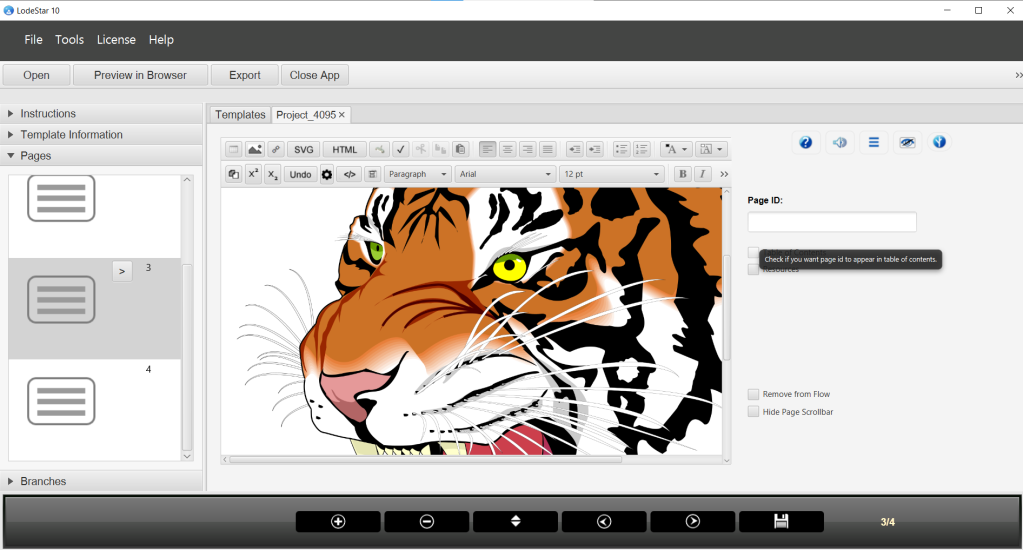
A lot of our development has focused on Scalable Vector Graphics.  SVG offers the designer many benefits.  Simple graphics such as the famous SVG tiger pictured here keep their sharpness regardless of the display size and the resolution. They are scalable.  They also offer more opportunity for accessibility.  Scaling can help learners with low vision.  The SVG title is readable by most screen readers. Also importantly, the SVG graphic is made up of individual elements whose properties can be changed by program code or user interaction.

LodeStar displays SVG graphic

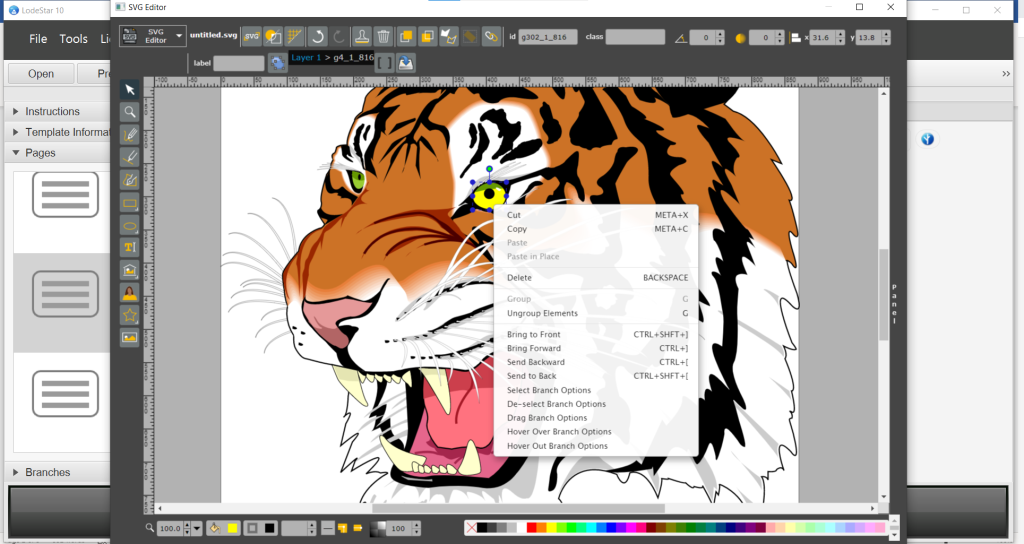
In the screenshot below, the tiger graphic is opened in an SVG editor in LodeStar.  The author has right-clicked on an eyeball and can now choose branch options based on selection, deselection, drag, hover over and hover out.  All of LodeStar’s branching options and script can be executed based on any of the above events.  For example, based on the click of an eye, things can happen: the eye color changes, an audio description plays, an overlay appears with a complete description of a tiger’s vision and so on.

With LodeStar, designers edit SVG graphics and add interactivity

Importing PowerPoint as SVG

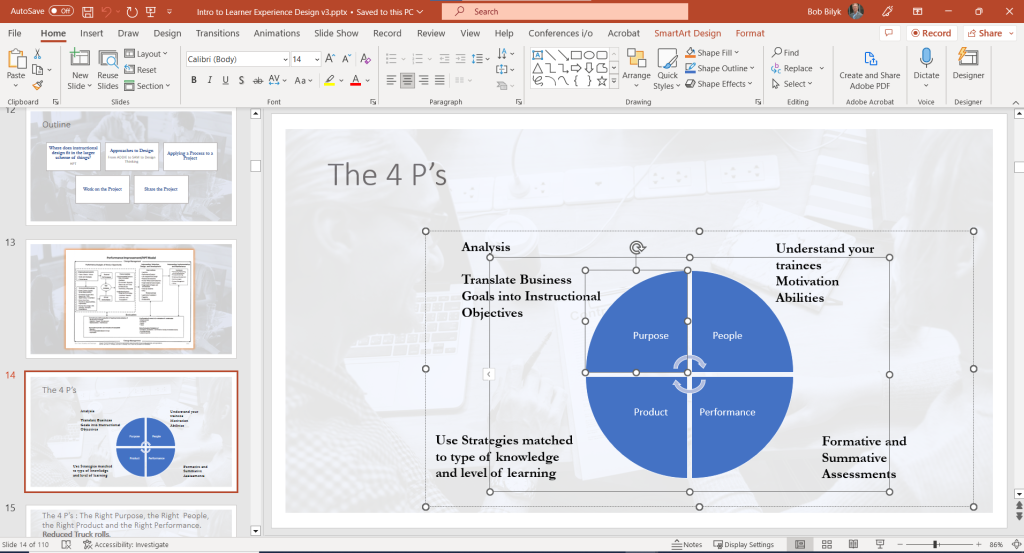
We’ve never been huge fans of starting an eLearning Project as a PowerPoint.  That hasn’t changed, but LodeStar10 does support importing a single PowerPoint slide or an entire PowerPoint presentation as a series of SVG pages. 

PowerPoint supports exporting a slide or series of slides as SVG.

PowerPoint Presentation

LodeStar 10 adds support for importing a single SVG image or an entire folder of SVG images.  LodeStar interrogates each slide and looks for things like Base64-encoded images.  PowerPoint converts imported images to a long string of characters called Base64.  This is a great format for transporting images inside a single file but browsers tend to load and render Base64-encoded images very very slowly.  LodeStar detects the Base64 encoding and then translates the characters back into an image file that is loaded into the project. 

The result is that vector graphics are editable as SVG elements, and embedded images load and display quickly.  The designer can display the slide as is, edit elements and add branch options to elements.

Designer edits a PowerPoint slide in SVG editor

MathML

For a short while, all browsers supported the MathML markup language, enabling markup without the need for add-ons.

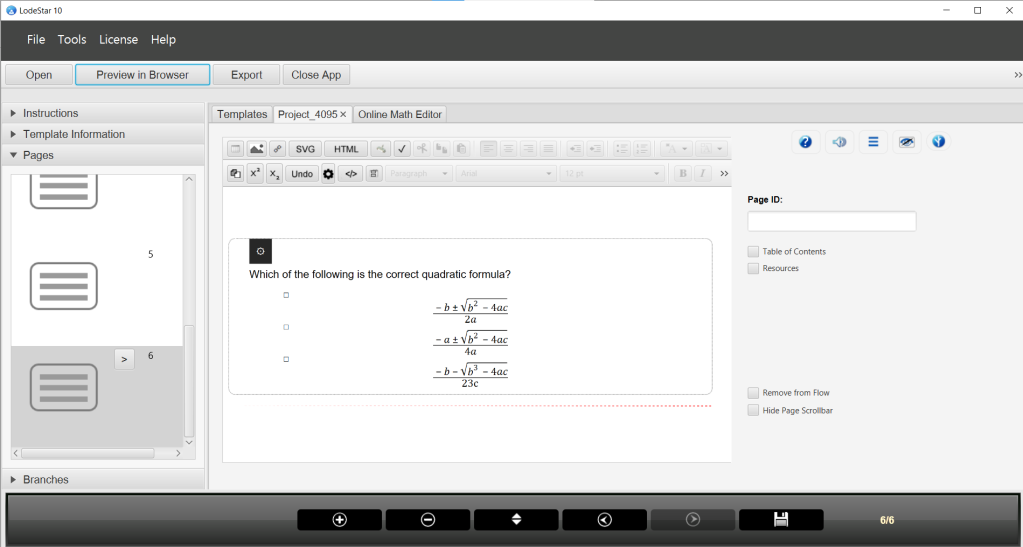
Rendered MathML in LodeStar HTML editor

But there have been setbacks. We’re looking forward to when MathML is once again available in all browsers. Given the likelihood of that, LodeStar continues to support MathML.

Support for MathML

MathML (Mathematical Markup Language) is supported by W3C as the preferred way of displaying mathematics on a web page or eLearning application. MathML describes structure and content of mathematical notation and provides for a higher level of accessibility than simply displaying an image.  Designers can quickly edit and manipulate the size of a MathML expression.  This is an improvement over taking a picture of an equation, for example, and pasting the image into a presentation.  In the past LodeStar automatically converted expressions into images or it used the MathJax library to convert expressions written in Latex to MathML.  But now we’re banking on full support for MathML in the near future.

SimpleSim

For years, LodeStar offered the Interviewer Page Type to support what we called decision-making scenarios and simple simulations.  We continue to offer that page type but have expanded the number of layout options for interactive decision-making. 

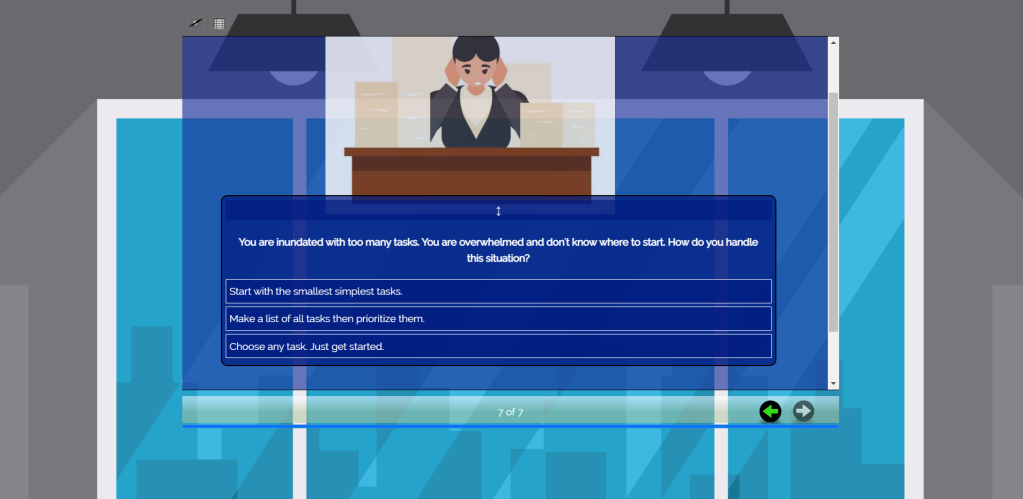
For starters, we added a new page type called the SimpleSim.  This page type supports graphics, interactive widgets, text and whatever else is needed to set the scene.  At center stage is the situational prompt and three decision options (as pictured below).   All of LodeStar’s branching options can be invoked based on the learner’s choice.   For example, the ‘Jump to Page’ branch option can bring up a scene that matches the choice and advances the narrative.   Branching options also allow us to add feedback, keep track of points, collect user responses and so forth.

To style the scene shown below, the author used a palette for the color scheme, added a header graphic through Tools>Themes, selected a layout style that set the window width and navigation at the top, and added a background graphic.   The use of palettes, themes, layouts and page types enables the author to control every aspect of this simple simulation, including the interactivity.

Look and feel is controlled by Layout, Theme, and Palette

CCAF

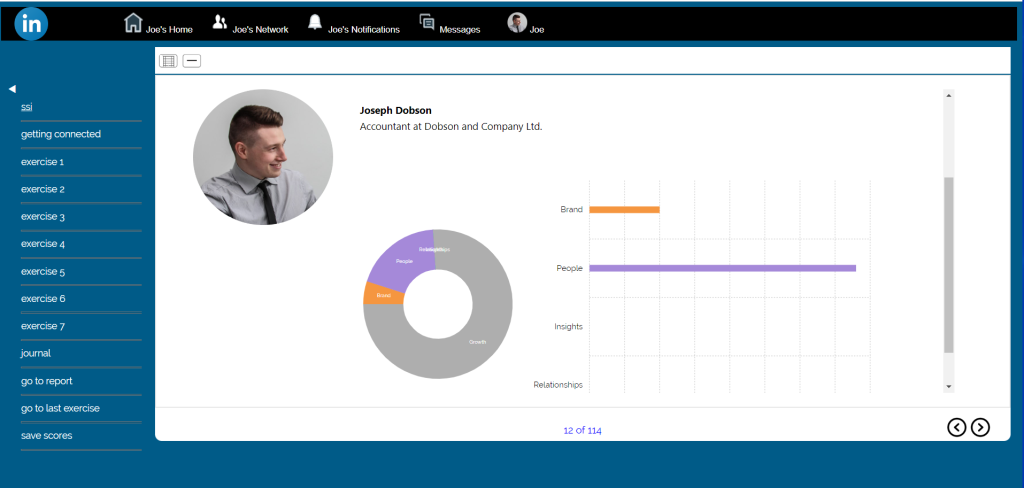
It’s no secret that we are huge fans of Dr. Michael Allen’s Context-Challenge-Activity-Feedback model.  In a project that was intended to improve employees’ social sales index (SSI) in LinkedIn, we set the context as a simulated LinkedIn.  For the challenge, the learner must improve the main character’s SSI score by providing the right advice and interacting with a simulated profile, notifications, messaging, etc. – just like LinkedIn!

LinkedIn Simulation

CCAF projects are not page turners or Present-and-Checks.  They can be quite advanced.  To support a more sophisticated interaction than the display of content and multiple-choice questions, LodeStar offers LodeStarScript, which can be written in the Execute Command branch option.

LodeStarScript enables designers to change the properties of graphics on the fly, including SVG graphics.  Properties can include color, position, image source, rotation, opacity, etc.  LodeStarScript offers the designer the power of conditional logic, loops, local and global scoped variables, and a long long list of functions.

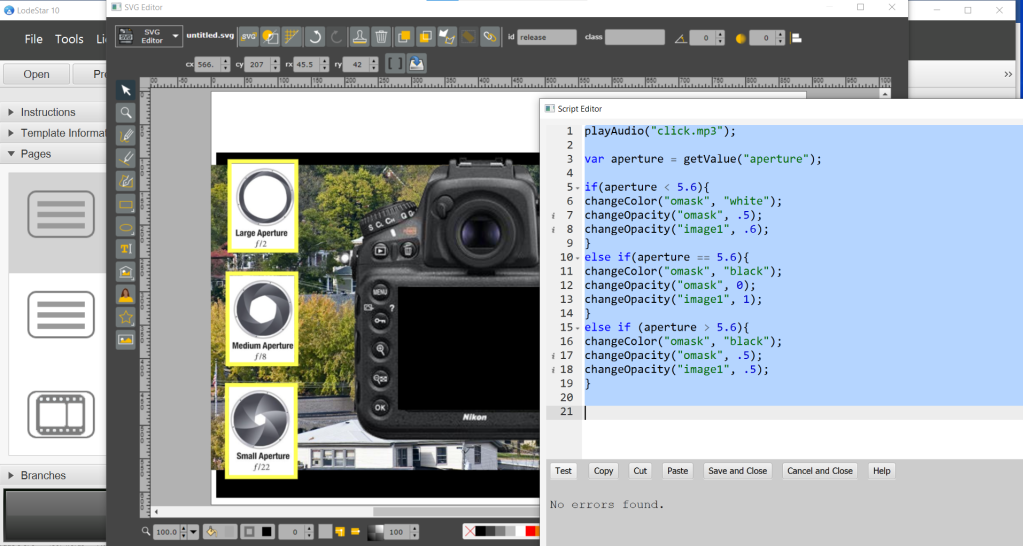
In the simulation below, the learner can select a camera aperture and control exposure.  The effects of exposure are simulated with the simple change of the color and opacity properties of an SVG element.

Camera simulation with LodeStarScript

xAPI/CMI5

Megan Torrance, a veteran of learning design, authored a research paper sponsored by the Learning Guild.  I won’t steal her thunder and encourage you to read the paper for yourself, but I’ll cite two statistics from her research that tell the story of xAPI.

In a survey of 368 respondents, the majority of whom belong to organizations that create or purchase learning solutions, 44.9% of the respondents indicated that ‘We are interested in xAPI but have not used it at all.” 

Version 1.0 of xAPI was released way back in 2013, and yet 10 years later adoption is not widespread.

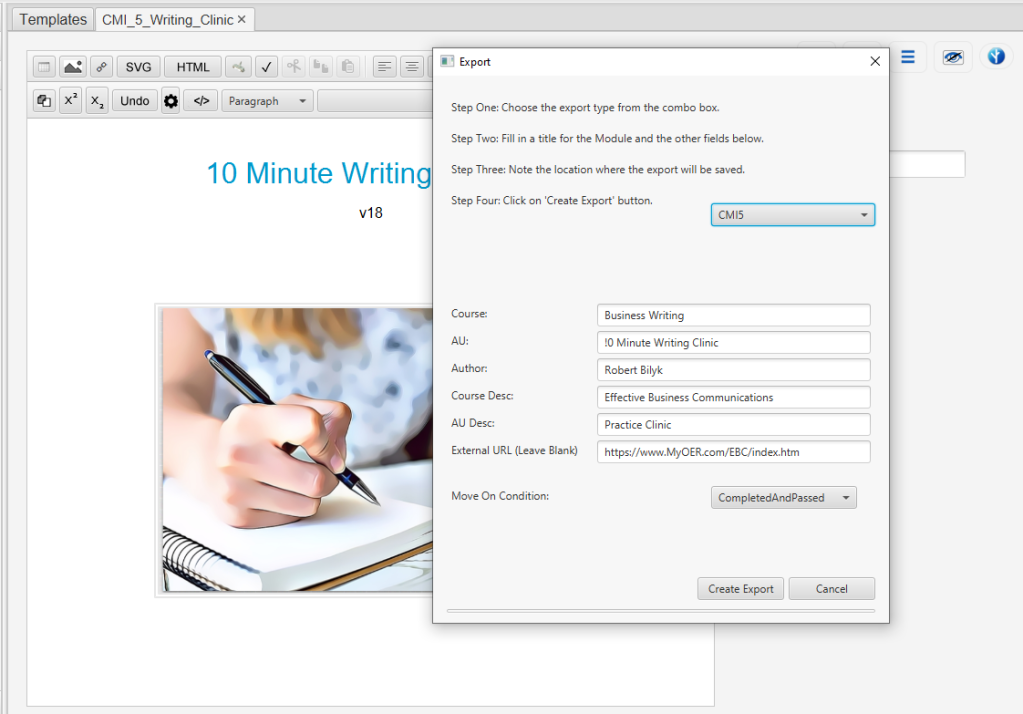
So what is xAPI, how does it relate to CMI5, and why are we so interested in it?  In short, xAPI and CMI5 are game changers.  They are not the same thing but they are close cousins.  An eLearning activity that uses CMI5 can generate an xAPI statement, which gets recorded in a Learner Record Store.  CMI5 can also tell the LMS whether the learner passed or failed. 

So, let me be a little more specific.

With these technologies, I can store my eLearning projects in my own repository — GitHub for example.  I can then import a very lean and simple file to the Learning Management System, which tells the LMS from where to launch the activity.  The LMS then passes to the activity learner information and a token for secure communication.

CMI5 uses xAPI technology but it also understands the vocabulary that LMSs require.  Pass/Fail.  Incomplete/Complete.  xAPI reports to a learner record store any statement that the designer has added to the eLearning activity.  ‘Learner has reached Level Two.  Learner completed a video.  Learner attempted Level Three four times.’  CMI5 can generate any kind of xAPI statement in the form of learner actions.  In addition, CMI5 can tell the LMS whether the learner passed and/or completed the module.

 But among the reasons why people don’t yet use it are:  lack of knowledge, lack of Learner Record Store, and LMS does not support it.

I am extremely fortunate in that our Learning Management System is Prolaera.  It is designed for the CPA industry.  Prolaera can import a CMI5 activity.  As a result, I can do the following:

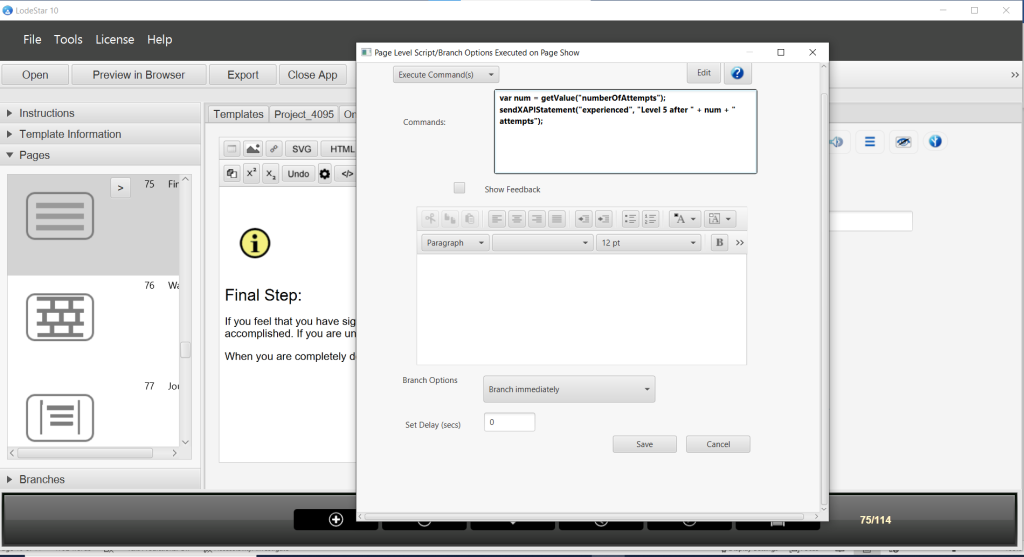
  1. Send a statement about the learner reaching Level 5 to the learner record store.
xAPI statement

2.

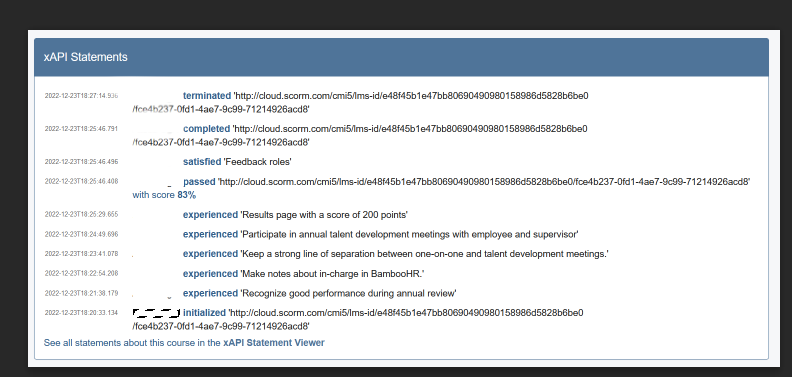
Read a list of learner experiences from the Learning Management System’s Learner Record Store. (the learner’s name has been erased from the screenshot).

Learner Record Store

From the screenshot above, you can see that we can report on any learner experience.  For example, the learner first experienced the results page with a score of 200 points.  We can also see that the learner passed, satisfied the requirements, completed the module and terminated the activity.  These are all terms that the Learning Management System understands.

It may take time but CMI5/xAPI will eventually be widely adopted.  These standards are incredibly important to the advancement of eLearning.  It begins with awareness. The more designers learn about it, the more they can encourage their learning management system vendors to support it.  In the meantime, we are ready for it!

3D

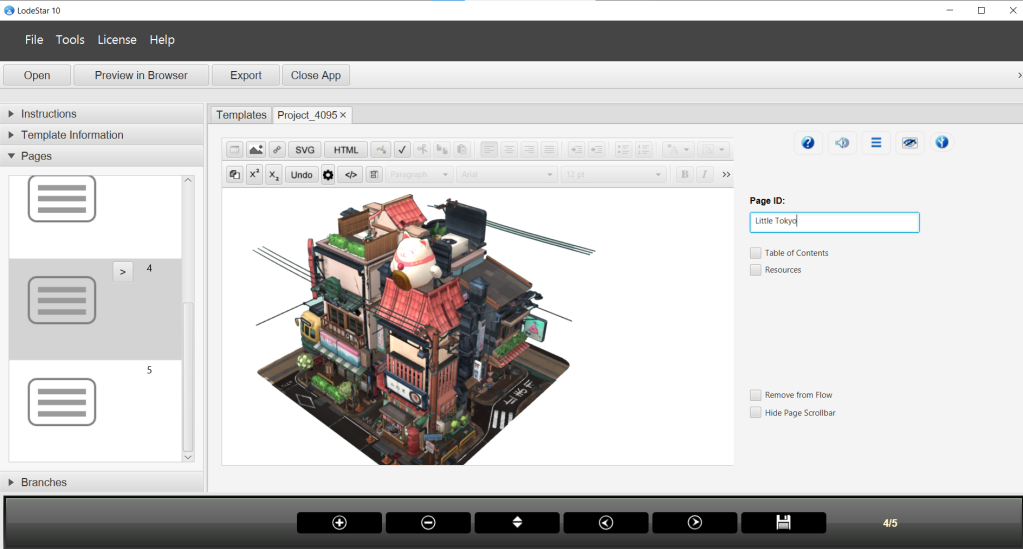
Glen Fox’s Littlest Tokyo is a great example of what is possible with Three Dimensional objects viewed jn a browser.  The object is beautifully detailed with a running streetcar animation as an integral part of the 3D object.

Littlest Toyko, by Glen Fox

Designers will be able to use free tools like Blender, TinkerCAD, Sketchup or even their smartphones to produce 3D meshes.  

Smartphones like iPhone 12 come equipped with LIDAR.  LIDAR emits a laser pulse that reflects off of solid surfaces and returns to a sensor on the smartphone.  The round-trip duration is noted. From that, the software can accurately position the solid surface in three-dimensional space. LIDAR has been available in specialty instruments for a long time but for designers to be able to use this technology practically, the software needed to improve.
In whatever way the 3D model gets created (3D graphics software, downloaded from a warehouse, generated by LIDAR) it can then be loaded into a viewer and manipulated (scaled, rotated, navigated) by the learner.  Imagine vital organs or historical places or complicated machines as manipulable objects. 

Currently, we’re working on a loader and viewer for 3D Models.  The first LodeStar 10 release won’t include a 3D model viewer, but we’ll introduce it later in a minor release.

In the meantime, we do support photospheres.  Photospheres use the same underlying technology: WebGL. WebGL enables hardware-accelerated physics and image processing and rendering onto the HTML5 canvas.  The hardware is a dedicated processor called the Graphical Processing Unit or GPU.

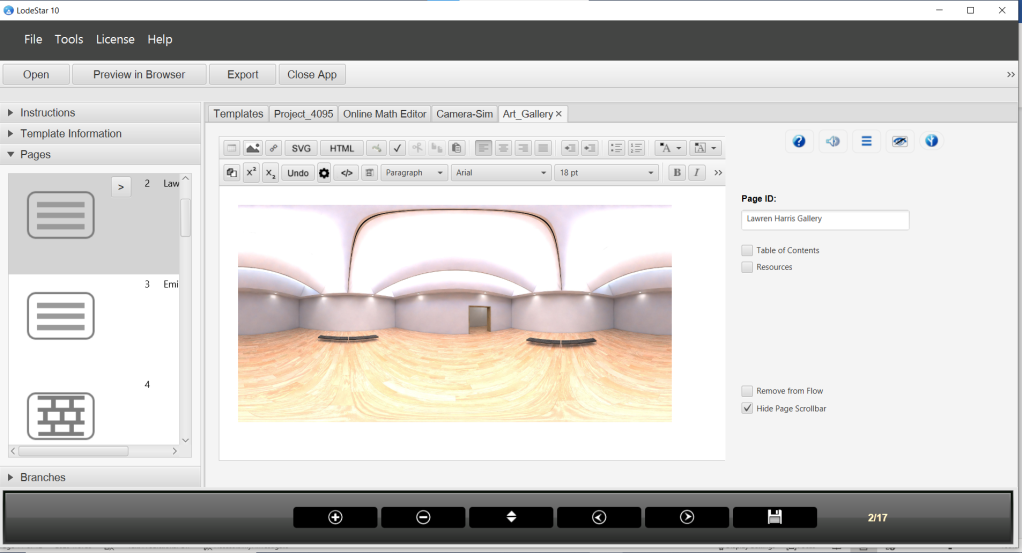
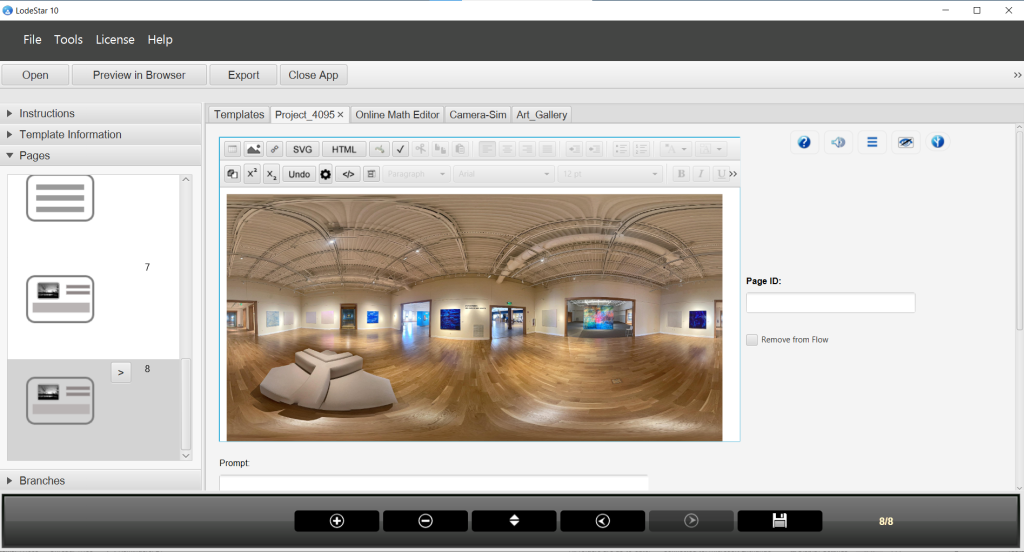
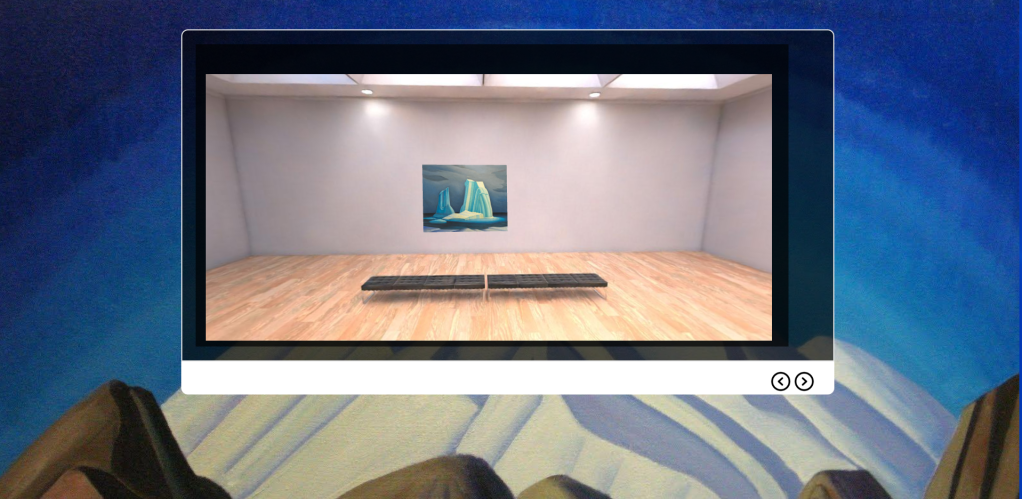
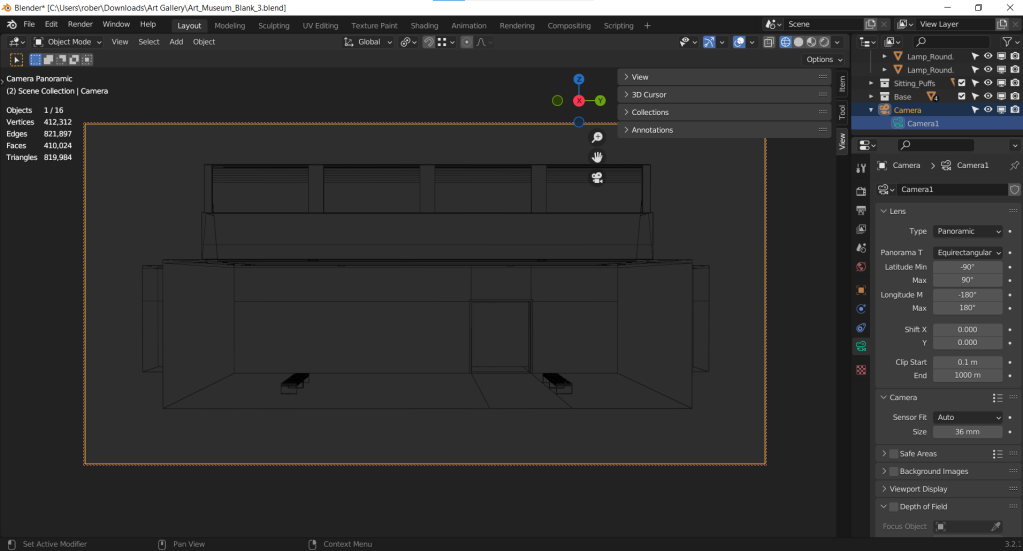
The photosphere that appears in the screenshot shows a distorted view of an art gallery.  The first art gallery image (shown below) was produced in Blender.  The second art gallery image was taken with an iPhone at the Minnesota Marine Art Museum in Winona.

Photosphere created in Blender
Photosphere created in iPhone

The image appears distorted – in fact, spherical.

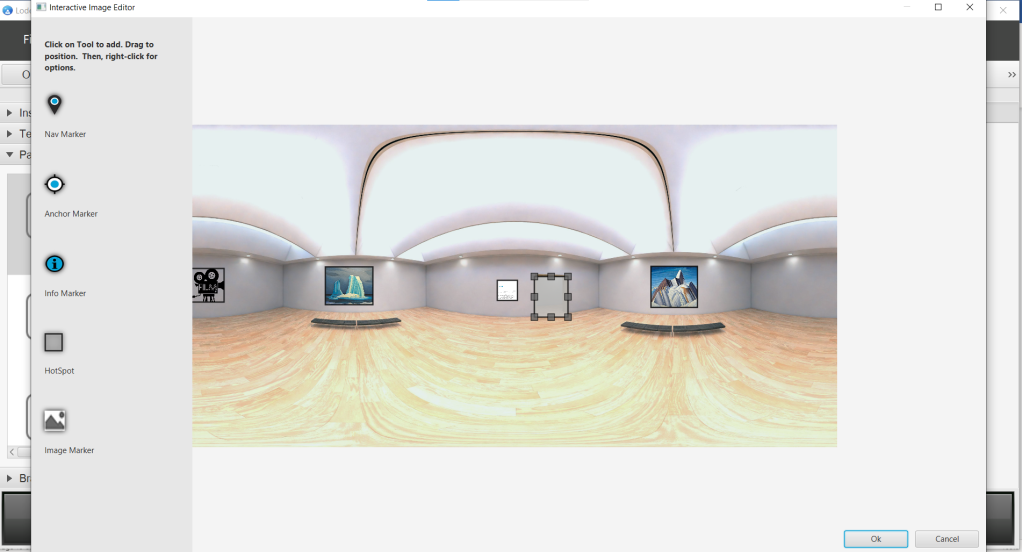
Once in LodeStar, the designer can add images, markers, and hotspots to the photosphere.  All of these things get correctly positioned on the sphere.

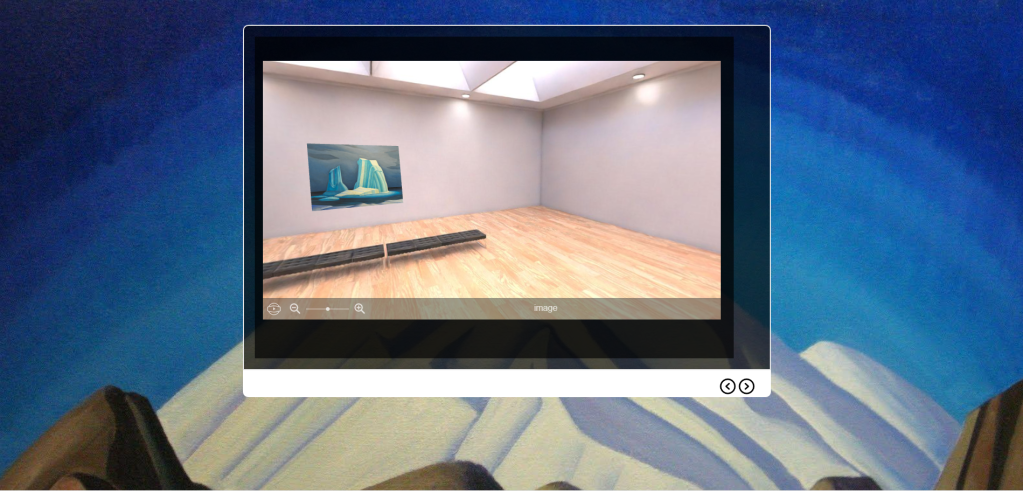
In the LodeStar editor below, I am adding Lawren Harris’ paintings to the gallery as well as hotspots.  A hotspot click takes the learner to another room in the gallery.  A click on the painting brings up an image overlay.  A click on the video graphic starts a video. 

LodeStar editor adds interactivity to Photosphere

The end result:

Interactive Art Gallery on the Group of Seven

Conclusion

2023 marks the twentieth anniversary of LodeStar Learning.  We filed with the Minnesota Secretary of State on March 11, 2003.  I’m pleased that LodeStar has adapted to all of the technology changes over the years.  LodeStar began as code embedded in Lotus’ LearningSpace.  It then enabled instructors to create rich learning activities in ActionScript and Flash.  In 2013, LodeStar Learning pivoted to a whole new generation of software that used HTML5.  LodeStar10 continues that progression and harnesses the power of HTML5, SVG, 3D and so much more to help designers create great learning experiences.

Learning Experiences in the 3rd Dimension.


Introduction

Great learning experiences can be crafted from 3D technology. The simplest form of 3D technology is the photosphere. It is accessible to teachers and trainers and can be used quite effectively. In this article, I’ll show off a demonstration project and describe the use of 3D models, a photosphere, text and graphics, video, and audio.

Two years ago, I wrote about using photospheres in online courses. Today, ‘interactive’ photospheres are a critical strategy that designers of every stripe should master. Currently, the use of photospheres is supported by the proliferation of 3D models, photosphere projects, new services, improved technology, and new features in our own authoring software.

So, let me parse this mix media approach. To start, a photosphere is a 360-degree panoramic image that can be displayed in a viewer. Learners can ‘navigate’ the image by dragging the view in any direction and zooming in and out.  Google Street View is the best-known example, but photospheres abound in art museums, tourist bureaus, real estate sites, and social media.

The photosphere is deceptively simple and hides a more profound change in the web.  As we all know, browsers support the trinity:  HTML, JavaScript, and CSS.  All three technologies have been evolving.  Recently, JavaScript began supporting a variety of new technologies, including WebGL.  WebGL makes 3D rendering possible in a browser without the need for plug-ins.  In short, WebGL (Web Graphics Library) displays 3D and 2D. Because of WebGL, browsers can benefit from hardware graphics acceleration to display (render) complicated graphics.  The key is hardware acceleration. The processing of graphics in a dedicated graphics process unit is many times faster than in the main CPU. 

The photosphere uses WebGL or hardware acceleration.   To display a photosphere, a distorted image is mapped on the inside of a 3D sphere.  Our perspective is from the center of the sphere with a narrow field of view.  By dragging the image, we pan the sphere and bring hidden parts of the image into view.

With the help of LodeStar, an eLearning authoring tool, we can add interactivity.

To best illustrate interactive photospheres, I created this demonstration project based on one of my loves, the Group of Seven.

A little background:  I went to school in Canada. Until the thirteenth grade, the study of history was the study of British, American, and Russian history.  The study of literature was primarily European and British literature. The study of art was primarily of British and French art.  In grade 13, that all changed.  We studied Canadian history, literature, and art.  For me, that was transforming.  Central to Canadian art was the Group of Seven.  Their subject was primarily the Canadian landscape. Until recently, I could find Group of Seven paintings only in the McMichael Canadian Art Collection in Kleinberg, Ontario. So, I decided to create a gallery of my own.  Just a small one for demo purposes, featuring two of the artists associated with the Group of Seven.

Visit this link and if your curiosity is piqued, I will share the details of how I made this learning experience. Launch the demo and on the second page drag your mouse across the scene.

Art Gallery (lodestarlearning.github.io)

Virtual Group of Seven Gallery Demonstration Project

The details

First, I needed a model of an art gallery. I went to TurboSquid and bought one for $19.  I could have found a photosphere from Flickr or elsewhere, but I wanted control of the objects in my gallery.  I could have built a 3D model from the ground up – but wanted a short cut.

The model came in the form of a DAE, which is a 3D interchange format.  The DAE format is based on the COLLADA (COLLAborative Design Activity) XML schema.  (This is a standard format that can describe 3D objects, effects, physics, animation, and other properties. All the major 3D modeling tools can import it.)   I then brought the model into Blender.             

Blender is a free 3D modeling tool and it is quite incredible.           

3D Model in Blender

In Blender, I edited the model and added my own camera.  To render a photosphere, I made the camera panoramic and then equirectangular. Equirectangular is a projection type used for mapping spheres onto a two-dimensional plane. This results in a very distorted image when viewed normally.  Viewed in a photosphere viewer, the image looks spectacular.

Next, I imported the image into LodeStar. With the help of the LodeStar’s interactive image editor, I drew hotspots over the doors and imported images of paintings that I positioned in the art gallery. Technically, the images become image overlays. As the viewer moves the image up and down and across, the imported images adjust accordingly by scaling, skewing, and repositioning.

Interactive Image Editor in LodeStar

In the scene above, the imported images appear above the benches.  A hotspot sits over the doorway.  When a learner clicks on the doorway, LodeStar executes a branching option.  In this case, that means a jump to the next gallery.

In the example, two gallery rooms are featured. The first gallery exhibits two paintings of Lawren Harris.  The video icon displays a YouTube presentation on Harris’ work. The second gallery exhibits two paintings of Emily Carr, and a wonderful YouTube presentation on her work.

Conclusion


Photospheres are but one part of 3D technology.  Browser support for WebGL makes it possible for us to use 3D models interactively. Students can view 3D models from any perspective and manipulate them. The possibilities are endless. LodeStar and other tool makers must make it easier to load these models and make them useful for educational and training purposes.  Just as we support functions that can change an image or element’s rotation, position, opacity, and color, we must provide functions that can manipulate 3D objects.

We are currently working on some prototypes and would love to hear from you and what would most benefit students. Please send us your comments.

Learner Experience Design

Introduction

Learner Experience Design has captured the attention and the imagination of just about everybody.  Some have cast learner experience design (LXD) as a discipline in direct opposition to instructional design; others consider LXD as a rebranded instructional design.

My own perspective comes directly from my community of practice.  For one, I worked as an instructional designer for creative studios who practiced learner experience design well before it became a thing.  We worked in teams that blended the disciplines of user experience design, cognitive psychology, learning technology, and design thinking, which included ideation and prototyping.  LXD as a discipline captures the very best of the principles that are espoused in the CCAF (Context-Challenge-Activity-Feedback) Model, the processes of design that include situational and user analysis, successive approximations, sketches, quick prototypes, a focus on the user, and a focus on doing.  The process of creating Allen Technology’s ZebraZapps, an eLearning authoring tool, included the best of design thinking and user experience design.

So what is Learner Experience Design?

So for me, LXD is what we’ve being doing for years and that is:

  • Centering on the learner versus the content (Dee Fink)
  • Focusing on the experience of the learner — on the doing (CCAF, problem-based learning)
  • Applying how people learn (cognitive science)
  • Empathizing, defining, idea-generating, prototyping, and testing (Design Thinking)
  • Following the principles of User Experience Design (Human Factors)
  • Collecting and analyzing data (Data analytics with the help of SCORM, and now xAPI, CMI5)
  • Using learning technology as enablers or affordances
  • Recognizing that formal training is but one part of improving human performance

In my view,  LXD is the power of all of these things combined under one label.  To illustrate the interplay of the learner, experience, cognition, behavior, UX, Design Thinking, data, technology, and human performance, I’ll draw upon a current project. 

An Example

The project goal is to help supervisors act more like coaches than formal evaluators.  The context is public accounting.  CPAs require deep technical skills and, as they progress in their careers, a host of success skills that include business development, leadership, supervision, and more.  In Minnesota, for example, CPAs complete 120 credits every three years to maintain their license.  They must also routinely attend trainings and updates related to changes in the law, technology, and business practices. 

In addition to this continuous training, the company seeks to improve employee retention, maintain good morale, and continue to grow rapidly.  To achieve its goals, the company adopted an employee engagement system that, among other things, helps supervisors collect feedback on employees from their tax reviewers or audit in-charges. More importantly, the company is switching from an annual review to monthly meetings that help supervisors and their reports improve their work.

There’s already a lot going on.  Learner Experience Design recognizes that all of these factors come into play:

  • Employees train a lot
  • New technology is in place
  • Industry is experiencing high turnover of staff
  • Company wants supervisors to be good coaches
  • Company is shifting from annual review to monthly meetings

At the heart of all of this lies a set of experiences shared between supervisors and their reports:

  • Requesting, providing, and organizing feedback with the employee engagement platform
  • Delivering effective feedback
  • Receiving feedback effectively

Let’s focus on one experience to illustrate the power of LXD.  Let’s focus on ‘giving feedback’.

There are underlying psychological principles as well as best and poor practices related to the giving feedback.  Giving feedback might elicit a perception of threat in the receiver and can easily be dismissed.  The feedback provider must use concrete examples, remain non-judgmental, draw from different perspectives, work toward a positive outcome and on and on. 

As designers, we can treat the topic of giving feedback in many different ways.  We can explain the function of the amygdala in the human brain and underscore its importance in decision making and emotional responses.  Feedback triggers those emotional responses and evokes a fight or flight response.  We could show video clips of good and bad practice or cartoon strips or excerpts from medical journals or any media that conveys information.  Our design might include this type of information sharing and then some form of assessment – a quiz or essay.

In contrast, LXD tends to favor placing the experience at the heart of the lesson.  In this case, the experience is the giving of feedback.  One design treatment might place the learner in a first-person scenario or simulation.  The context is the office with a new employee who is not performing well.  The learner acts as supervisor and selects the best thing to say in a conversation with the employee.  If the learner’s choices disagree with the principles and best practices of providing feedback, then the instruction may come in the form of an employee thought bubble, a pop-up outlining best practices, references to a text or a video, and other visual indicators of success or failure. 

In the prototype below some of these ideas come together.  The learner has selected one of three options.  The choice causes a change in the employee’s outward expression (full figure on the left), inward expression and thoughts, and in the information that is collected on the interaction.  In this prototype, the learner can access a transcript or review it at the end.  At this point in the scenario, the employee came in with the expectation of being coached only to be confronted by the reality that she is being evaluated (because of what the learner chose).  She outwardly smiles while inwardly expressing her concern about being evaluated.  A meter shows generally how things are going.

At the bottom of the screenshot, the learner has access to feedback given about the employee from two sources.  Just as in real life, the learner can consult that feedback to get different perspectives on the employee’s performance.

Giving Feedback prototype authored with the LodeStar eLearning authoring tool

The Design Thinking that led to this prototype included, to start, an analysis.  We must know something about the audience, their situation and the processes that were in place in the past.  In fact, while thinking about the actual problem we are trying to solve, we placed feedback ‘training’ on the back burner.  Other things needed to be in place first:  clear processes; and role definition between supervisors, audit in-charges and tax reviewers, and other personnel.  We also needed to work out how the workplace engagement platform will be used optimally to solicit and collect feedback in preparation for the one-on-one meetings between supervisors and their employees.

As we continue to think about people and processes, we’ll come up with new ideas, build new prototypes and test them out. 

Well…admittedly, to a point.  For a mid-sized company the return on time and effort is calculated quite differently than for a creative agency that plans training for thousands.  Design thinking still plays a role, but perhaps at a smaller scale.

The cognitive aspects of this training relate to how we can help the learners acquire and retain new knowledge without overload, how they can assimilate that new knowledge, and how they can apply the knowledge to their daily lives.  Human Performance Improvement considers any job aids or prompts that support the learner’s application of the principles and procedures.  User Experience Design challenges us to think about a lot of things on the screen (fonts, colors, layout, flow, navigation,  interactive elements, accessibility, desire paths) and off (cognitive overload, attention, memory, and more).

All of these things interplay and intersect.  Cognitive load might cause us to scaffold or plan out the curriculum differently (instructional design), or create a job aid (human performance), or map out the experience (UX) so that it doesn’t overwhelm the learner.  As we build prototypes or test the product, we collect data and analyze it.  Learning technology (xAPI, CMI5, SCORM) helps us collect the data from the learning experience.  xAPI and CMI5 are standards that are centered on experience.  (As I’ve written in the past, the x in xAPI is ‘experience’.)    Statistical methods help us make sense of the data.  For example, are learners benefiting from one design over another.

Conclusion

Since the term Learner Experience Design was first introduced, it has become part of our vocabulary and a rallying cry against content-centric designs, training-centric human performance improvement, and ineffective user interfaces.  LXD may not be anything new and yet it feels new and it feels exciting.

CMI5: A Call to Action

Introduction

Since 2000 a lot has changed. Think airport security, smart phones, digital television, and social media. In 2000, the Advanced Distributed Learning (ADL) Initiative gathered a set of eLearning specifications and organized them under the name of SCORM. In 2021, in a time of tremendous technological change, SCORM still remains the standard for how we describe, package, and report on eLearning.

However, finally, we are on the eve of adopting something new and something better: CMI5.

We no longer have landlines, but we still have SCORM

CMI5 Examples

To many, CMI5 is another meaningless acronym. To understand the power and benefit of CMI5, consider these very simple examples:


A Learning and Development specialist creates a learning activity that offers managers several samples of readings and videos from leadership experts. The activity allows the managers the freedom to pick and choose what they read or view; however, the specialist wants to know what they choose to read or watch as well as how they fare on a culminating assessment.

CMI5 enables the activity to capture both the learner experience (for example, the learner read an excerpt from Brené Brown’s Daring to Lead ) and the test score. CMI5 can generate a statement on virtually any kind of learner experience as well as the traditional data elements such as score, time on task, quiz questions and student answers. In this sense, CMI5 supports both openness and structure.

Let’s consider another example:

An instructor authors a learning activity that virtually guides students to places in Canada to observe the effects of climate change. She wants students to answer questions, post reflections and observe the effects of climate change on glaciers, Arctic ice, sea levels and permafrost. She sets a passing threshold for each activity. Once students have completed all of the units, then the learning management system registers that the course was mastered.

Let’s go further:

The instructor wants the learning activity to reside in a learning object repository or website outside of the learning management system – but still report to the learning management system. In fact, she wishes that no content reside on the learning management system. Regardless of where the content resides, she wants to know what sites students visited, how they scored on short quizzes, and how students reacted to the severe impact of climate change on Canada.

For students with disabilities, the instructor makes an accommodation and requests that the LMS administrator adjust the mastery score without editing the activity.

As the course becomes more and more popular, she anticipates placing the website and its activity onto CloudFlare or some content distribution network so that students all around the world can gain faster access to the learning activities.

The instructor works as adjunct for multiple universities and wants each of their learning management systems to get the content from a single location. In some cases, she wants the content locked for anyone who circumvents the Learning Management System and in other cases she openly lists the unlocked content with OER libraries like Merlot and OER Commons.


Before CMI5 much of this was difficult to achieve, if not impossible. So, let’s review what CMI5 offers us.


CMI5 captures scores in the traditional sense. But it also records data on learning experiences such as students virtually observing the change in the permafrost. CMI5 allows instructors and trainers to set the move-on criteria for each unit in a course (i.e. passing score before student moving on to the next unit).

CMI5 activities can reside anywhere – on one’s own website, for example, and still report to the learning management system. CMI5 enables an LMS administrator to change the mastery score from the LMS for the benefit of students who need accommodations and essentially trump what is set in the unit.

LodeStar’s CMI5 Implementation allows
authors to indicate where the content resides


CMI5 is a game changer. And yet for many – learning and development leaders, instructional designers, technologists and students – it doesn’t seem that way in 2021. CMI5 seems like a non-event. It feels like something we all talked about – a welcome change of weather on the horizon –and then nothing. Not a drop of rain.


We have been talking about and anticipating CMI5 for a long time – and yet, major learning management systems both in the corporate and academic worlds still don’t support it. CMI5 was envisioned in 2010, released to developers in 2015, and then released to the public in its first edition in 2016. We are now in the waning days of 2021—with limited adoption.


But that is likely to change.


For one, Rustici Software and ADL delivered on their promise of Catapult. Catapult is likely to accelerate adoption of CMI5. It provides many benefits to developers, including the ability to test if a CMI5 package conforms to the standard.

In my view, the learning technology architects have done their part. They brought us a meaningful set of specifications. They brought us the tools to test learning packages and to test the learning management system’s implementation of CMI5. Now’s it’s up to learning and development specialists and the instructional design community to cheer CMI5 on. It is my belief that once the community understands CMI5, spreads the word, and imposes its collective will on the LMS providers, CMI5 will become an important part of our tool bag. I urge you to share this article and others like it.


In the meantime, let’s take a deeper dive into CMI5’s potential.


Benefit One: Freedom to capture and report on any learner experience.


With CMI you can report on scores, completion status, and just about anything else. You can report on standard assessment results, and the not-so-standard learning experiences.


To understand this, we need to re-look at SCORM.


One should consider CMI5 as a replacement for SCORM – an improved specification. Conforming to SCORM was useful because a learning object or learning activity could be imported into just about any modern learning management system. As an instructor, if you created a game, quiz, presentation, simulation, whatever and exported it as a SCORM package, your activity could be imported into Moodle, BrightSpace, Canvas, Cornerstone, Blackboard, and any learning management system that supported SCORM. So, the benefit of SCORM was that it was a set of standards that most LMS systems understood. The standards that fell under the SCORM umbrella included metadata, a reporting data model, and standard methods for initializing an activity, reporting scores, reporting on interactions, and reporting passing or failing and completion status.

The data model included dozens of elements. One example of a data element is cmi.core.score.min. Related to score, SCORM conformant activities reported on the minimum score, the maximum score, the raw score (absolute number) and the scaled score ( a percentage between 0 and 1).


SCORM supported a lot of different data elements. A SCORM conformant activity could report on a variety of things. The limitation of SCORM, however, was that, despite the large number of elements, it was still a finite list. Take a Geolocation Storytelling activity as an example or an eBook reading. If I wanted to capture and report that the student virtually or physically visited location A, then B, and then C, I would have to work around the limitations of SCORM. I could not generate a statement such as, for example, ‘Student visited the Amphitheater in Arles’. If I wanted to capture a student’s progress through an eBook, SCORM would be problematic.


At this point, you might be protesting, but xAPI does that! xAPI? Another acronym! Yes. xAPI, or The Experience API is a new specification that makes it possible to report on a limitless range of things that a learner has experienced: such as, completed a chapter of an eBook; watched a video; toured a museum, and on and on. So, if we have this thing called xAPI, why CMI5?


The benefit of xAPI is that it supports the reporting of anything. The downside to xAPI is that, by itself, it doesn’t have a vocabulary that the LMS understands such as launched, initialized, scored, passed, completed. That is what CMI5 offers. CMI5 is, in fact, an xAPI profile that includes a vocabulary that the LMS understands. In addition, CMI5 can report on any type of learner experience. Here is the definition of CMI5 from the Advanced Distributed Learning Initiative:


cmi5 is a profile for using the xAPI specification with traditional learning management (LMS) systems

(Advanced Distributed Learning).


With CMI5, you can have your cake and eat it too. You can report on learner activity in a way that LMS understands and you can report on just about anything else that the Learning Management System stores in a Learner Record Store. The Learner Record Store or LRS is a database populated by statements about what the learner experienced.

xAPI Statements can capture an
any learner experience, including reading the instructions


Benefit Two: Freedom to put the learning activity anywhere


With CMI5, you can place a learning activity in a repository, in GitHub, on a web server, in a Site44 drop box site, in SharePoint, in a distributed network, wherever….without restricting its ability to connect with a learning management system. CMI5 content does not need to be imported. A CMI5 package can contain as little as one XML file, which among other things, tells the LMS where to find the content.


To appreciate this, we need to look back at SCORM once more (as if it were ancient history).


I’ll start with a pseudo technical explanation and then follow with why it matters.
The way SCORM works is that the learning activity sits in a window. The learning activity uses a simple looping algorithm to find the Learning Management System’s SCORM Adapter. It checks its parent window for a special object. If the window’s parent doesn’t contain the object, the activity looks to the parent’s parent, and so on. In other words, somewhere in that chain of parents, there must be that special object. Typically, the SCORM activity can only communicate to the learning management system if it is a child window of that system or if some server-side technology is used.

CMI5 works quite differently. CMI5 gives us freedom to leave our parents’ home. Whereas SCORM uses a Javascript Application Programmer Interface to communicate, CMI5 uses xAPI to reach across the internet and call a web service’s methods. Loosely, it’s like the difference between a landline and a cellular phone service. To use the landline you must be in the house; to use a cell phone, you must be in the network.

Benefit Three: A simplified sequencing model.

SCORM supported simple sequencing, which many say is not so simple. CMI5’s ‘move on’ property, in contrast, is very easy. A CMI course can contain one or more Assignable Units (AUs). The instructor spells out what the learner must achieve in an assignable unit before being able to move on. The move on property has one of the following values:


• Passed
• Completed
• Completed Or Passed
• Completed And Passed
• Not Applicable


Once the student has ‘moved on’ through all of the assignable units, the LMS notes that the course has been satisfied by that student.


Benefit Four: An assignable unit passing score can be overridden


In SCORM, the mastery score is hard-coded in the activity. In a SCORM activity, the instructor can base completion status on a passing score. But what if that hard-coded score were inappropriate for a group of students, for whatever reason? The specification enables an LMS to pass the mastery score to the Assignable Unit upon launch. So the LMS launches the AU, and sends it student name and mastery score (among other things). By specification, the AU cannot ignore the mastery score but must use it to trump what is hard-coded in the unit or refuse to run.


Benefit Five: Theoretically, CMI5 isn’t hamstrung by pop-up blockers.

When an LMS launches a SCORM activity, it either embeds the activity in an Iframe or launches a window. Both scenarios are problematic. The content may not be well suited for an iFrame and a pop-up blocker can obstruct the launched window.


Theoretically, CMI5 AU can replace the LMS with its own content. It’s not in an embedded iFrame and it’s not a pop-up window. When the LMS launches the AU, along with student name and mastery score, the LMS sends the AU a return URL. When ended, the AU returns the student to that return URL, which is the address of the LMS.


I write “theoretical” because the LMS should not but may ignore this requirement.

Benefit Six: CMI5 activities securely communicate to the Learner Record Store


As I wrote, the activity can send information about learner experiences clear across the internet to the learner record store. But how does the AU have the authorization to do this from, let’s say, a web site? And how does it happen securely?


This is the marvel of 2021 technology versus 2000 technology. Before 2000, we had difficult-to-use protocols for passing information securely across the internet. Oftentimes, special rules needed to be added to internet routers. Then along came a simpler protocol that the first version of CMI5 used (SOAP). Then came an even better way (OAUTH and REST). After launch, the LMS hands the AU a security token (kind of like a key that dissolves in time). The AU uses that key to gain access and to post information to the Learner Record Store.

Conclusion

CMI5 returns power to the instructor and to the L&D specialist. CMI5 allows one to choose where the content resides and to choose what the content reports. CMI5 captures learner experiences more completely and yet it communicates with Learning Management Systems with a vocabulary that LMSs understand. CMI5 supports accommodations for a special group of students without needing to change the code of the Assignable Unit. Finally, CMI5 uses current technology to send data over the internet.

The implications of this emerging specification are tremendous. It is better suited to mobile learning and it is better suited to the learner experience platforms that are emerging (e.g. LinkedIn Learning’s Learning Hub). Soon instructors may be able to organize content from a variety of providers (like LinkedIn Learning, Khan Academy, or OER Commons) but retain the learning management system as an organizer of content, data collector, and credentialing agent. Now instructors, average instructors, may be able participate in that content market from their own GitHub repositories and web sites.

But many LMSs have yet to adopt CMI5. The architects have done their part. Now it’s on us to understand this technology and advocate for it. Start by sharing this article. Thank you.

Appendix A — How it Works (A simplified flow)

For those interested in a deeper dive, let’s walk through the CMI5 process flow step-by-step. (See diagram)

To begin, the author (instructor, L&D specialist) exports content as a CMI5 package. The package can be a simple file that instructs the LMS where to find the content or it can include the content itself.

(1) When a student needs the content, the Learning Management System (LMS) launches the content and sends the Assignable Unit (a course can contain one or more Assignable Units) (2) information that includes student name, a fetch URL and the activity ID.

(3) The Assignable Unit (AU) uses the fetch URL to retrieve a security token. The security token enables the AU to communicate securely to the Learner Record Store (LRS).

(4) As the student interacts with the content, the AU can optionally send Experience API (xAPI) statements to the LRS . (5) At some point, the AU reports that the student passed and/or completed the unit.

(6) The LMS uses the ‘move-on’ information to determine whether or not the student can move on to the next assignable unit. The move-on options are passed, completed, passed and completed, passed or completed, or not applicable.

Finally, when all of the assignable units within a course are completed, the course is marked as satisfied for the specific learner.

A simplified process flow that starts with the
launch of the CMI5 Assignable Unit by the LMS

Geolocation Storytelling Revisited

We’ve observed an uptick in interest in Geolocation Storytelling. We’ll revisit the subject for those who know little about this medium as well as those who either want to design a project on paper (i.e. Word) or who want to go all the way and use the LodeStar Authoring tool to complete a working project.

To reach all audiences at some level, this article starts from the general and ends with the specific. Hop on and off at any point.

Introduction

Every place hides its own unique, rich story. Have you visited an unfamiliar town or area and wondered about its history,  geography, and points of interest? Have you ever wanted to connect to a place on a level deeper than a quick drive-by?

A new form of storytelling—geolocation storytelling—combines technology and traditional storytelling to connect visitors at a deeper level.  With the help of an app, the place where you’ve entered or visited on a map suddenly comes alive with narrative and imagery.  You may hear about the past or be guided to an unusual rock formation or the vantage point of a famous painter.   Geolocation stories can work on-site, guiding you from point to point or they can help you discover a place from the comfort of your home.  Geolocation stories can be both informative and entertaining.  They can involve the visitor in discovering why a place got put on the map, or solving a challenge, or even solving a murder mystery.  In short, geolocation stories can be about anything that piques the visitor’s interest about a place.

The Inspiration

Places inspire people to learn more about them.

A group of history buffs, known as Lensflare Stillwater, were inspired by the many untold stories of Stillwater, a Minnesota river town.  Stillwater was a lumber town with connections to Minnesota and Wisconsin pine lands by river and connections to Saint Paul by stage road and later by rail. 

Stillwater inspired a number of geolocation stories. The first stories were guided  tours of Stillwater’s historical downtown.   A subsequent story helped cyclists learn about the rich history from the vantage point of a bicycle trail.  Even later, another story recovered the lost memory of Stillwater’s streetcars.   

Thousands of miles from Stillwater, a geolocation project told the story of Vincent Van Gogh’s year in Arles, France, and what went horribly wrong for him.   Its authors first visited Arles to learn more about Van Gogh but were disappointed in the local tour booklets, which didn’t sufficiently tell the story. 

If your town or place has points of interest, a rich history, or geographical features, you will want to consider creating a geolocation story to help others see the place from a new point of view.  Visitors can walk to the specific places of interest and hear audio, see imagery, read text, scroll through time lines and learn more about this special place.

How it works

Typically the visitor launches a geolocation story (a web-based application) from a web address on a smartphone. The first page of the story provides instructions and a starting point. When the visitor reaches that point, she crosses an invisible geofence. Geofence is a just a metaphor. Actually, the visitor’s location is calculated from the signals of three or more satellites . Most modern smartphones are equipped with the hardware to detect these signals. Global positioning satellites constantly emit signals. The GPS receiver in the visitor’s phone listens for these signals. Once the receiver calculates its location from these satellites, it provides that information to the application. The logic of the application is constantly checking to see if the location matches a place of interest. If yes, then content in the form of audio, text and imagery is called up and presented.

Getting more specific: Best practices

If you already understand the power of the geolocation story and wish to get started, you’ll want to consider a few things.  These are not hard and fast guidelines.  As we gain more and more experience, we’ll learn about what works and what doesn’t.

  1. First, geolocation storytelling works best when the audience is on foot and out of doors.  Smartphones can’t receive satellite GPS signals from inside of buildings.  The technology works best outside with clear line-of-sight to the sky.
  2. Geolocation projects must be housed on a website that supports HTTPS.   Smartphones don’t reveal their locations to applications that run from websites that begin with http:// The web address must be https:// The ‘s’ means secure.  Information that is transported by HTTPS is encrypted in order to increase security of data transfer.  
  3. There is a limit to the distance that people will walk on a tour or the length of a tour in time.  Limit yourself to two miles completed within one hour.  Of course, this is a very loose rule of thumb.  Consider your audience when setting the limits.  Young adults will have no difficulty with 3 – 5 mile hikes.  Time and attention span, however, will remain a factor.  Senior citizens with mobility issues will find two miles too long.  The steepness of the terrain will be a factor. Use your discretion but keep it as short as possible.
  4. Some people’s interest may wane quickly.  A two mile tour should have at least a dozen points of interest.  Limit the distance and length of time between geolocation points.
  5. Present narrations in audio and text formats.  People like to hear a recorded narration but, without headphones, the narration could easily be drowned out by traffic or a rushing river. On the flipside, audio narration often works in situations (e.g. bright sun) where the screen is difficult to see. You’ll need to use your judgement.
  6. Consider the format of the tour.  Will you guide your audience from point to point or will you cluster points so that the audience will simply wander about and come upon points of interest? 
  7. Audio should be cleanly recorded.  The audience should not hear background noise or a muffled narration.
  8. Text must be spelled correctly, grammatically correct and short. 
  9. Favor more points of interest and shorter narration/text rather than fewer points of interest and narration that drones on.
  10. Have fun creating this story. You’ll learn a lot!

Get your Geolocations

Even if you’re starting with Word to capture your text, find the locations. You can use Google Maps.  This is a very accurate way of finding locations.  For example, if I wanted the location of the intersection of Myrtle and Water Streets in Stillwater, I would do the following:

  1. Go https://www.google.com/maps
  2. Search for Myrtle Street, Stillwater.
  3. Move the map to the location of interest.
  4. Click on the intersection.
  5. Either write down the location coordinates or click on them.  The coordinates will now appear in the address field at the top and can be copied and pasted into your Word document or directly onto a LodeStar page (see below).
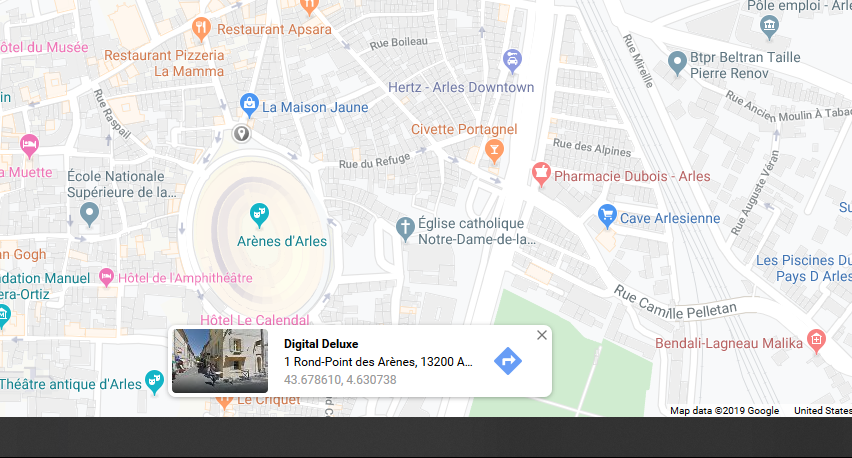
Google Maps reveals latitude and longitude

About the Location Coordinates

In the example above the coordinates were 45.056745,-92.805510.  The first coordinate (45.056745) is the latitude.  The second coordinate is (-92.805510) is longitude.  Always use a coordinate with six digits of precision (six digits to the right of the decimal point).  The six digits will ensure an accuracy within a few inches but never rely on that.  In other words, allow the technology a slop factor. Use precise coordinates but allow for imprecision in the ability of device to calculate its location. Never create a geolocation story that relies on an accuracy of a few inches.  You control this by typing in numbers in the latitude and longitude proximity fields. The numbers spell out how close one needs to be to the precise location to trigger an event. In our geolocation stories we trigger something (e.g. show content) when the user is within 25 to 50 feet of a location.  We call that crossing the geofence.   The minus sign is important.  In latitude, the minus sign denotes the southern hemisphere (south of the equator).  In longitude, the minus sign denotes west of the prime meridian (Greenwich) and east of the antemeridian (roughly where the international date line resides).

If you want to grab your location while physically on the spot, use your smartphone’s Google Maps app. 

Current Location Arrow in Google Maps
  1. In Google Maps, click on the arrow to show your current location.
  2. Scroll down until you find the marker and the location.  See screenshot below.
  3. Copy and paste the coordinate into your notes so that you can transfer the coordinate to LodeStar.

Getting a location from Google Maps while on site

Preparing a Geolocation Story in Word

Your role might be to prepare the content. When you’ve completed the preparation, you can hand off the content in the form of a Word file. In Word, each location should be on a separate page. At the top of each page, key in the title and the latitude and longitude coordinates of the location. Add your text, graphics, image and narration. If your version of Word doesn’t support audio narration, use a free tool like Audacity to generate an MP3 audio file.

Even More Specific: Authoring a Geolocation Story with LodeStar

To create a geolocation tour in LodeStar, do the following:

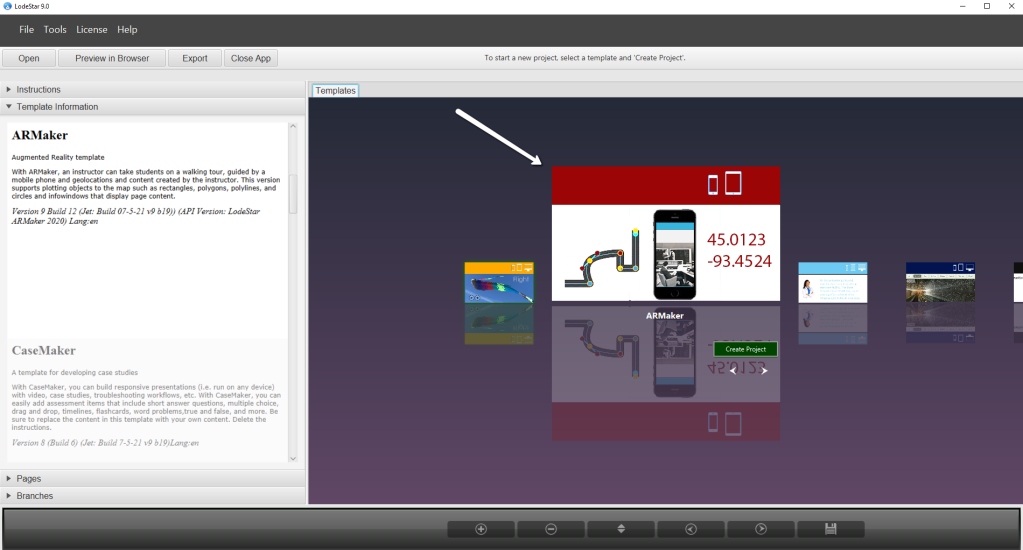
Launch LodeStar and select the ARMaker template.  (AR stands for augmented reality.)

LodeStar’s ARMaker template
  1. Title your project.  The project will now reside on your hard drive in a folder with the same title.  It will be found in the LodeStar/Projects/[your title]  directory.
  2. Add your title to the first page.
  3. Add a page by clicking on the + button at the bottom of the app.
  • Ensure that the new page is a Text Page Type.  Examine the screenshot below.  The page should have a place to enter a latitude and longitude.
  • Add your content.  You can insert a widget (e.g. Image Layout Widget), text, audio, and more.
  • Add a page to add more content.
  • Then Preview in Browser (find button at the top).
  • When you are ready to publish,  Export as a SCORM 1.3 package and import to a Learning Management System or simply copy the LodeStar/Projects/[your title]  directory to a web server.
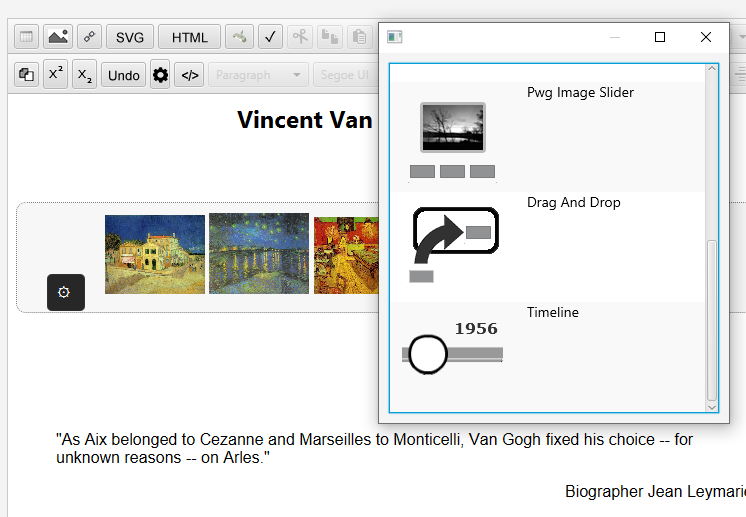
LodeStar authoring tool with ARMaker template. Click on image to view.

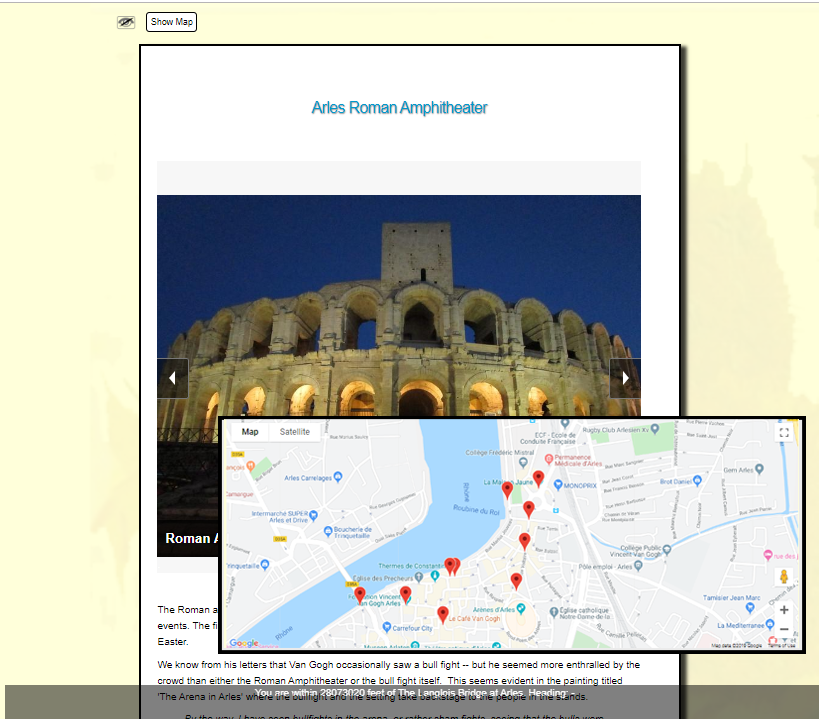
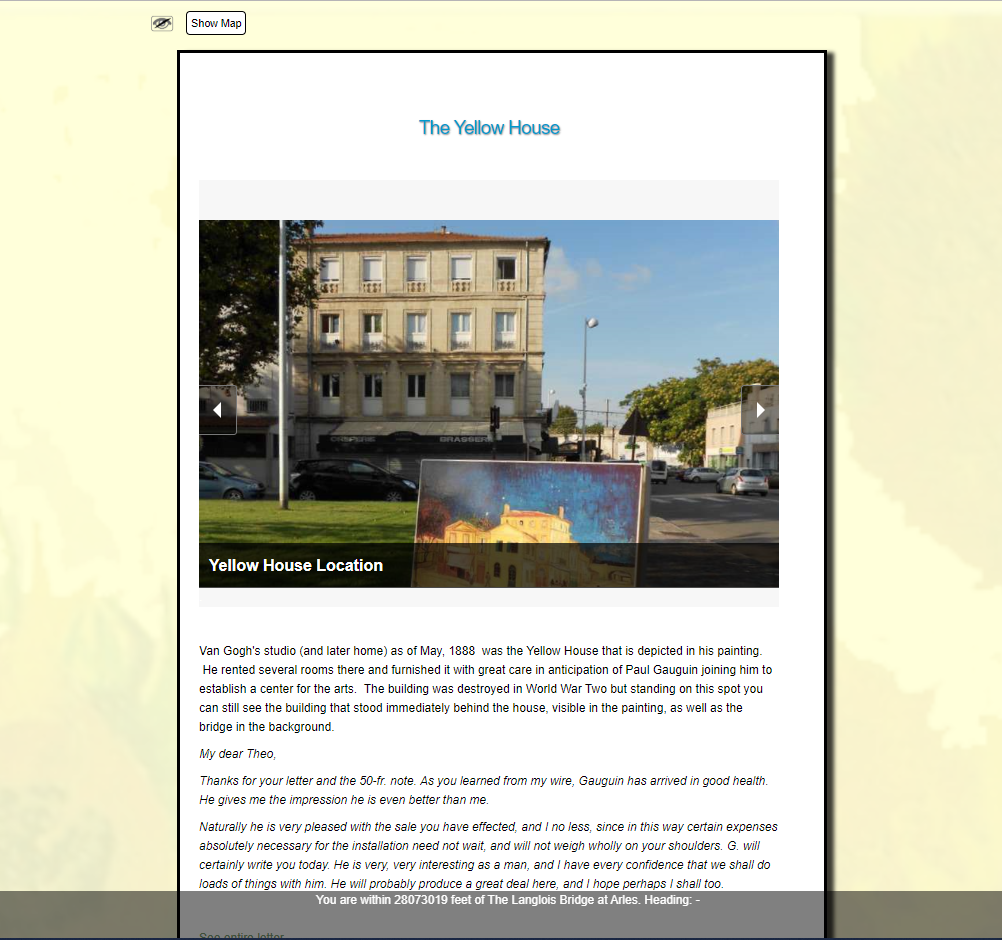
Below is what this page looks like in Preview.  Notice the audio control at top left and the Show Map at the top left.   Notice the navigation buttons top right (depending on layout).  Notice the how the image slider appears, created by the PWG Image Slider Widget.

Previewing a Geolocation story

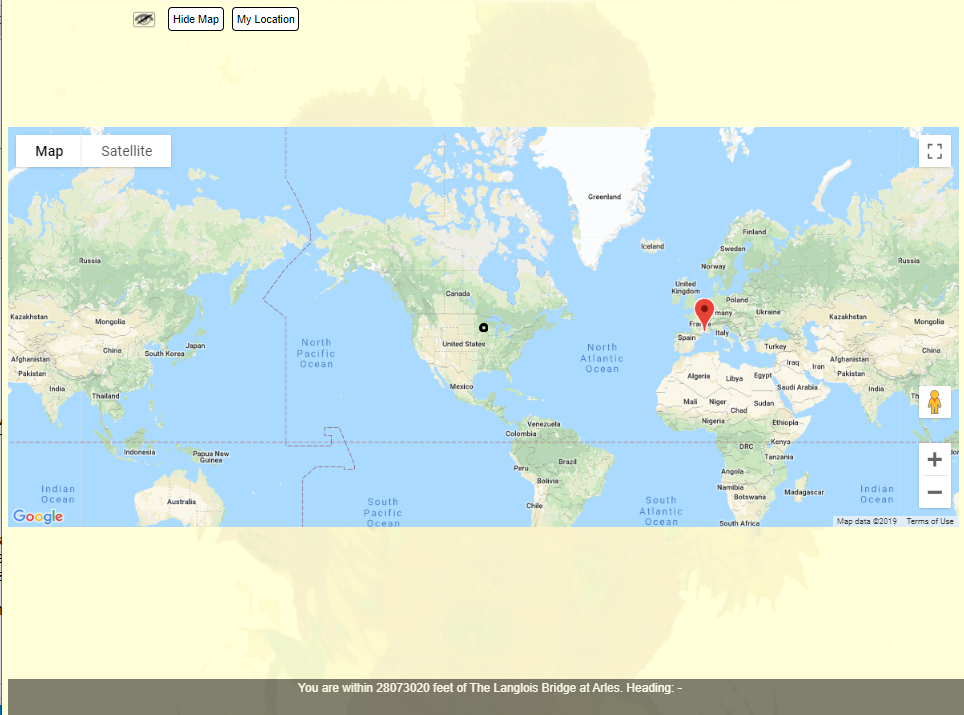
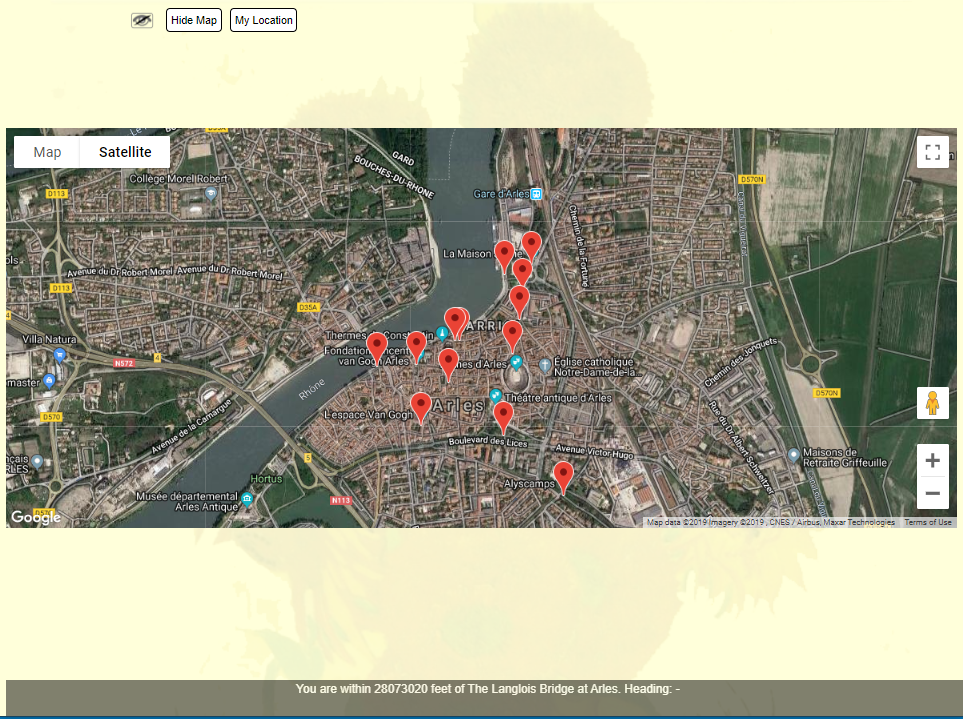
If your audience clicks on the ‘Show Map’ button, a Google Map appears with all of the locations marked with red markers.  Again, each location represents a separate page in LodeStar. 

Each location (marked by red marker) matches a LodeStar page

Controlling the User Experience

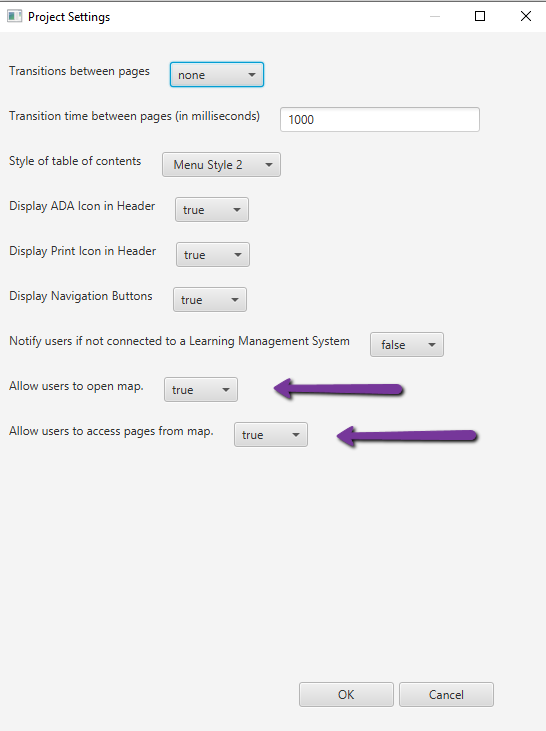
If you allow users both to show map and navigate to content by clicking on a marker, then you need not adjust project settings.    If you want to restrict users’ access to the map and/or their ability to access pages of content from the map, select Tools > Project Settings.  Change the settings according to your needs.  (The important settings are marked with arrows. See screenshot below.)

Project settings in LodeStar allow control of application

Publishing your project

As a SCORM object

If you use a Learning Management System (LMS) and want to control access to your geolocation story, then, with your project opened in LodeStar, click on Export and export to SCORM 1.3.    Go to your LMS and import the story as a SCORM object.

As a website

If you have access to a web server, copy the project folder to the web server and use the index.htm file in your URL.  Once again, location services will only work on web servers that support https://

If you don’t have access to a web server, then read the following article that explains how you can use GitHub as a web server.

https://lodestarlearn.wordpress.com/2020/05/14/seven-steps-that-will-change-how-you-share-elearning/embed/#?secret=5b4inntyGg

Alternatively, you can use Site44 to convert your Dropbox folder to a published website:

See https://www.site44.com/

(We are not endorsing Site44 but LodeStar Learning has successfully used it on a number of projects.)

As an Open Education Resource (OER)

Publish the geolocation story as a web site, then register the URL (address) of that site with OER Commons, Merlot, or whatever OER repository you prefer.


Additional Details

If you are new to Geolocation Story-telling to learn more detail, visit:

Geolocation Storytelling: Van Gogh In Arles | LodeStar Web Journal (wordpress.com)

To see an example of a finished product as OER, visit:

https://www.oercommons.org/courses/vincent-van-gogh-s-arles/view

Or view the app at:

‎Van Gogh In Arles on the App Store (apple.com)

Conclusion

Geolocation stories are a great way to help visitors uncover the hidden wonders of place. Google Maps and the LodeStar Authoring tool are indispensable ways of authoring stories and publishing them either to Learning Management Systems or to the web.

If you complete a project, share your project. Drop a comment or drop a line to supportteam@lodestarlearning.com.

Online Learning After COVID

Robert N. Bilyk

As a Learning and Development Specialist, eLearning Toolmaker, former director of a Center for Online Learning, and founder of Cyber Village Academy, I’m observing education’s response to the current crisis with profound regret.

Introduction

I feel like the curator of an art gallery.  I’ve grown a collection of fine art and agonized over every detail of its presentation.  Then disaster strikes and my exhibition space is displaced by a thousand people who evacuated to the art gallery and sought shelter.  The space is suddenly overcrowded, the toilets overflowing, and the art hidden behind sweltering bodies.  When the danger passes, thousands of people will say that they’ve experienced firsthand my most treasured art gallery.

The COVID Crisis — Our Emergency Response

During the COVID crisis, thousands of teachers and tens of thousands of students evacuated to emergency online learning – and they can now say that they’ve experience online learning firsthand.

Image Credit – Dobrislava (Wikimedia Commons)

But in a recent survey of 7,238 K12 teachers (Network of Public Educators, April 2020), here is what they had to say about it:

  • 56% of the teachers felt overwhelmed by distance teaching
  • 55% of teachers said that their students will be further behind than in the classroom
  • A month into the crisis, 25% of teachers (n= 7238) hadn’t determined how they will assess student’s work.
  • 26% of teachers held video conferences with their students once per week and 36% did not video conference at all.
  • 30% struggled to adjust to distance learning
  • 56% of students struggled to adjust to distance learning
  • 64% used Google Classroom

The results are not good, and probably not unexpected.  The results in higher education are no better. In a recent survey of 826 faculty members conducted by the Babson Survey Research Group:

  • 55% of teachers (who had no previous online experience at the institution) lowered their expectations for the amount of work that students would be able to do
  • 34% of teachers (who had no previous online experience at the institution) lowered their expectations for the quality of work that students would be able to do

Educause writes:

Online learning carries a stigma of being lower quality than face-to-face learning, despite research showing otherwise. These hurried moves online by so many institutions at once could seal the perception of online learning as a weak option, when in truth nobody making the transition to online teaching under these circumstances will truly be designing to take full advantage of the affordances and possibilities of the online format. (Educause Review, March 2020)

The authors of the Educause article define what we are seeing. They propose a specific term for the type of instruction being delivered during the COVID crisis. They call it emergency remote teaching.

Online Learning versus Emergency Remote Teaching

I subscribe to that view.  Online learning and emergency remote teaching are not the same.  What we conclude about the one can’t be generalized to the other.

Effective and engaging online learning requires that a lot of things come together and work in harmony before we can hope for good outcomes.   It also has to start with inspiration and vision – and not an emergency measure.

My own inspiration comes from a deep appreciation of individualized instruction, adaptive learning, the power of interaction, the power of challenge, and the satisfaction of grasping new concepts.  Online learning has a place in every curriculum regardless of the primary modality, lecture or otherwise.

To underscore the distinction between online learning and emergency remote teaching, the Educause article cites  Learning Online: What Research Tells Us about Whether, When and How.  In Learning Online,  the authors identify nine dimensions, each of which has options, reflective of the complexity of the design and decision-making process.

The nine dimensions are modality, pacing, student-instructor ratio, pedagogy, instructor role online, student role online, online communication synchrony, role of online assessments, and source of feedback.

The authors also made another point that has stuck with me.

Yet an understanding of the important differences has mostly not diffused beyond the insular world of educational technology and instructional design researchers and professionals. 

What Lessons Have We Learned?

As a member of the instructional design community, I’m challenged with the question of how can we break out of this insular world and really make an impact?  Many are feeling the pain of this crisis and feeling dissatisfied with online teaching and learning.

From parents, I’ve heard:  Kids are getting stir crazy.  Parents are in a power struggle with their kids.  Both teachers and parents struggle to find good sites, good videos, and good activities.  Kids need organizers – from lockers to bulletin boards.

I’ve also heard a few triumphs.  Recently, a parent showed me an obstacle course that a seven year old built.  A required video recording showed the kid scrambling through this course three times.  To me this represented design, physical education, and communication all rolled into one activity.  To me, it seemed very clever and a credit to the teacher.

I have other observations.

Online learning needs some organizer: a place where students can find assignments, submit work, get feedback, etc. It is amazing that to me that K12 teachers adapted so quickly to such a variety of systems  — but they were on a learning curve at the worst possible time.

In the survey, 64% of the teachers used Google Classroom.  Google Classroom wasn’t around before May, 2014.  The Google statistic surprised me despite the reasons being obvious.  Google classroom is free and simple.  A fifteen-minute YouTube video can get teachers and students up and running.  In time, they can master slightly more sophisticated tasks like sharing the editing rights to documents, collaboration and integrating other Google applications.

Google classroom lacks many of the features of learning management systems like Moodle, Schoology and D2L Brightspace  — but again, its simplicity is attractive especially during an emergency response time.

After the COVID crisis, will simple and free be sufficient or will K12 school leaders inventory what worked and what was missing?  Will teachers get the professional development and support that they deserve?  They certainly accomplished a lot with what little they had in terms of training and resources.

In higher education, the story is a little different.  Most higher education institutions have adopted very sophisticated learning management systems, and have invested in media libraries, web conferencing, assessment platforms, quality-control processes and so forth.

And yet, we know that there are only 13,000 instructional designers (source: Online Learning Consortium)  with a wide range of roles spread over 5,500 higher education institutions.  Many institutions, like the University of Minnesota, have more than a dozen instructional designers.  That means many smaller institutions are lucky to have even one specialist whose role it is to help faculty design and build online courseware.  And how about professional development?  Are faculty getting the training they require?   After the COVID crisis, will school leaders double-down on online learning development, or dismiss it as a ‘lower-quality’ option?  Will online learning get properly funded or will it be down-sized in response to the enrollment crisis that appears to be hanging over institutions (https://www.bloomberg.com/opinion/articles/2020-05-11/what-colleges-must-do-to-survive-the-coronavirus-crisis)?

Just before the COVID crisis, higher education administrators participated in a survey administered by Quality Matters and Eduventures, titled “The Changing Landscape of Online Education, 2020” (CHLOE).  The majority of respondents said that they did not require students to complete an orientation before studying online.  Then suddenly, online learning became a necessity.  How well prepared were students to learn online?

Another survey statistic, although not surprising, also suggests room for improvement.  In the regional public universities, only 50% of the faculty who are approved to teach online received training on the learning management system.  Approximately 45% received training on resources and pedagogy.  The reason for that lack of participation is not known.  The authors of the survey write that more data is needed to understand the resistance of faculty to becoming more effective online teachers.

I’ll look forward to learning more after the crisis is over.  Did faculty simply substitute their lecture classes with Zoom, or did they take advantage of all that blended learning has to offer in synchronous and asynchronous environments?

It’s Time for a True Sea Change

I expect that a true sea change in online learning will require effort and resources at every level: from student and faculty development to school leaders supporting and rewarding that effort – and paying attention.

But a lot responsibility also falls on the tech providers.  For one, we need to make it easier for instructors to find, select, adopt, adapt and collect data from Open Educational Resources.

In a sense, we operate in a Balkanized environment.   Balkanization is the breakdown of a region into smaller autonomous units that are usually hostile to one another.  We can embed eLearning resources, but they don’t interoperate at any level.  That makes it particularly challenging for teachers with such little time.

As an example, Open Educational Resources are wonderful, and yet faculty must expend quite an effort to find something that matches their objectives. What is the free equivalent to expensive, proprietary systems, which do a good job mining OER and aligning OER to standards and objectives?

Image Credit : Merridy Wilson-Strydom (Wikimedia Commons)

From the perspective of a toolmaker, I am impressed with the work that repositories like OpenStax, Merlot, OERCommons have done.  But OER repositories don’t offer a place to store, share and collaborate on learning objects.  (Although, in some cases, they do allow you to store materials created with their own authoring tool.)

That’s why we began integrating our own tool with GitHub, which offers a place to store, publish, version control, and collaborate on projects. Seven Steps That Will Change How You Share eLearning  What is the EdTech equivalent of GitHub?  The closest that I’ve seen is OpenStax.

Perhaps only the largest of our tech companies can solve the problem of interoperability.  We need to be able to store, share, version control, and plug in learning resources into our learning environments.

Along with the technology, our teachers need professional development and reward and recognition for their efforts.  A single teacher might be able to create one quality resource in one academic year.  That single resource should be shared with the broader community and the teacher rewarded for her contribution.  In higher ed, the resource might factor into tenure and promotion.  In K12,  it might mean a cash reward equivalent to a coaching assignment.

A higher power needs to organize a learning activity exchange where reward comes with contribution.  Each and every resource needs to be interoperable with learning management systems and learner record stores (LRS).  Every resource needs to be tagged by standards specialists so that they are easily discovered and aligned to standards.

Conclusion

A lot of factors contributed to the poor results of emergency remote teaching.  At the fore are the lack of teacher and student preparation for online learning.  School leaders can help with that.  We are also asking teachers to operate in an environment that is somewhat hostile and not interoperable.  The onus is on the tech community to do better and to think through how learning materials can be stored, shared, collaboratively worked on, and plugged into environments that can capture student responses and performance data.

We need to improve not only for the sake of emergency response but for the betterment of education…even at the best of times.

References:

Emergency Remote Learning Survey Results

Perspectives: COVID-19, and the future of higher
education

http://www.onlinelearningsurvey.com/covid.html

Means, B., Bakia, M., & Murphy, R. (2014). Learning online: what research tells us about whether, when and how. New York: Routledge, Taylor & Francis Group.


Geolocation Storytelling: Van Gogh In Arles

Introduction:

Because this is so personal, I’ll introduce myself.  I am Robert “Bob” Bilyk,  founder of LodeStar Learning.  I am passionate about the project I am about to describe and a proponent of instructional technology in general.

I recently heard an interview with Christopher Kimball, formerly of America’s Test Kitchen.  Two things he said that stuck with me: First, he described himself as being a home cook rather than a chef.  Secondly, he talked about introducing recipes to other home cooks that were slightly out of reach of their comfort zone and knowledge but not way out of reach.

My efforts are a modest version of that.  I’m interested in helping online instructors reach out and embrace new ways of interacting with their students.  I’m trying to connect to that inner instructional designer in all online teachers. And I’m trying to introduce strategies that are within reach but may require a stretch.

Geolocation storytelling is one such strategy.  It’s an incredible strategy that, I believe, is within reach of all online instructors.  Geolocation storytelling works for a broad range of disciplines: literature, history, biology, environmental studies, communications, urban planning, and on and on – wherever location is relevant. I use the term storytelling very loosely.  It can be fiction or non-fiction.

Geolocation storytelling reveals something about a location when the student visits the site either physically or virtually.   The student can see or hear the narrative on her smartphone when she physically visits a site or clicks on a map marker.

In this article I intend to share a project that I’m currently working on.  I intend to disclose the inspiration of the project, the brainstorming, and the nuts and bolts of how I am putting it all together.  It’s not completed. It truly is a work in progress.


Screenshot of a Geolocation project.

Screenshot of one page of a LodeStar Geolocation storytelling project situated in Arles, France, and focused on Vincent Van Gogh, the Dutch painter.


The idea

Recently my wife and I traveled to Iceland and France.  We had several ideas in mind for geolocation stories — ideas that would match up to educational needs.  Some of our ideas turned out to be impractical because of cell phone coverage issues. But one of our ideas hit the jackpot.

The keys to a good geolocation story are a)  locations where there is a strong cellular signal b) exterior locations with line of sight to the sky for the Global Positioning Satellite (GPS) signal c) a strong educational objective that is tied to location and d) somewhere to house the project like a learning management system.

For us, all of the elements came together in Arles, France.  Before arriving in Provence, in southern France where Arles is located, I imagined a GPS-guided walking tour of all the places that Vincent Van Gogh painted and sketched in Arles.  But I didn’t know whether or not it would be practical.

As it turned out, it was not only a practical idea (cell phone coverage was great and the buildings didn’t obstruct the satellite signal) but one that needed to be done.

The need

I’m sure there are dozens of guidebooks, brochures and pamphlets on Van Gogh’s Arles.  We didn’t immediately find any. The tourist office had a nicely illustrated guide in French, which we didn’t buy.  Instead,  we thought we’d start off with the obvious starting point — Fondation Vincent Van Gogh.

The mission of Fondation Vincent Van Gogh is wonderful — but it houses only a few of Van Gogh’s paintings.   If you are fresh off the train, boat or motorway, full of anticipation of all things Van Gogh, the Fondation is a bit of a disappointment.  (They do sell rubber ear erasers, however.)

We then thought of the next thing we knew.  The Yellow House!  That’s where Van Gogh stayed and painted and decorated in anticipation of the arrival of a fellow artist: Paul Gauguin.

As we soon learned, the Yellow House doesn’t exist.  We asked around. No Yellow House.

Arles is a wonderful place.  But it is difficult, at first, to make that Van Gogh connection.   If you know where to go, you’ll find panels of Van Gogh’s work at the locations where he painted some of his most famous works.  However, you need a guide to find them. Arles is a big place. The panels are helpful but you need to know something about Van Gogh to really appreciate them.

The opportunity

So here is the crux of the thing.  Van Gogh painted in locations. Location — with its people, rooted in the farms and neighborhoods, its colors, patterns, streets, trees, and flora — is an important part of the story.  As important is the perspective and knowledge of the educator. What the educator can bring to the story, superimposed on location, is the opportunity.   In our project, visitors to Arles would be guided by the story to important places and then presented with information related to the places.

The intrepid educator

I’m not a Vincent Van Gogh scholar.  In contrast, I think of the scholarship of educators with whom I have worked.  I think of educators like Dr. Carolyn Whitson, at Metropolitan State University, who recently published an eBook titled  ‘Understanding Medieval Last Judgment Art’* and I imagine what they could do with geolocation story telling. This strategy is within reach of educators like Dr. Whitson because she teaches online, she uses technology, and she has already embraced eBook technology (and other technologies) to make her text and photography accessible to a wide range of students.  (The link to her book can be found at the end of this post.)

I’m not a Van Gogh scholar, but I am an enthusiast.  Since I was a teen, I’ve been drawn to his sketches, paintings and personal life.  His ministry in the Borinage coal mining district, ‘The Potato Eaters’ and the sketch ‘Sorrow’ with its accompanying tortured love story hooked me from an early age.   His hope of renewal in Arles and the vibrancy of his paintings and the eventual devastation of his dreams and aspirations, in various ways, inspired me. I carved wood, painted, and wrote stories under the same melancholic humor as the artist.

And so it was with much enthusiasm that I approached this geolocation story-telling project.  But recognizing that I am not a Van Gogh scholar I limited myself to these few simple elements:  location, Van Gogh’s own words and paintings, photography, and (sparingly) some shared insights from an art historian, the late Jean Leymarie.   I added a few details to help bring significance to the location but kept those to a minimum.

Less is More

From an instructional perspective, less is more.  Writers like Leymarie can bring boatloads of insight to the subject, but what do the paintings and locations evoke in students?  Too much information in geolocation story telling cuts off the blood supply. The student needs to be aware of  her surroundings – with a modicum of interpretive assistance.  At several of the Arles locations, what is interesting is the contrast between the scene and the paintings.  How might students account for the contrast? In places, like the Rhone River, the scene is not nearly as interesting as the painting.  In other places, life imitated art. The hospital garden (now the library garden) and the Cafe Van Gogh had to be decorated to match the painting. In short, geolocation can be the convergence of location, media, the educator’s perspective and the students’ own thinking and imagination.

The Nuts and Bolts

The coordinates

To produce the geolocation tour of Arles, I used the ARMaker template in LodeStar 7.3.  Other tools are available that will create similar projects, but I’ll describe the tool that I designed and know.

Each page produced with the ARMaker template includes a rich text editor and geolocation fields that I’ll explain in a minute.  In the authoring tool, a page looks like this:


YellowHousePage


Note where the content sits, and where the coordinates are held.

To the student, the page will look like this:


yellowhousepageforstudents


The images that appear as thumbnails in the authoring tool are now rendered in full size in a slide viewer.  The coordinates now appear as markers on a map.

map

The student can either walk to the site and have the page content called up or, if the instructor allows, the student can simply click on a marker to bring up the content associated with the marker.

In other words, geolocation story telling can require students to visit sites or it can help organize content in a virtual tour that students can take from the comfort of the library or their homes.

In our project, we actually traveled to Arles to see the sights first hand and designed the application for a guided walking tour.  We meandered the streets, took photographs, took GPS readings, and absorbed the sights and sounds.  But a lot of this can be assembled by the instructor without leaving her office.

The GPS readings can just as accurately be obtained from Google Maps.  In the screenshot below I invoked the popup by keeping my mouse depressed on a location.

If you are interested in this approach, bring up a Google Map, click and keep your mouse button down.  If nothing pops up, click on a street away from any existing Google markers or building outlines.

The number that appears at the bottom of the popup is a coordinate.  For example 43.678610, 4.630738 means roughly 43.6 degrees latitude and 4.6 degrees longitude.   These coordinates have six numbers to the right of the decimal.  You need this level of precision so that your coordinates fall within a few feet of your target location.  Click on the coordinate and it appears at the top left of the screen, in a format that is easy to copy to your clipboard.

GoogleMap

Google map with the coordinates popup. Incidentally, La Maison Jaune is not the Yellow House and we only encountered Gilets Jaunes once and not in Arles.


The following is a screenshot of the LodeStar page with the coordinates pasted in. The next thing to add is proximity, which means how close do the students need to be to the location before they pass an invisible geofence that triggers the display of content.

coordinates

The content

The content can be in the form of audio, imagery, text, timelines, questions, and other assessment exercises.

In the following screenshot, the page features text and an inserted widget.  In the screenshot below, I clicked on the black sprocket. widget_sprocket , which brought up all of the widgets that can be inserted into the text.  I chose the image slider widget.

LodeStarWidgetDropDown


From there I could insert my images, caption them and dictate how they would be displayed – with a display list or without.

LodeStarImageWidget


The result could be something like this:


LodeStarScreenShot.png


Audio can be added with the help of the audio icon at the top right of a text page and the audio dialog, which supports the import of mp3 files. (Note that auto play policies in browsers prevent the auto play of sound files unless the user has interacted with the application first. Browser policies differ.)


audiodialog


Finally,  ARMaker (our template) is built on Google technology and so it supports what Google has afforded us, including the ability to map our location and mark it.  In this case, I scaled way up to a global view.  My current position is the black dot.  Arles is the red marker.  Normally, the student uses ‘My Location’ to mark how close they are to one of the locations.  The screenshot below shows that I’m 28,073,020 feet away from the nearest location, which is the Langlois Bridge, on the outskirts of Arles.  I have a bit of a walk ahead of me.


MyLocation


Google technology also allows us, in many locations, to switch to the satellite view or to drop down to the street view.


Satellite View

satelliteView

Satellite view of Arles


Street View

streetview

Street view of Place du Forum, in Arles


The red marker was placed on the street view by our coordinates in the LodeStar tool.  (LodeStar interacts with the Google Map.)  The white arrows and our mouse clicks enable us to navigate the streets.  In this view, we are in the Place du Forum, which was a plaza that dates back to the Roman times. We are facing the Café Van Gogh (yellow building), which was the location of a very famous and wonderful Van Gogh painting, ‘Café Terrace at Night’, that the artist described in his letter to his brother.  The second story of the Café recreates the scene of another famous painting named the Night Café.  The original site, Café de la Gare, was near the Yellow House and is now gone.

Conclusion

All of this can be housed in the instructor’s learning management system: D2L Brightspace, Moodle, Blackboard, Canvas, Schoology, wherever.  In fact, in order for the application to be able to receive location data, it must be launched from an address that begins with HTTPS//   The ‘s’ means secure. All learning management systems use this protocol to secure student data.

So technical stuff aside, imagine the possibilities.  With the combination of location and the instructor’s perspective or prima facie information shared through text, imagery, and audio, educators can use geolocation storytelling to transport their students to another place or they can get online students out of the house and into a neighborhood location that is of scientific, social, historical or artistic interest.

Again, the possibilities are endless.

As for ‘Van Gogh in Arles’, this project will be completed and published shortly after Thanksgiving, 2019.  You won’t need to go to Arles to view it  — but I highly recommend the trip.


References


Online Learning Trends: Risks and Opportunities

Introduction:

Our web journal focuses on specific instructional design strategies for online learning.  But in this post, I step back and address something much more fundamental – and at risk.

Online learning has tremendous potential.  I am encouraged by faculty who really want to do a great job in their online courses and continuously strive to do better.  Chances are very good that you are in that group.  You are taking the time to read this blog and explore new ways of engaging students.

Next month I’m retiring from my position as Director of the Center for Online Learning from a state university. This gives me occasion to reflect on the eight years I’ve served in this role and on current trends.  As trends would indicate, the immediate future presents faculty with both risks and opportunities.  Faculty who are invested in quality online learning should think about the immediate future very carefully and help direct policy and best practices at their institutions that advance the state of teaching and learning in this relatively new medium.

Online learning can be an instrument of good.  But because of its technological nature, it is susceptible to scale, mechanization and bad practice. At risk, at the very least,  is the autonomy and self-determination of faculty.

In our university, faculty make the critical decisions related to their courses.  They are free to make choices related to activities, assessments, instructional materials, teaching methods and course support.  When faculty are free to decide and exercise that freedom, individually and collectively, they exercise self-determination.  With self-determination comes leveraging of faculty strengths and recognizing their own limitations;  responsibility for decisions; and substantial personal reward for success.  Self determination means faculty can apply their competency, and effect positive change in their students.

Risks to self-determination may appear in many forms.  Today, a few of the potential sources of risk include:

  • Highly competitive and large-scale online programs that discourage or eliminate fledgling entrants
  • A billion dollar Online Program Management industry that can dictate the design of courses from entrance requirements to curriculum and course design.
  • Turn-key publisher platforms that demote the decision-making of instructors

Competition, Online Program Management (OPM), and publisher resources are not inherently bad things.  I view them as risks only when they subvert faculty control. OPMs, for example,  have successfully ramped up online programs and built university enrollment.  Publisher platforms have provided course content and resources where, perhaps,  none existed.  Each of these trends, however, does impact faculty self-determination and needs to be carefully considered.


1024px-Adult-coding-collaborate-1181472

Photo Credit: Christina Morillo,  Creative Commons CC0 1.0 Universal Public Domain


The Nature of Change

The nature of change in online learning can be misleading.

Many changes in this space get hyped and then disregarded when they don’t achieve immediate, high impact.  But, then, over time they have profound, long-lasting impact.  The MOOC is a good example.  2012 was the hype year.  2013 was the year of disillusionment.   Today, MOOCS are a vital enrollment strategy for many universities.

(See https://en.wikipedia.org/wiki/Hype_cycle for a definition of this phenomenon.)

In a somewhat related manner, many of the changes in the last decade happened incrementally without cataclysmic impact and disruption.  And yet eLearning is in a very different place today because of them.

The Recent Past

It is eye opening to consider just a few things that the past decade has brought to us.  I’ve intentionally omitted a deeper discussion on many things such as Virtual Reality, Augmented Reality, eBooks, artificial intelligence, and so much more.  I’m sticking to a few basic things that have had profound impact on just about everyone.

Online enrollments have steadily increased

The Babson Survey Research Group showed us year after year that distance education enrollments continued to grow, even as overall higher education enrollments declined. Today, nationally, nearly a third of all higher education enrollments are online. (Seaman, Allen & Seaman, 2018).

(For more on the Babson reports see: https://www.onlinelearningsurvey.com/highered.html)

At our state university, nearly a third of our credits are earned by students in fully online classes.  More than forty percent of the credits are earned in either online or hybrid classes.  Most of our students take at least one online class each year.

Over the past eight years, online enrollments kept climbing as did the perception of faculty that online courses were qualitatively on par with face-to-face courses.  As more faculty became engaged in online learning, perceptions changed in favor of online learning.

Today, imagine the negative impact on your university if online enrollments were removed overnight.

Tools have become cloud-based

In addition to online enrollment increases, most of our tools today have become cloud-based.  Our IT department, in a metaphoric sense, is spread across many for-profit companies who host our learning management system, media system, collaboration tools, office applications, remote proctoring, and more.  Where you won’t easily find a cloud-based service is in how to improve teaching and learning experiences for your own students.  Universities will need to keep online pedagogy/andragogy  in their wheelhouse of expertise.

(See article that recognizes shift away from technology-focused professional development to pedagogical-focused:  https://www.insidehighered.com/digital-learning/article/2018/02/28/centers-teaching-and-learning-serve-hub-improving-teaching)

Accessibility, Mobility and Interoperability have become critical

In the past decade, legislation and compassion have demanded that we pay greater attention to accessibility for all students, including those who are visually and hearing impaired.  Our courses play on mobile devices and are adaptable to smart phones, tablets, and desktop computers.  Cloud-based services talk to one another.  The learning management system survived obsolescence by partnering with other service providers.   Our university learning management system, because of integrations with other providers, can display media from a library, check originality of student papers, remotely proctor, engage students in a discussion over a PowerPoint, and perform other services that are not innate to the platform.

It is a different world – and yet it didn’t seem to change overnight or particularly startle anyone with its abruptness.  It didn’t feel like an eruption or disruption.

The Near Future

Current trends suggest that the future won’t be any different.  It will change incrementally, but one day instructors will wonder what happened!  Related to faculty autonomy and self-determination, specifically, here are some of the critical market forces faculty should observe:

Market dominance

The annual Babson report tells us that nearly half of online students are served by five percent of higher education institutions.   Only 47 universities enroll almost one-quarter of fully online students.  Those universities will presumably have the resources to reinvest in curriculum development, instructional design, enrollment management and aggressive digital marketing.  Smaller institutions and new entrants to the marketplace may be forced out or forced to partner with each other and with external organizations in order to compete.  The challenge to faculty comes with a perceived gap between well-resourced and under-resourced programs, unnatural alliances and forced partnerships.

On a side note, the encouraging news for smaller public universities is that the majority of online students take at least one course on campus.  Most online students come from within 50 miles of campus.  Distant education is local, which means that the university can cultivate relationships with partnering two-year colleges, local employers, and community groups and market through both traditional and digital methods.

In short there is hope for smaller institutions – but only if the following are diligently and vigorously supported:

  • Strong faculty support for online development, both pedagogically and technically (instructional designers, instructional technologists, learning management specialists)
  • Strong student support (orientations, mentoring, advising, tutoring, high impact practices like first year seminar and electronic portfolio)
  • Integrated, team-based approaches to enrollment management, marketing, advising, online program development and professional development.
  • Communities of practice that encourage faculty to share best practices with one another and especially with other members of their discipline

In my opinion, the days of working in silos are numbered.  If programs are developed without market analysis and attention to enrollment/communication strategies from the start, they will not compete and will not be available to faculty and students in the future.

Instructional Design Support

In the past, the tide of instructional design has ebbed and flowed.  Today and toward the future, it is cresting.  A quick scan of Indeed.com will convince you of that. The best programs now have a phalanx of instructional designers.  My chats with educational leaders has underscored the fact that instructional designers provide university programs with a competitive advantage.

The Online Learning Consortium (OLC) reports that as online learning has grown there has been an equivalent increase in demand for instructional designers in higher education institutions (Barrett, 2016).

(To learn more about OLC and the evolving field of instructional design, visit https://olc-wordpress-assets.s3.amazonaws.com/uploads/2018/07/Instructional-Design-in-Higher-Education-Defining-an-Evolving-Field.pdf)

Fulfilling that demand has not been consistent across universities.   In a recent survey, fewer than half of those who taught online said they had worked with an instructional designer.  The following article provides one interesting approach to sizing the number of designers to the institution.

https://www.insidehighered.com/blogs/technology-and-learning/many-instructional-designers-librarians

In my opinion, we typically don’t have enough instructional designers. Designers play a critical role in helping faculty match instructional strategies to the level and type of learning and can draw from a tool chest of techniques, applications, methods and evidence-based practices.  A recent survey of instructional designers, cited by OLC, showed that 87% of respondents have masters’ degrees, and 32% have doctoral degrees.  Most higher education instructional designers provide faculty with direct support in design and professional development (Intentional Futures, 2016).  The result is increased student performance and satisfaction as evidenced by research studies on specific practices.

At our university, through extensive professional development we saw a growing body of faculty adopt the skill set of instructional designers.  We saw faculty who could critically evaluate online courses and discuss issues of course alignment, integrated course design, accessibility, student engagement and many of the issues that concern instructional designers and make a difference to students.

In the past, in instructional design and other areas of online learning, higher ed institutions failed to build their core competence.  Several sources identify the number of instructional designers employed by colleges and universities as 13,000. But, as the report from the Online Learning Consortium states, “There is still a certain mystery surrounding who instructional designers are.”

In short, instructional designers in a good relationship with faculty will strengthen the faculty’s ability to make good decisions and produce a good, impactful course.  Over time, faculty who design and develop online courses should acquire many of the skills of an instructional designer.  That can happen through seminars and workshops and communities of practice, learning circles, brown bag lunch sessions – all of it sponsored by faculty groups and the centers focused on faculty development and online learning.

Online Program Management

Wherever we have failed to build our core competence, external providers are ready to flood in and assist us at great cost to the university.

One category of external provider is the online program management company.  Online Program Management companies (OPMs) provide expertise and services in instructional design, enrollment management, digital marketing and other areas in support of online learning.  They provide the support through a number of revenue-sharing mechanisms.  An online program manager, for example, might help plan a program, design courses, produce courses and manage enrollment and marketing.  In exchange for these services, the Online Program Management company might receive revenue equivalent to 40 to 60 percent of the tuition dollars earned from the program for a contracted number of years.  A typical number is 10 years.

The following Eliterate article estimates that 27 companies currently provide Online Program Management.

https://eliterate.us/online-program-management-market-landscape-s2018/

The alternative is that there are external providers who will provide a needed service for a fee.  For example, if the university is weak in digital marketing, an external fee-for-service organization can help. In this arrangement, the university pays the fee up front but keeps the tuition revenue.  A growing number of companies provide services and then recover the fees through tuition revenue sharing – but only until the initial costs are covered.

Faculty need to be aware of all of these flavors of services because faculty are invested in the future of the university and its their autonomy that is at stake.

One of the founders of the original Online Program Management companies (but who now has a vested interest in a different business model) describes a growing dissatisfaction with the OPM revenue-sharing model:

“He compared revenue-share OPMs to the businesses in the early 2000s that built websites for millions of dollars. At the time, they were the only people who knew how to do it, but as more workers learned HTML, these companies went from ‘very valuable to pretty much out of business’ in a very short span, he said.”

Inside Higher Education, 2018


According to Inside Higher Ed, the bottom line is one that all faculty should recognize:

“To launch a successful online degree, institutions need expertise in instructional design, must be skilled in identifying areas where there is student demand, and must have enough funds to develop and market the program, which several sources said could cost upward of $1 million each.”


https://www.insidehighered.com/digital-learning/article/2018/06/04/shakeout-coming-online-program-management-companies

 Publisher Platforms

Business analysts predict that the US digital education publishing market will register a compound annual growth rate of close to 12% by 2023. (Research And Markets, 2019) The digital education business is a huge and growing market.

Online faculty can choose to use digital publisher resources for part or all of their courses.  Textbooks often come with a publisher-based online learning platform where students can engage with course material.  In many cases the publisher platform is integrated with the university learning management system.  Students log in to their university online course and seamlessly connect to the publisher resources without a second log in and in many cases with no awareness that they are accessing the publisher platform. In some cases, the reverse is true.

Key players in the U.S. digital education publishing market are Cengage Learning, Inc., Houghton Mifflin, McGraw-Hill Education, and Pearson.

The upside to publisher platforms is that they save instructors time and that publishers are continuously improving their offerings, which, in some cases, include adaptive learning.  (McGraw Hill’s LearnSmart, for example.)  The downside is that, for some platforms, answers to quizzes and solutions to problems are discoverable on sites that students use in order to cheat on their assignments and exams.

The more insidious downside to publisher platforms is that they can lead to an instructor acquiescence to all of the critical design decisions of a course.  In some, hopefully rare, cases instructors substitute publisher PowerPoints for their own advance organizers, explanations, guiding questions, graphical illustrations, and materials that are contextualized for the specific circumstances of the students, program and environment.

As one online program manager cautions:  “Never allow publisher-made materials to be the meat of your course!“

Learning House

Adaptive Learning

Adaptive Learning has huge potential and should be continuously monitored and repeatedly evaluated – but again, the role of the faculty member should be carefully considered.

Contrasted with traditional Learning Management System content, adaptive is not a ‘one size fits all’ learning product.  Typically,  we structure topics within a learning management system in a sequence.  All students, regardless of knowledge, experience or ability move through the same sequence.  Adaptive Learning, in contrast, assesses students on what they know and what they need to learn.  Students then view or engage in the content that they need.  If students miss items or lack confidence, then the adaptive system connects them to the appropriate prerequisite skills.

Adaptive Learning solutions are available in a variety of forms.  For one, they are available as turnkey systems.  McGraw Hill’s ALEKS is a popular product that assesses and teaches math subjects that range from pre-algebra to calculus.  They are also available as open platforms in which an instructor or department can build content and sequence learning pathways that capture the prerequisite relationships between topics.  Examples of open adaptive learning systems include Acrobatiq, CogBooks, and BrightSpace LeaP™  .  Many of these platforms can be integrated with learning management systems through an interoperability standard called LTI (Learning Tools Interoperability).

(For a glimpse into adaptive learning, visit: https://campustechnology.com/articles/2019/04/24/new-frontiers-of-adaptive-learning.aspx)

Once the adaptive system has been designed/adopted and deployed, faculty need training on how to facilitate a group of students who are progressing at their own pace but still need the academic and social support of their peers and instructor.  There are many design decisions related to how an adaptive system dovetails into a course – and faculty need to be at the center of that decision-making.

Open Educational Resources (OER)

Open Educational Resources are already impacting us in so many ways.  You might be surprised to hear faculty denounce open textbooks, for example, and yet find them in your book store.  Faculty can engage with OER on so many levels.  They can find open resources cataloged in dozens of repositories such as OER Commons (https://www.oercommons.org/ ) and Merlot (https://www.merlot.org/merlot/).  They can purchase completely assembled OER-based courses from, ironically, publishers who earn more from their digital platforms than from underwriting and maintaining original content.  They can use repositories like OpenStax (https://openstax.org/ ) to find complete textbooks or sign up for a free account in OpenStax CNX (https://cnx.org/), which gives granular access to open material at the page and module level.  Finally, faculty can participate in the creation of OER by creating content, assessments, learning objects and supplementary material and posting them to a repository.  In our state, we’ve just launched Opendora (http://www.opendora.com/ ) that houses materials created by MinnState faculty.  Faculty can also participate in textbook reviews.   In other words, faculty can engage in the use of OER in many ways before even considering authoring a book and making their intellectual property freely available.

Conclusion

Current trends and practices offer support to faculty, but also have the potential of rendering instructors passive bystanders in their own courses.  The online learning space is becoming more competitive and expensive.  To many, this seems counter-intuitive. After all, online learning should be opening up new markets and it should be cheaper.  Universities can decrease their physical footprint!

The reality is that universities will either invest internally in multifaceted teams in support of strategic program development or pay outsiders to design, build and market online programs.  Potentially, instructors could be supported or sidelined.   We will either invest in instructors populating adaptive systems or purchase off-the-shelf solutions that may not, in the end, be well adapted to our learners.  We will either support rich curriculum development or populate online courses with publisher materials and, in the end, pass on the cost to students.   We will either use OER in new ways of engaging students or purchase turn-key solutions built entirely on OER.

Faculty have the greatest stake in the future direction of the university and the impact of these key trends.  Their own autonomy and academic freedom is at stake.  Faculty need to be aware of the issues and be present wherever decisions that impact curriculum development are made.

References:

Michael Feldstein’s Blog (industry observer) eLiterate
https://eliterate.us/

Phil Hill’s Blog (industry observer)
https://philonedtech.com

Wil Thalheimer’s Debunker Club (research to practice)
https://debunker.club/debunking-resources/

Online Learning Consortium
https://onlinelearningconsortium.org/

Inside Higher Ed
https://www.insidehighered.com/digital-learning/views/2018/04/04/are-we-giving-online-students-education-all-nuance-and-complexity

Publishing Market Research
https://www.researchandmarkets.com/reports/4764929/digital-education-publishing-market-in-the-us?utm_source=CI&utm_medium=PressRelease&utm_code=4lszwc&utm_campaign=1237781+-+US+Digital+Education+Publishing+Market+Report+2019+-+Increasing+Number+of+E-Learning+Enrolments+in+the+Higher+Education+Sector&utm_exec=joca220prd